
Hundreds of industry leaders use Hightouch to turn Snowflake into a marketing, sales, success and operational engine
Overview
Hightouch lets you pull data stored in your Snowflake warehouse and push it to downstream destinations.
You can connect Snowflake to Hightouch using Snowflake Partner Connect to bypass the setup steps outlined below. You can learn more about this in Snowflake's documentation.
Connecting Hightouch to Snowflake requires some setup in both platforms. It's recommended to set up a service account with the correct permissions in Snowflake before configuring the connection in Hightouch.
Snowflake credential setup
To allow Hightouch access to Snowflake, it's best to create a user specifically provisioned with access to the required tables and schemas. You can also use a personal Snowflake login for your credentials, as long as it has the correct permissions.
You can use the following SQL template to create a service account with the necessary roles and permissions with some considerations:
- This snippet provides an example of creating a service account; you may need to alter it depending on your Snowflake implementation details.
- RSA key pair authentication setup is detailed in the Provide credentials section.
- If you want Hightouch to access multiple databases, run the snippet multiple times, changing
ht_databaseeach time. - If you want Hightouch to have read-only access, omit the last line of the query.
- The snippet includes lines for creating a new warehouse and database for Hightouch to use; if you already have databases and warehouses you intend to use, omit these lines.
-- Edit the following variables
set ht_username='HIGHTOUCH_USER';
set ht_default_warehouse='<warehouse>';
set ht_database='<database>';
set ht_default_namespace='<database.schema>';
set ht_default_role='HIGHTOUCH_ROLE';
set ht_comment='Used for Hightouch integrations';
-- Set role for grants
USE ROLE ACCOUNTADMIN;
-- Create a role for Hightouch
CREATE ROLE IF NOT EXISTS identifier($ht_default_role)
COMMENT = $ht_comment;
-- Only if you want to create a new warehouse for Hightouch to use
CREATE WAREHOUSE IF NOT EXISTS identifier($ht_default_warehouse);
-- Create Hightouch's user
CREATE USER IF NOT EXISTS identifier($ht_username)
TYPE=service
rsa_public_key='<public_key>'
DEFAULT_WAREHOUSE=$ht_default_warehouse
DEFAULT_NAMESPACE=$ht_default_namespace
DEFAULT_ROLE=$ht_default_role
COMMENT=$ht_comment;
-- Grant permissions to the role
GRANT ROLE identifier($ht_default_role) TO ROLE SYSADMIN;
GRANT USAGE ON WAREHOUSE identifier($ht_default_warehouse) TO ROLE identifier($ht_default_role);
GRANT ROLE identifier($ht_default_role) TO USER identifier($ht_username);
-- Only if you want to create a new database for Hightouch to use
CREATE DATABASE IF NOT EXISTS identifier($ht_database);
GRANT USAGE ON DATABASE identifier($ht_database) TO ROLE identifier($ht_default_role);
GRANT USAGE ON ALL SCHEMAS IN DATABASE identifier($ht_database) TO ROLE identifier($ht_default_role);
GRANT SELECT ON ALL TABLES IN DATABASE identifier($ht_database) TO ROLE identifier($ht_default_role);
GRANT SELECT ON FUTURE TABLES IN DATABASE identifier($ht_database) TO ROLE identifier($ht_default_role);
GRANT SELECT ON ALL VIEWS IN DATABASE identifier($ht_database) TO ROLE identifier($ht_default_role);
GRANT SELECT ON FUTURE VIEWS IN DATABASE identifier($ht_database) TO ROLE identifier($ht_default_role);
-- Grant write access for the Lightning Sync Engine (faster syncs) & Sync Logs - Recommended
USE identifier($ht_database);
CREATE SCHEMA IF NOT EXISTS hightouch_audit;
CREATE SCHEMA IF NOT EXISTS hightouch_planner;
GRANT OWNERSHIP ON SCHEMA hightouch_audit TO ROLE identifier($ht_default_role);
GRANT OWNERSHIP ON SCHEMA hightouch_planner TO ROLE identifier($ht_default_role);
If you opt to use the Lightning engine, you must grant additional permissions.
Once you've created a Snowflake service account, you're ready to set up the connection in Hightouch.
Connection configuration
You may need to allowlist Hightouch's IP addresses to let our systems connect to your Snowflake account. Reference our networking docs to determine which IP addresses you need to allowlist.
You can also securely connect to your Snowflake account using AWS PrivateLink. AWS PrivateLink is a Business Tier feature.
To get started, go to the Sources overview page and click the Add source button. Select Snowflake and follow the steps below.
Configure your source
Enter the following required fields into Hightouch:
-
Account identifier: You can find this identifier at the beginning of your Snowflake URL, for example, (
https://ACCOUNT_IDENTIFIER.snowflakecomputing.com). Only enter theACCOUNT_IDENTIFIERand not the full URL. -
Warehouse: This specifies the warehouse to use when Hightouch executes queries in Snowflake.
You can choose to route all queries to a single warehouse, or configure separate warehouses optimized for different workloads (recommended):
-
Route all queries to a single warehouse: Use this option if you want to use a single warehouse for all Hightouch operations.
-
Route queries to different warehouses (split by workload) (Recommended): This option allows you to optimize performance and cost by routing different types of queries to different warehouses:
- Batch warehouse: For background jobs like sync runs, schema sampling, audience snapshots, and other workloads that are not latency-sensitive. This warehouse can be optimized for cost efficiency.
- Interactive warehouse: For latency-sensitive queries (e.g., audience previews) and heavier workloads that need more compute (e.g., identity resolution). This warehouse should be sized up for best experience.
-
-
Database: This specifies the database to use when Hightouch executes queries in Snowflake.
Account identifier format may differ based on Snowflake account age.
For example, older Snowflake accounts often have identifiers that look like ACCOUNT_LOCATOR.CLOUD_REGION_ID.CLOUD, whereas newer Snowflake accounts have identifiers that look like ORGNAME-ACCOUNT_NAME.
For more details, visit Snowflake's account identifier docs.
Choose your sync engine
For optimal performance, Hightouch tracks incremental changes in your data model—such as added, changed, or removed rows—and only syncs those records. You can choose between two different sync engines for this work.
The Basic engine requires read-only access to Snowflake. Hightouch executes a query in your database, reads all query results, and then determines incremental changes using Hightouch's infrastructure. This engine is easier to set up since it requires read—not write—access to Snowflake.
The Lightning engine requires read and write access to Snowflake. The engine stores previously synced data in a separate schema in Snowflake managed by Hightouch. In other words, the engine uses Snowflake to track incremental changes to your data rather than performing these calculations in Hightouch. Therefore, these computations are completed more quickly.
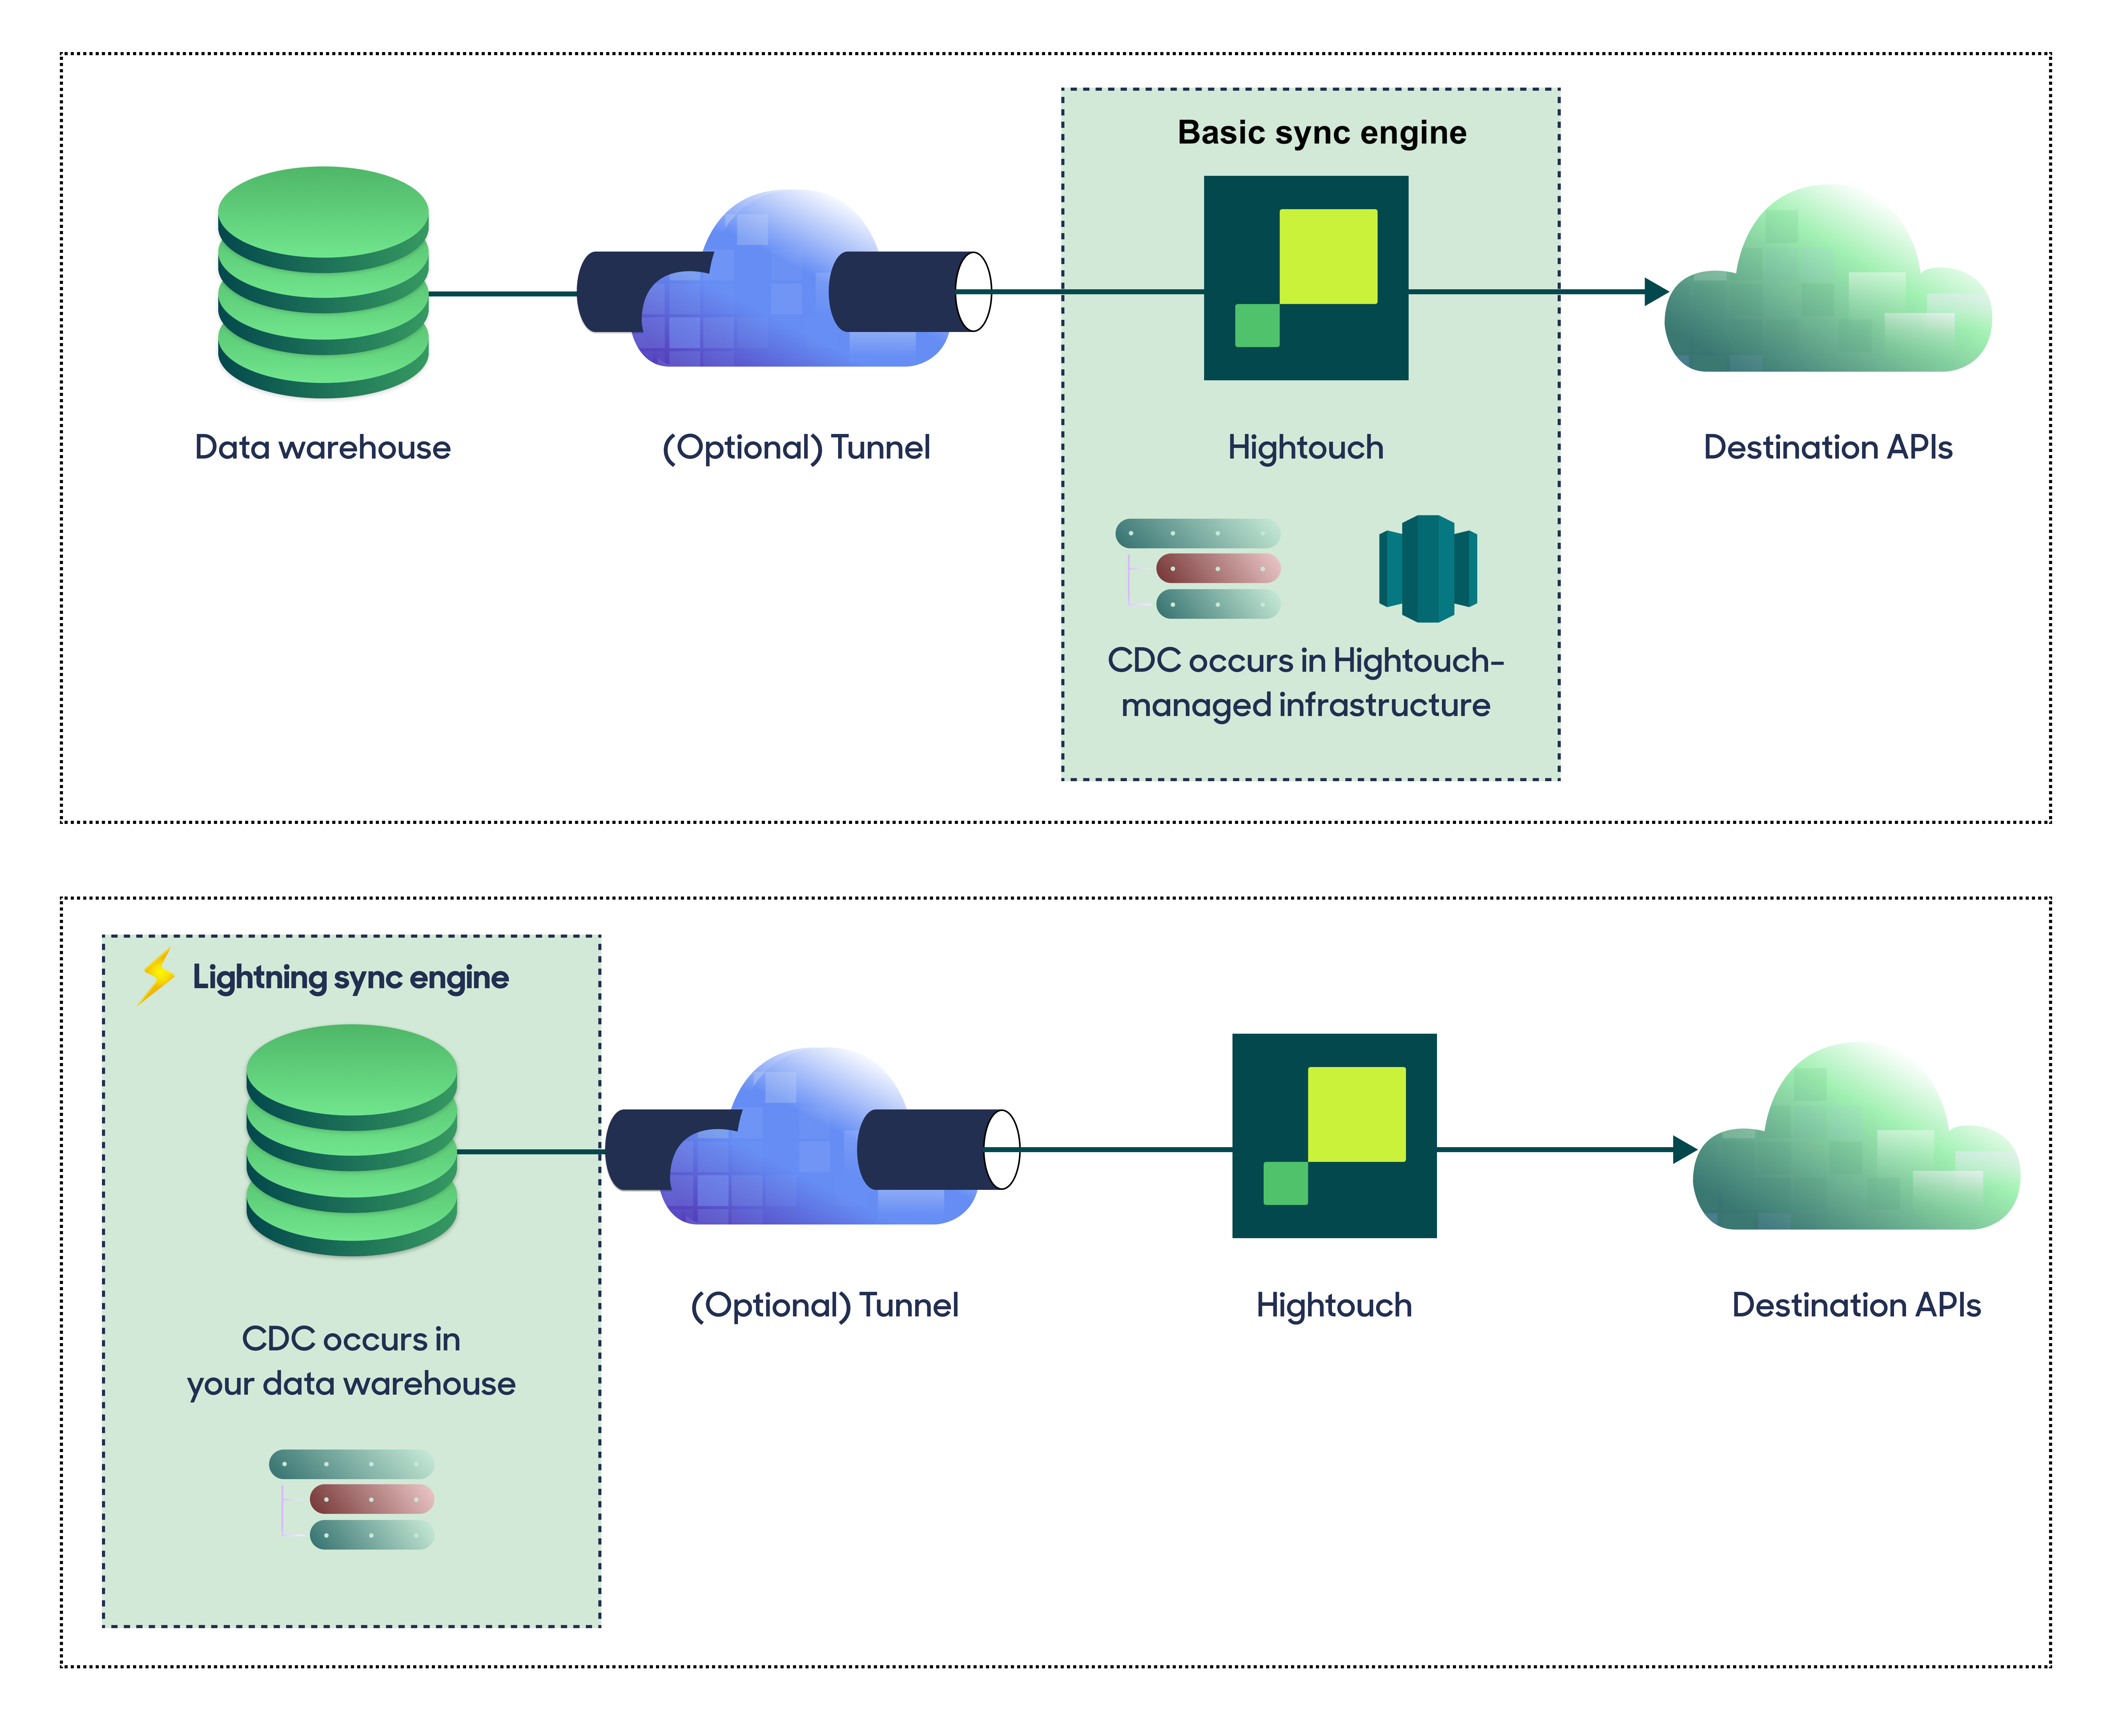
If you select the Basic engine, you can switch to the Lightning engine later. Once you've configured the Lightning engine, you can't move back to the Basic engine without recreating Snowflake as a source.
To learn more, including migration steps and tips, check out the Lightning sync engine docs.
Basic versus Lightning engine comparison
The Lightning sync engine requires granting write access to your data warehouse, which makes its setup more involved than the Basic sync engine. However, it is more performant and reliable than the Basic engine. This makes it the ideal choice to guarantee faster syncs, especially with large data models. It also supports more features, such as Warehouse Sync Logs, Match Booster, and Identity Resolution.
| Criteria | Basic sync engine | Lightning sync engine |
|---|---|---|
| Performance | Slower | Quicker |
| Ideal for large data models (over 100 thousand rows) | No | Yes |
| Reliability | Normal | High |
| Resilience to sync interruptions | Normal | High |
| Extra features | None | Warehouse Sync Logs, Match Booster, Identity Resolution |
| Ease of setup | Simpler | More involved |
| Location of change data capture | Hightouch infrastructure | Snowflake schemas managed by Hightouch |
| Required permissions in Snowflake | Read-only | Read and write |
| Ability to switch | You can move to the Lightning engine at any time | You can't move to the Basic engine once Lightning is configured |
Lightning engine setup
To set up the Lightning engine, ensure that the service account you previously created has the appropriate permissions.
Specifically, append these commands to the service account creation:
CREATE SCHEMA IF NOT EXISTS hightouch_audit;
CREATE SCHEMA IF NOT EXISTS hightouch_planner;
GRANT OWNERSHIP ON SCHEMA hightouch_audit TO ROLE identifier($ht_default_role);
GRANT OWNERSHIP ON SCHEMA hightouch_planner TO ROLE identifier($ht_default_role);
Provide credentials
Enter the following fields into Hightouch:
- Username: This can be your personal Snowflake login or a dedicated user for Hightouch. When using the Basic engine, this user must have read access to the data you wish to sync. If using the Lightning engine, you must also grant the permissions described in the preceding snippet. Note: Use the "Login name", which may differ from the Snowflake username.
- Role (optional) - Use this field to specify the role Hightouch should use when executing queries in Snowflake. If left blank, Hightouch uses the user's default role.
You have two options for finalizing your credentials:
- RSA key pair (recommended)
- Password
Snowflake is deprecating password authentication in favor of RSA key pair authentication or multi-factor authentication. Hightouch will continue to support password authentication for existing customers until they have migrated.
RSA authentication
Generate a private key and public key by running the following commands in your terminal:
$ openssl genrsa 2048 | openssl pkcs8 -topk8 -inform PEM -out rsa_key.p8
$ openssl rsa -in rsa_key.p8 -pubout -out rsa_key.pub
Save the password you used for the key, you will need to enter it when creating the Snowflake source in Hightouch.
Then in Snowflake, execute an ALTER USER command to assign the public key to your Hightouch Snowflake user:
alter user ht_user set rsa_public_key='MIIBIjANBgkqh...';
In the Authentication Method of the Snowflake Source settings, drag and drop or upload the private key you just generated into the Private key file field. Enter the password for your private key in the box below here, unless you used an unencrypted key.
Test your connection
When setting up a source for the first time, Hightouch validates the following:
- Network connectivity
- Snowflake credentials
- Permission to list schemas and tables
- Permission to write to
hightouch_plannerschema - Permission to write to
hightouch_auditschema
All configurations must pass the first three, while those with the Lightning engine must pass all of them.
Some sources may initially fail connection tests due to timeouts. Once a connection is established, subsequent API requests should happen more quickly, so it's best to retry tests if they first fail. You can do this by clicking Test again.
If you've retried the tests and verified your credentials are correct but the tests are still failing, don't hesitate to .
Manage warehouse compute
Hightouch runs queries in Snowflake to power audiences, syncs, and other workflows. Because Snowflake bills primarily on compute, your warehouse setup, schema design, and job frequency can affect both cost and performance.
This section outlines recommended patterns to help you:
- Keep Hightouch’s Snowflake usage predictable and easy to review
- Scope Hightouch’s access to only the data it needs
- Avoid unnecessary compute for common activation workflows
For a warehouse-agnostic overview, see Manage warehouse compute.
Recommended Snowflake setup
When you connect Snowflake to Hightouch, we recommend that you:
-
Use a dedicated user, role, and warehouse
So compute usage and data access are easy to track and control. -
Set practical warehouse defaults
Start with a modest size, shorten idle time, and add reasonable query time limits. -
Separate interactive and scheduled work when needed
Run UI-driven queries and background jobs on different warehouses if you need stronger performance isolation. -
Design models with query cost in mind
Keep parent models focused, handle large event tables carefully, and combine tables only when it clearly helps. -
Review usage regularly
Use Snowflake’s cost dashboards, resource monitors, and query history to confirm performance and spend.
Use a dedicated user, role, and warehouse
Snowflake organizes access and compute around three objects:
- A user (who runs queries)
- A role (what they can access)
- A virtual warehouse (where queries run)
Creating all three specifically for Hightouch makes both compute and data access easier to manage.
Scope access with a dedicated role
The role controls which objects Hightouch can read and write.
- Grant read access only to the databases and schemas that back your Hightouch models.
- Grant write access only when required (for example, for Warehouse Sync Logs or Hightouch-managed audit schemas).
- Avoid broad account-level privileges.
If you need additional governance, Snowflake supports:
- Masking policies on sensitive columns
- Row- or column-level security
- Views that expose filtered or redacted data
These controls ensure Hightouch can only access the data you intentionally expose.
Separate Hightouch from human users
Create a dedicated Snowflake user for Hightouch:
- Set its default role to the Hightouch role.
- Set its default warehouse to the Hightouch warehouse.
- Use strong authentication (for example, RSA key pair authentication).
With a dedicated user and role, you can filter query history to see exactly what Hightouch is running.
Isolate compute with a dedicated warehouse
The warehouse is the compute engine Snowflake bills.
- Create a virtual warehouse dedicated to Hightouch (for example,
HIGHTOUCH_WH). - Attach it to the Snowflake source configuration in Hightouch.
A dedicated warehouse makes it easier to:
- Attribute Snowflake credits to Hightouch
- Adjust warehouse settings without impacting other workloads
Set practical warehouse defaults
Once Hightouch has its own warehouse, a few settings determine how it behaves.
Choose a starting size and adjust as needed
Start with a modest size rather than the largest option available. Many teams begin with Medium and adjust based on real usage.
Watch for:
- How long syncs and other Hightouch jobs take
- Whether Customer Studio previews remain responsive
- Whether Snowflake reports consistent queuing
If performance is acceptable and the warehouse is mostly idle, try a smaller size.
If you see frequent queuing or slow UI performance, increase the size or simplify models before scaling up.
Reduce idle time with auto-suspend
Auto-suspend controls how long the warehouse stays running when idle.
Snowflake’s default (often 10 minutes) is higher than many teams need. Reducing auto-suspend to around 1 minute, while keeping auto-resume enabled, is common.
This helps the warehouse shut down soon after Hightouch stops issuing queries while still starting automatically when new work begins.
Add query time limits as a safeguard
Statement timeouts limit how long a query can run and help prevent unexpectedly long-running workloads.
The default timeout (2 days) is typically higher than necessary. Set a maximum duration that:
- Covers your typical sync runtimes
- Prevents a query from running indefinitely
If queries hit time limits:
- Review Snowflake query history
- Identify the models or filters causing long runtimes
- Simplify the query before increasing the timeout
Use multi-cluster only when concurrency is the issue (optional)
Concurrency (sometimes called parallelization) means how many queries run at the same time.
Multi-cluster warehouses can add extra clusters during busy periods to handle higher concurrency.
This can help when:
- Many Hightouch jobs run at once
- You see consistent queuing during peak times
- Usage spikes unpredictably
If a single warehouse handles your workload without queuing, multi-cluster may not be necessary.
If you choose to go with a larger warehouse (M/L), you can ignore this suggestion.
Separate interactive and scheduled work
Hightouch issues both interactive and batch queries:
- Interactive: audience previews, traits exploration, dashboards, and other UI actions
- Batch: sync runs, Identity Resolution jobs, heavy traits, sampling refreshes, and snapshots
If needed, configure Hightouch to run these on different Snowflake warehouses.
Common pattern: two warehouses
Many teams use:
- An interactive warehouse for fast UI queries
- A batch warehouse for scheduled and background jobs
To set this up:
- Create two warehouses (for example,
HIGHTOUCH_INTERACTIVE_WHandHIGHTOUCH_BATCH_WH). - Configure Hightouch to send interactive work to one and batch work to the other.
- Set size and auto-suspend settings independently.
This keeps the UI responsive during heavy sync windows and gives you clearer cost control.
Design Customer Studio models with query cost in mind
Warehouse configuration determines how much compute is available. Schema design strongly affects how much work each query must do and which data Hightouch touches.
Keep parent and related models simple
For Customer Studio:
- The parent model should represent the main entity (for example, customer or account).
- Include stable identifiers and frequently used segmentation fields.
- Include keys needed to join related models.
Related models can represent 1:many relationships such as orders or sessions.
Where possible, do complex joins and calculations ahead of time (for example, in dbt), and have Hightouch read from tables you’ve already built instead of re-running large joins every time.
Limit event tables to what activation requires
Event tables can grow very large. To keep queries manageable:
- Limit time windows to what activation actually needs
- Organize tables based on common filters (often date or tenant)
- Create smaller summary tables for common metrics when helpful
Traits can perform aggregations directly, which may reduce the need for additional summary tables.
Combine tables only when it clearly helps
As a general guideline:
- Keep data in separate tables by default.
- Combine tables only when it clearly improves common Hightouch queries.
- Avoid flattening very large tables unless it solves a specific performance problem.
For large or time-series tables, consider clustering once you’ve observed real query patterns in Snowflake.
Improve audience building performance
If Customer Studio previews feel slow, you can increase warehouse size—but before doing that, consider enabling sampling.
- Sampling runs previews against a subset of rows for faster results.
- You can still run full queries for production syncs or reporting.
Sampling often provides a strong balance between responsiveness and Snowflake cost.
Reduce cost
Overspending typically results from multiple factors rather than a single issue.
Reduce unnecessary query volume
Running more queries than needed increases cost by:
- Keeping warehouses active longer
- Increasing concurrency, which may require larger warehouses
If you need frequent updates, consider running those workloads on a right-sized warehouse and separating them from interactive work.
Right-size warehouses for your workload
Many teams overspend because their warehouse is larger than necessary.
Aim for balance: enough capacity to meet performance expectations without paying for idle time or excess headroom.
Monitor cost and usage
Use Snowflake’s built-in tools to validate Hightouch usage.
Review cost dashboards
- Filter by warehouse name to track credit usage
- Compare Hightouch warehouses with other workloads
Use budgets and resource monitors
- Set budgets for Hightouch warehouses
- Configure alerts or automatic suspension for unexpected spikes
Inspect query history
- Filter by Hightouch user, role, or warehouse
- Identify expensive or slow queries
- Tie them back to specific models or workflows
Regular monitoring ensures Hightouch stays aligned with your performance, cost, and governance expectations.
Next steps
Once your source configuration has passed the necessary validation, your source setup is complete. Next, you can set up models to define which data you want to pull from Snowflake.
The Snowflake source supports these modeling methods:
- writing a query in the SQL editor
- using the visual table selector
- leveraging existing dbt models
- leveraging existing Looker Looks
- leveraging existing Sigma workbooks
The SQL editor allows you to query data from all databases that your Snowflake service account has access to. The table selector only supports querying from the database specified in the source configuration.
You may also want to consider storing sync logs in Snowflake. Like using the Lightning sync engine versus the standard one, this feature lets you use Snowflake instead of Hightouch infrastructure. Rather than performance gains, it makes your sync log data available for more complex analysis. Refer to the warehouse sync logs docs to learn more.
You must enable the Lightning sync engine to store sync logs in your warehouse.
FAQs
How can I tell how much compute Hightouch is using?
If you’re using a dedicated warehouse for Hightouch, most high-level cost questions can be answered directly in the Snowflake console.
- Go to Admin → Cost Management.
- Open the Consumption tab.
- Filter by your Hightouch warehouse name.
This view shows:
- Credit usage over time
- Breakdown by warehouse
- Query and service-level cost trends
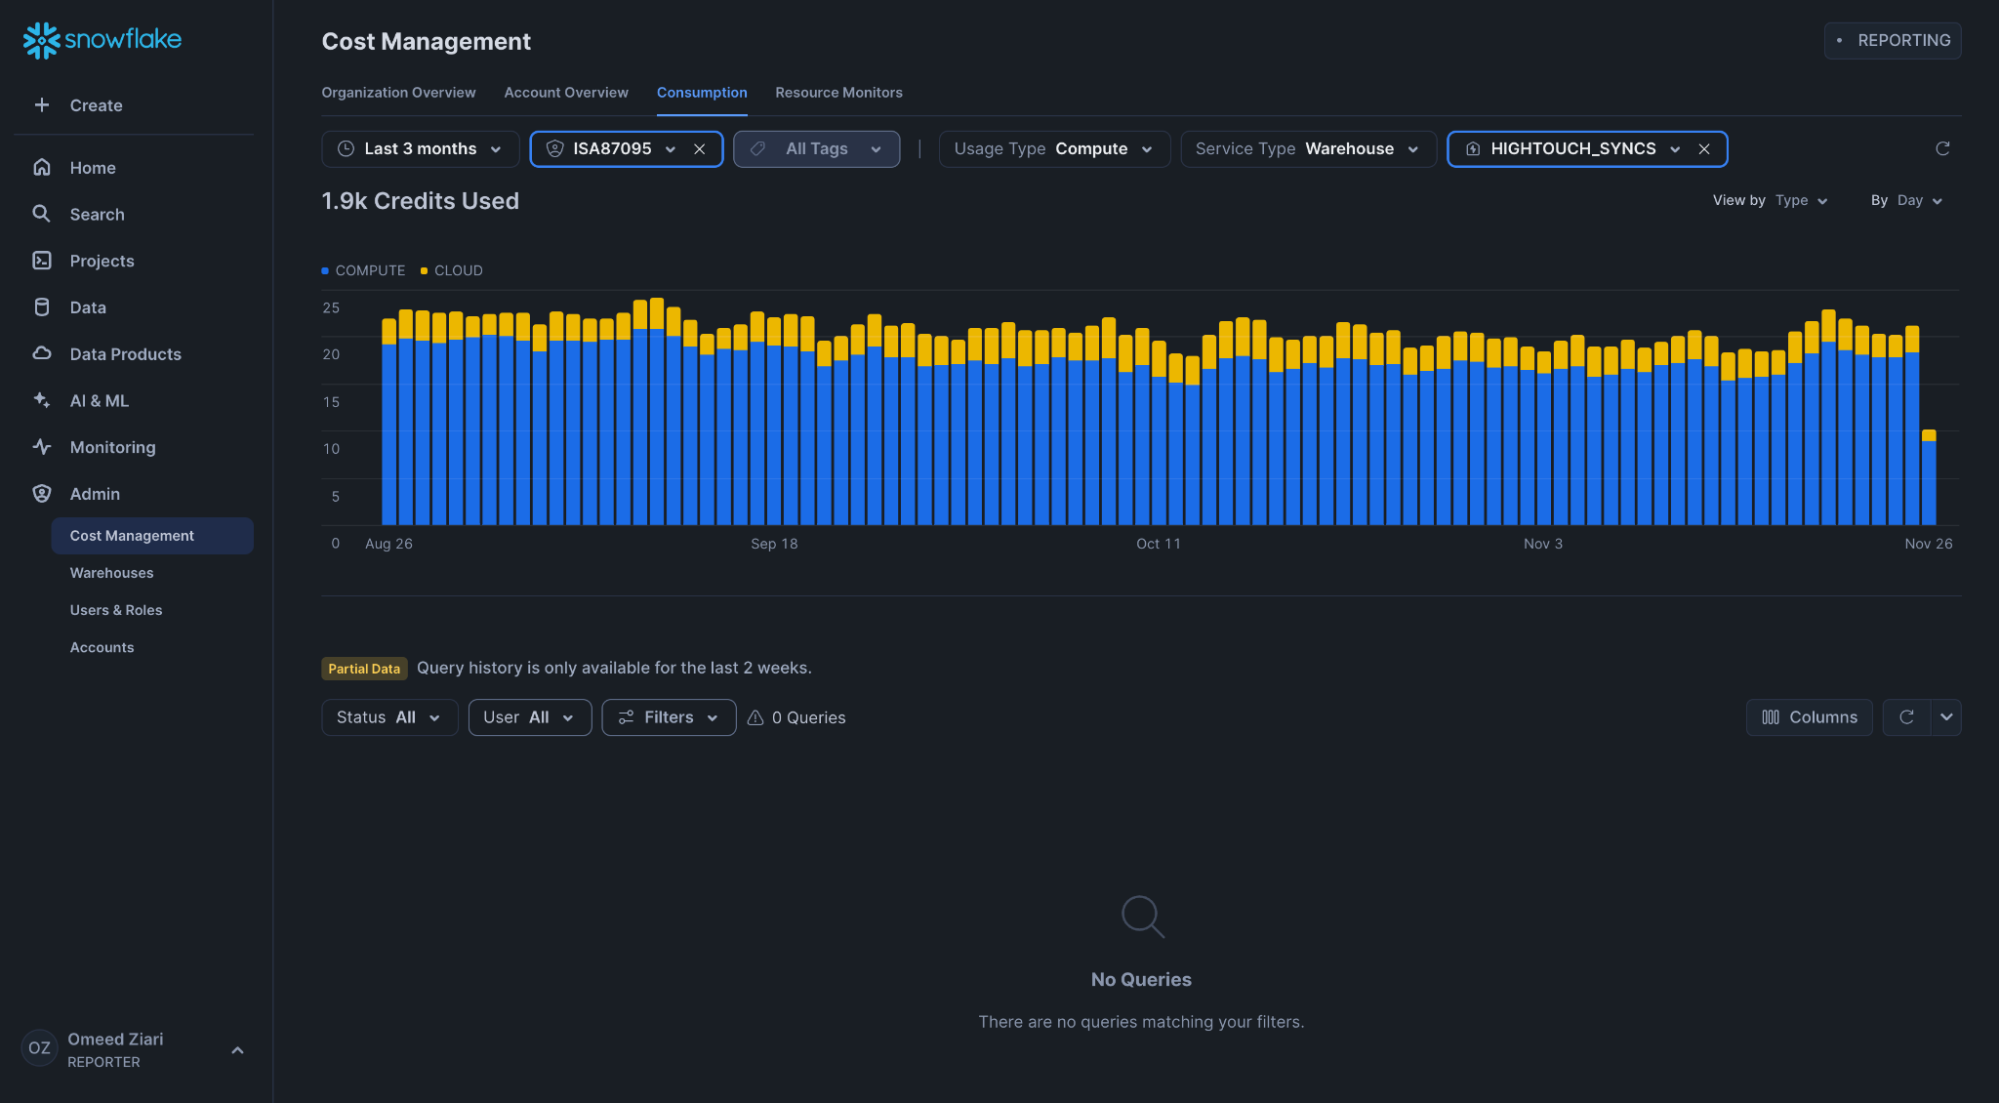
You must be an ACCOUNTADMIN or have the necessary permissions to access these views.
If Hightouch uses its own warehouse, this report provides a clear view of total Snowflake spend attributable to Hightouch workloads.
How can I identify specific queries driving cost?
For more detailed analysis, Snowflake exposes usage and query telemetry in the shared SNOWFLAKE database.
Two views are especially useful:
SNOWFLAKE.ACCOUNT_USAGE.QUERY_ATTRIBUTION_HISTORY
This view includes the CREDITS_ATTRIBUTED_COMPUTE column, which reports how many credits were consumed by each query.
- It accounts for concurrent queries by allocating weighted compute usage.
- It excludes idle time between query completion and warehouse shutdown.
- It allows you to identify the most expensive individual queries.
SNOWFLAKE.ACCOUNT_USAGE.QUERY_HISTORY
This related view includes:
- Full SQL query text
- Query duration
- Bytes scanned and written
- Rows produced
- Queuing time
- Spill metrics
Together, these views help you determine:
- Which queries consume the most credits
- Whether queuing is contributing to performance issues
- Whether large scans or joins are driving cost
The easiest way to access recent query history for a specific warehouse is via the table function SNOWFLAKE.INFORMATION_SCHEMA.QUERY_HISTORY_BY_WAREHOUSE, which allows filtering by WAREHOUSE_NAME.
Example: Identify expensive Hightouch queries in the last day
The following example joins query attribution and warehouse-scoped history to show the most expensive queries executed on a specific Hightouch warehouse in the last 24 hours:
SELECT
  QAH.*,
  QHBW.QUERY_TEXT,
  QHBW.QUEUED_PROVISIONING_TIME,
  QHBW.ROWS_WRITTEN_TO_RESULT
FROM
  SNOWFLAKE.ACCOUNT_USAGE.QUERY_ATTRIBUTION_HISTORY AS QAH
  JOIN (
    SELECT
      *
    FROM
      TABLE(
        SNOWFLAKE.INFORMATION_SCHEMA.QUERY_HISTORY_BY_WAREHOUSE(
          WAREHOUSE_NAME => 'HIGHTOUCH_SYNCS',
          RESULT_LIMIT => 10000
        )
      )
  ) AS QHBW
    ON QHBW.QUERY_ID = QAH.QUERY_ID
WHERE
  QAH.START_TIME > CURRENT_DATE - INTERVAL '1 DAY'
ORDER BY
  QAH.CREDITS_ATTRIBUTED_COMPUTE DESC;
You can modify:
WAREHOUSE_NAMEto match your Hightouch warehouse- The time window in the
WHEREclause - The
RESULT_LIMITparameter
This query helps you:
- Rank queries by compute consumption
- Inspect SQL text to identify inefficient joins or scans
- Confirm that configuration changes (warehouse size, routing, schema adjustments) are having the intended effect
Tips and troubleshooting
If you encounter an error or question not listed below and need assistance, don't hesitate to . We're here to help.
Connection timeout
When initially testing your connection, you may receive a connection timeout error. Once a connection is established, subsequent API requests should happen more quickly, so it's best to retry the tests if they first fail. You can do this by clicking Test again.
Network error: Could not reach Snowflake
You may receive this error if the input for Account identifier is invalid.
Instead of using the complete Snowflake URL, for example, https://ACCOUNT_IDENTIFIER.snowflakecomputing.com,
ensure that you're only using the ACCOUNT_IDENTIFIER part of the URL, for example, companyname-xu12345 or companyname-xu12345.us-east-1.
SQL compilation error with quoted identifiers
You may receive a SQL compilation error: invalid identifier '"column name"' error when your Snowflake table has column names that contain spaces or special characters. Snowflake requires double-quoted identifiers for these columns, but Hightouch's query engine may not handle them correctly in all contexts.
To work around this, rename the columns in a CTE or view before using them in your Hightouch model:
SELECT "job number" AS job_number, "first name" AS first_name
FROM my_schema.my_table
JWT token is invalid
You may receive intermittent JWT token is invalid errors when using key pair authentication. This is typically caused by clock skew between your Snowflake account and Hightouch's servers, and is more common after configuring dbt models or other tools that also use key pair auth.
Resetting the key pair in Snowflake and re-configuring the connection in Hightouch may temporarily resolve the issue. If the error recurs, for further troubleshooting.