| Audience | Marketers, business users |
| Prerequisites |
|
Add Messages to optimize content from your destination templates by defining variants and letting agents control which version is sent, when, and to whom.
What you’ll learn
In this article, you’ll learn how to:
- Add messages from your destination
- Understand base vs optimized content
- Create and manage message variants
- Control variant eligibility with rules and tags
- Translate message content for a user's locale
- Configure message-level settings
- Manage messages at scale with CSV uploads and bulk actions
Overview
Messages define the creative variations an agent can send. Each message is sourced from a destination (such as Braze or Iterable) and can include multiple variants for experimentation.
Agents continuously evaluate messages to determine which variant, timing, and channel perform best for each user.
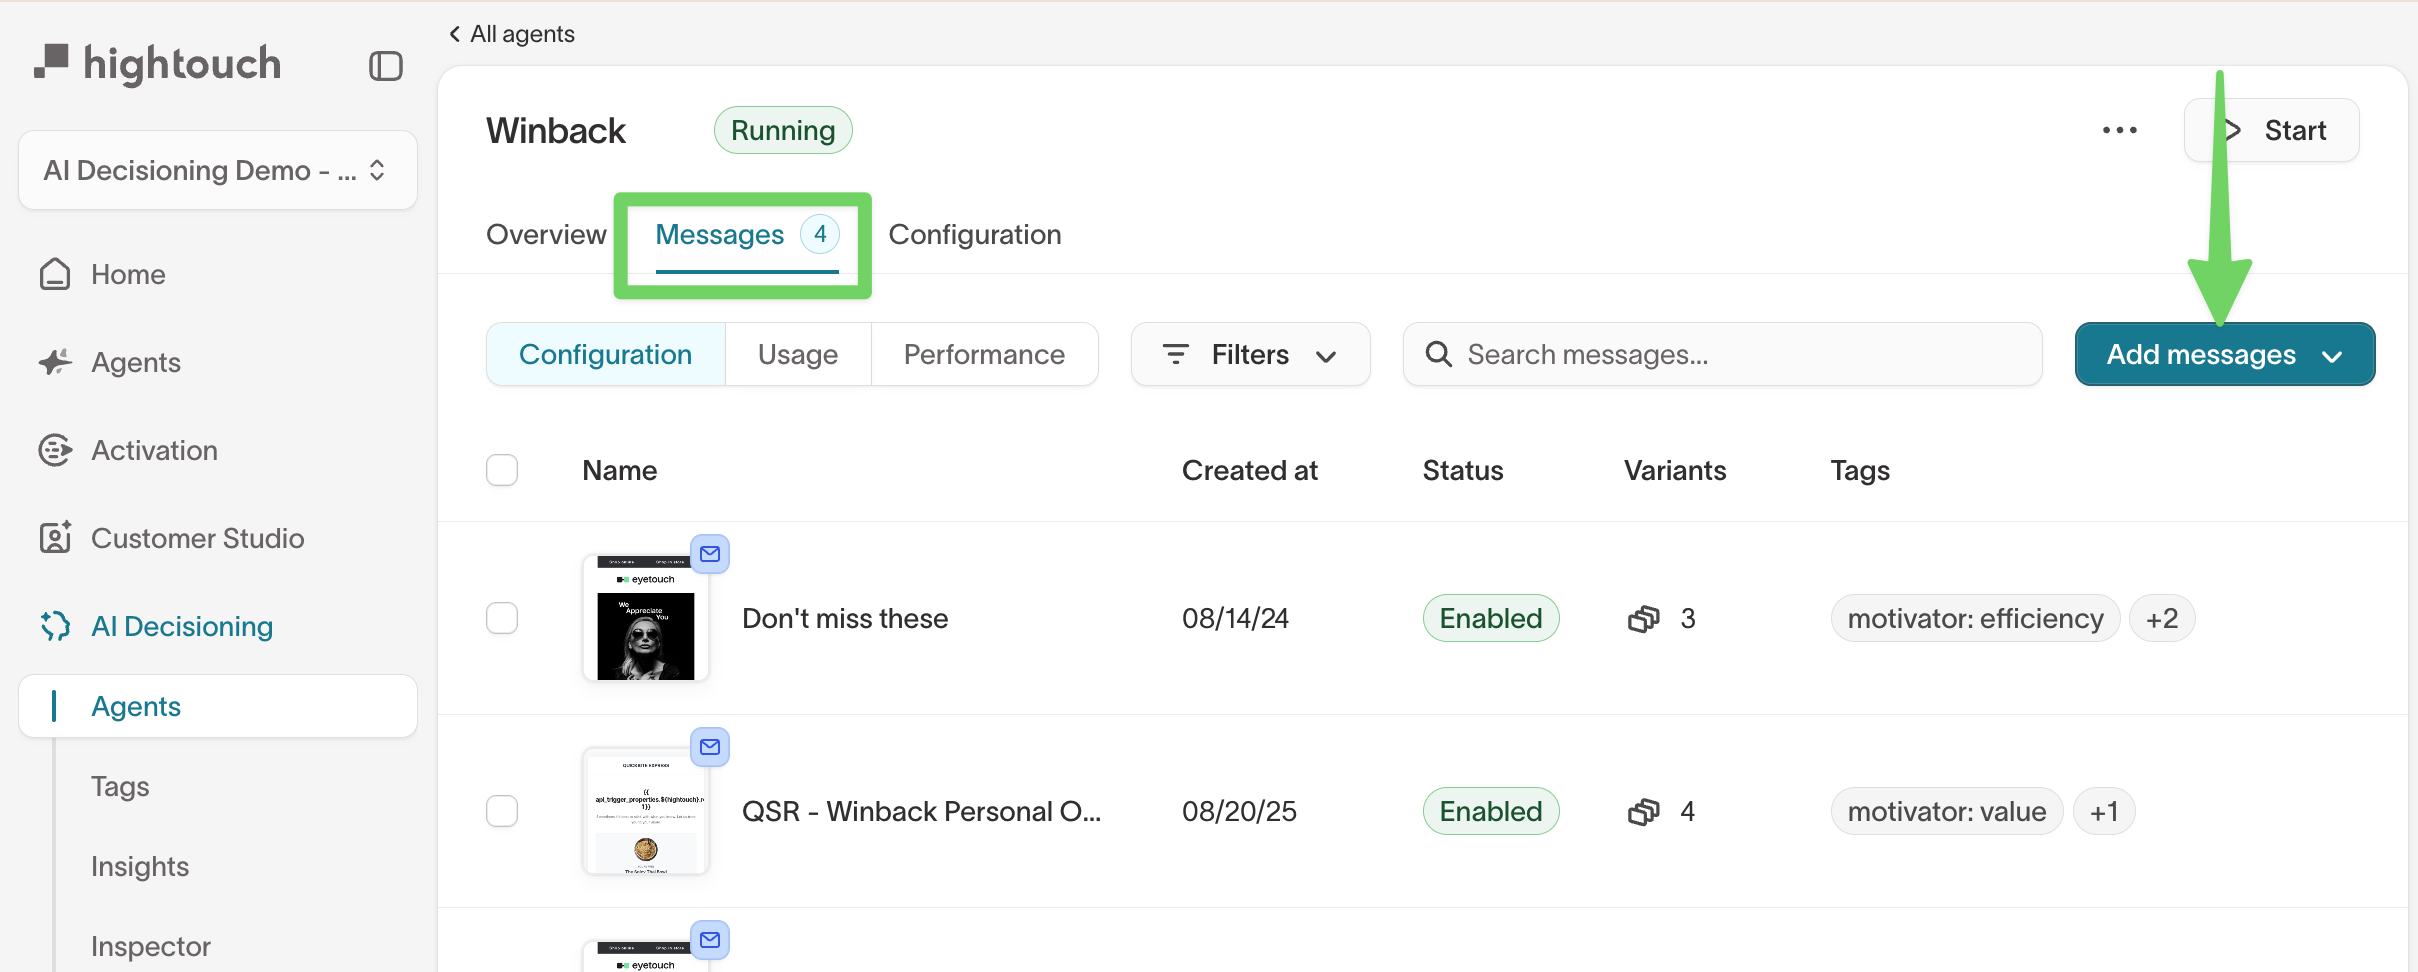
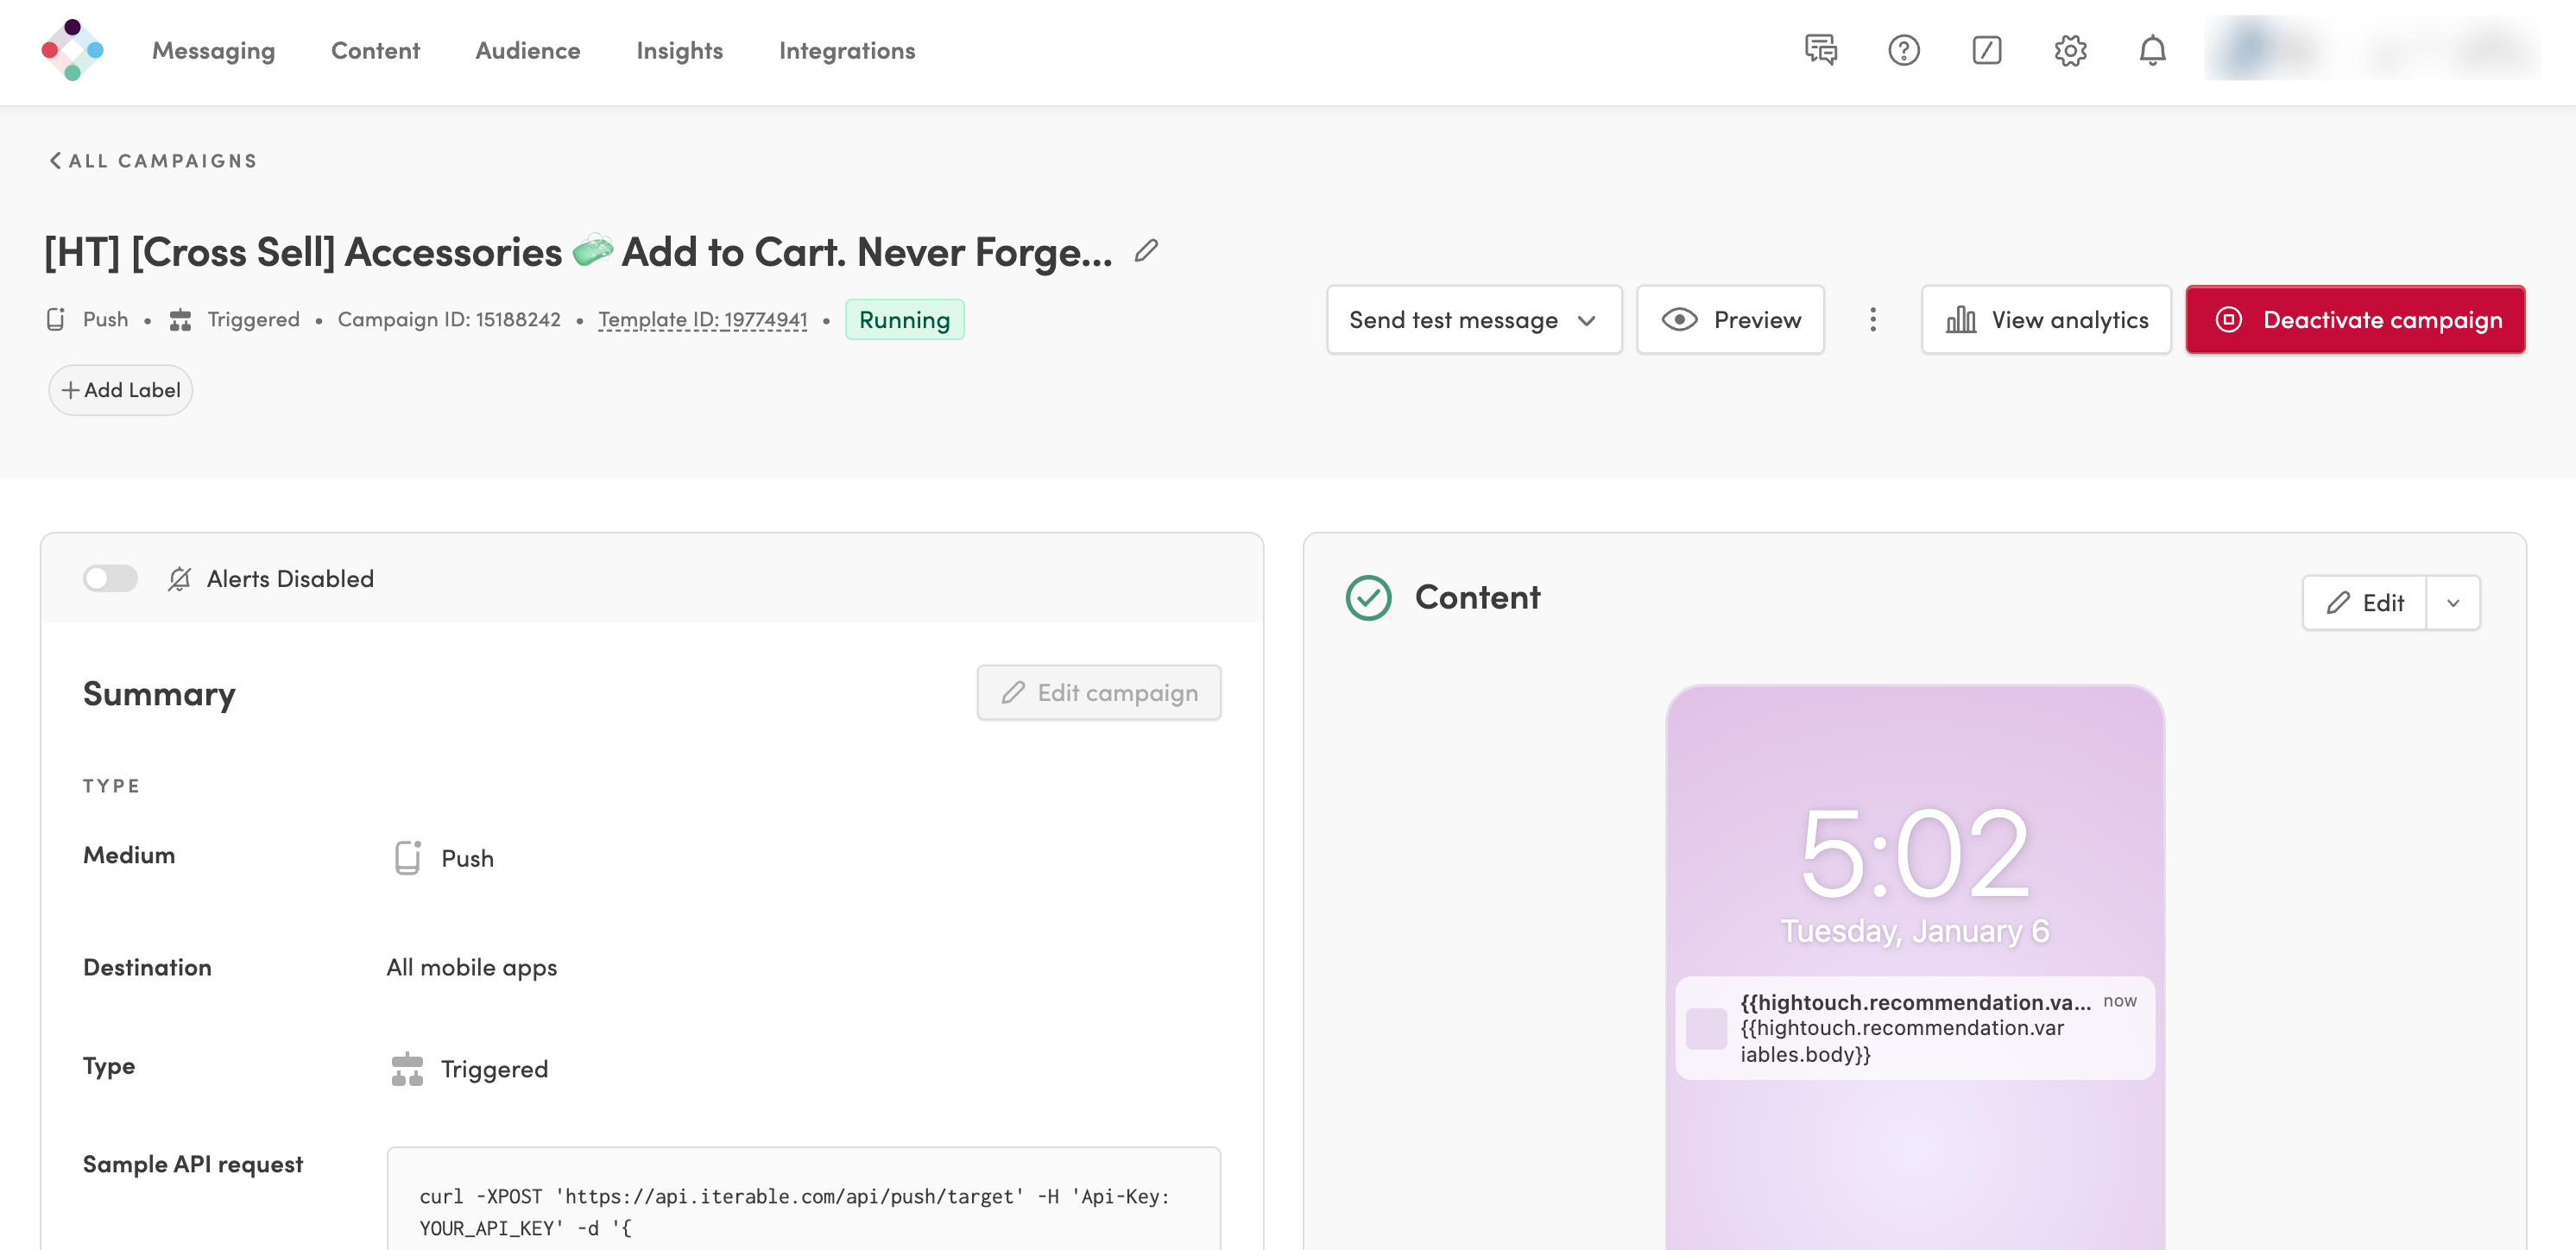
Add a message
- Open an agent and go to the
Messagestab. - Click
Add messages, then select Add messages individually. - In the Add messages window:
- Select a channel and destination.
- A channel defines how a message is delivered (for example, email or push), while the destination defines where the content is managed (such as Braze or Iterable).
- Select the destination-specific identifier:
- Braze: Choose a campaign
- Iterable: Choose a template
- Salesforce Marketing Cloud: Choose a triggered send or message
- Custom (S3): Enter a resource identifier
- Enter a message name to identify the message in Hightouch.
- Select a channel and destination.
- Click
Add messages.
The message is added to the agent and appears in the Messages list.
Use message names that describe the intent or use case (for example,
Cross-sell – accessories email) to make messages easier to find and analyze
later.
View and manage messages
The Messages page provides a centralized view of message configuration and performance for an agent.
From this view, you can:
- Review message status (
EnabledorDraft) - See the number of variants per message
- View the audience size — the estimated number of eligible users for each message
- View applied tags
- Search messages by name
- Filter messages by status
Select a message to access three views:
| Tab | Purpose |
|---|---|
Configuration | Review and manage message settings including tags, offers, collections, and advanced delivery guardrails (send limits, timeline, delivery windows, eligibility, and campaign attribution). Goals inherited from the agent are also visible here. |
Usage | See how often the message is eligible to send and how it is being evaluated by the agent. |
Performance | Review delivery and outcome metrics to understand how the message contributes to agent goals. |
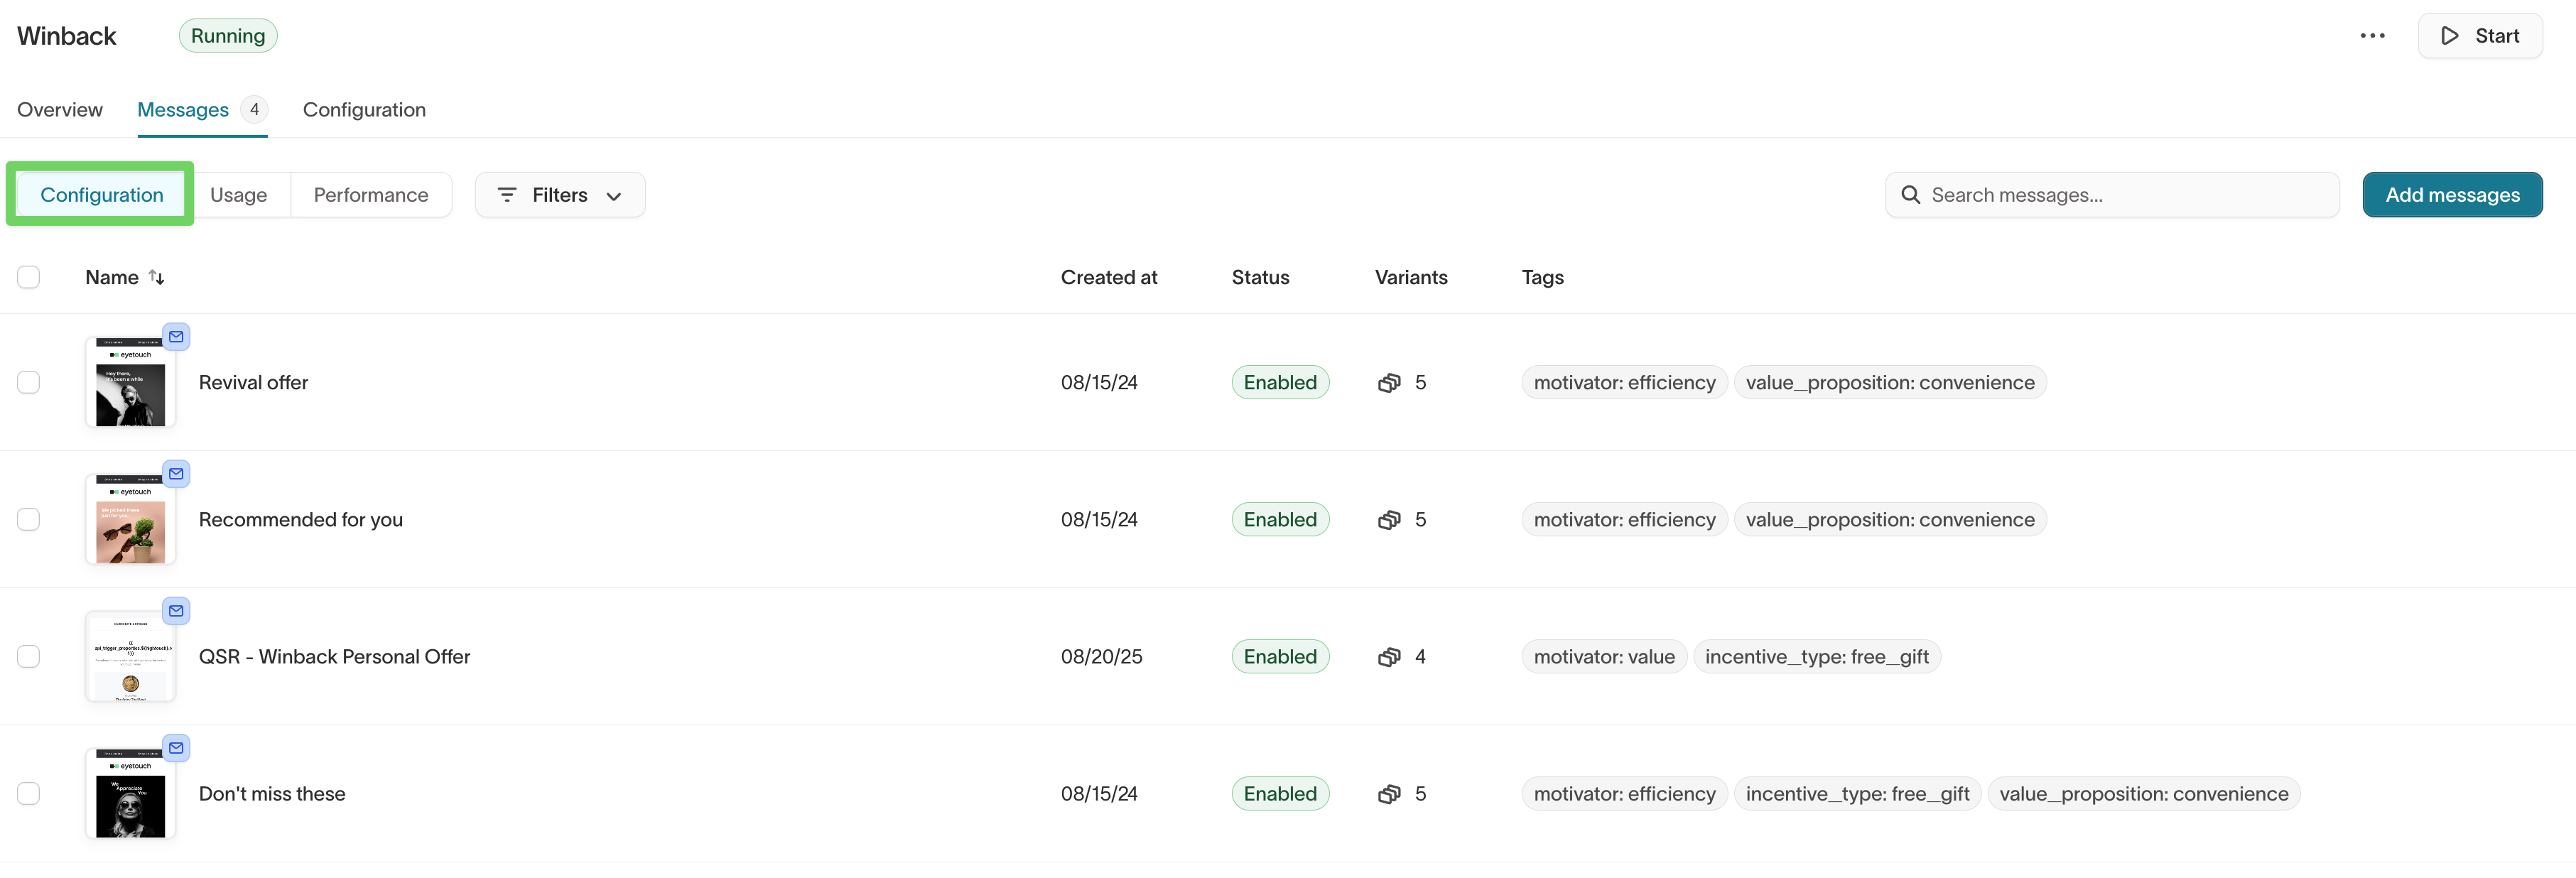
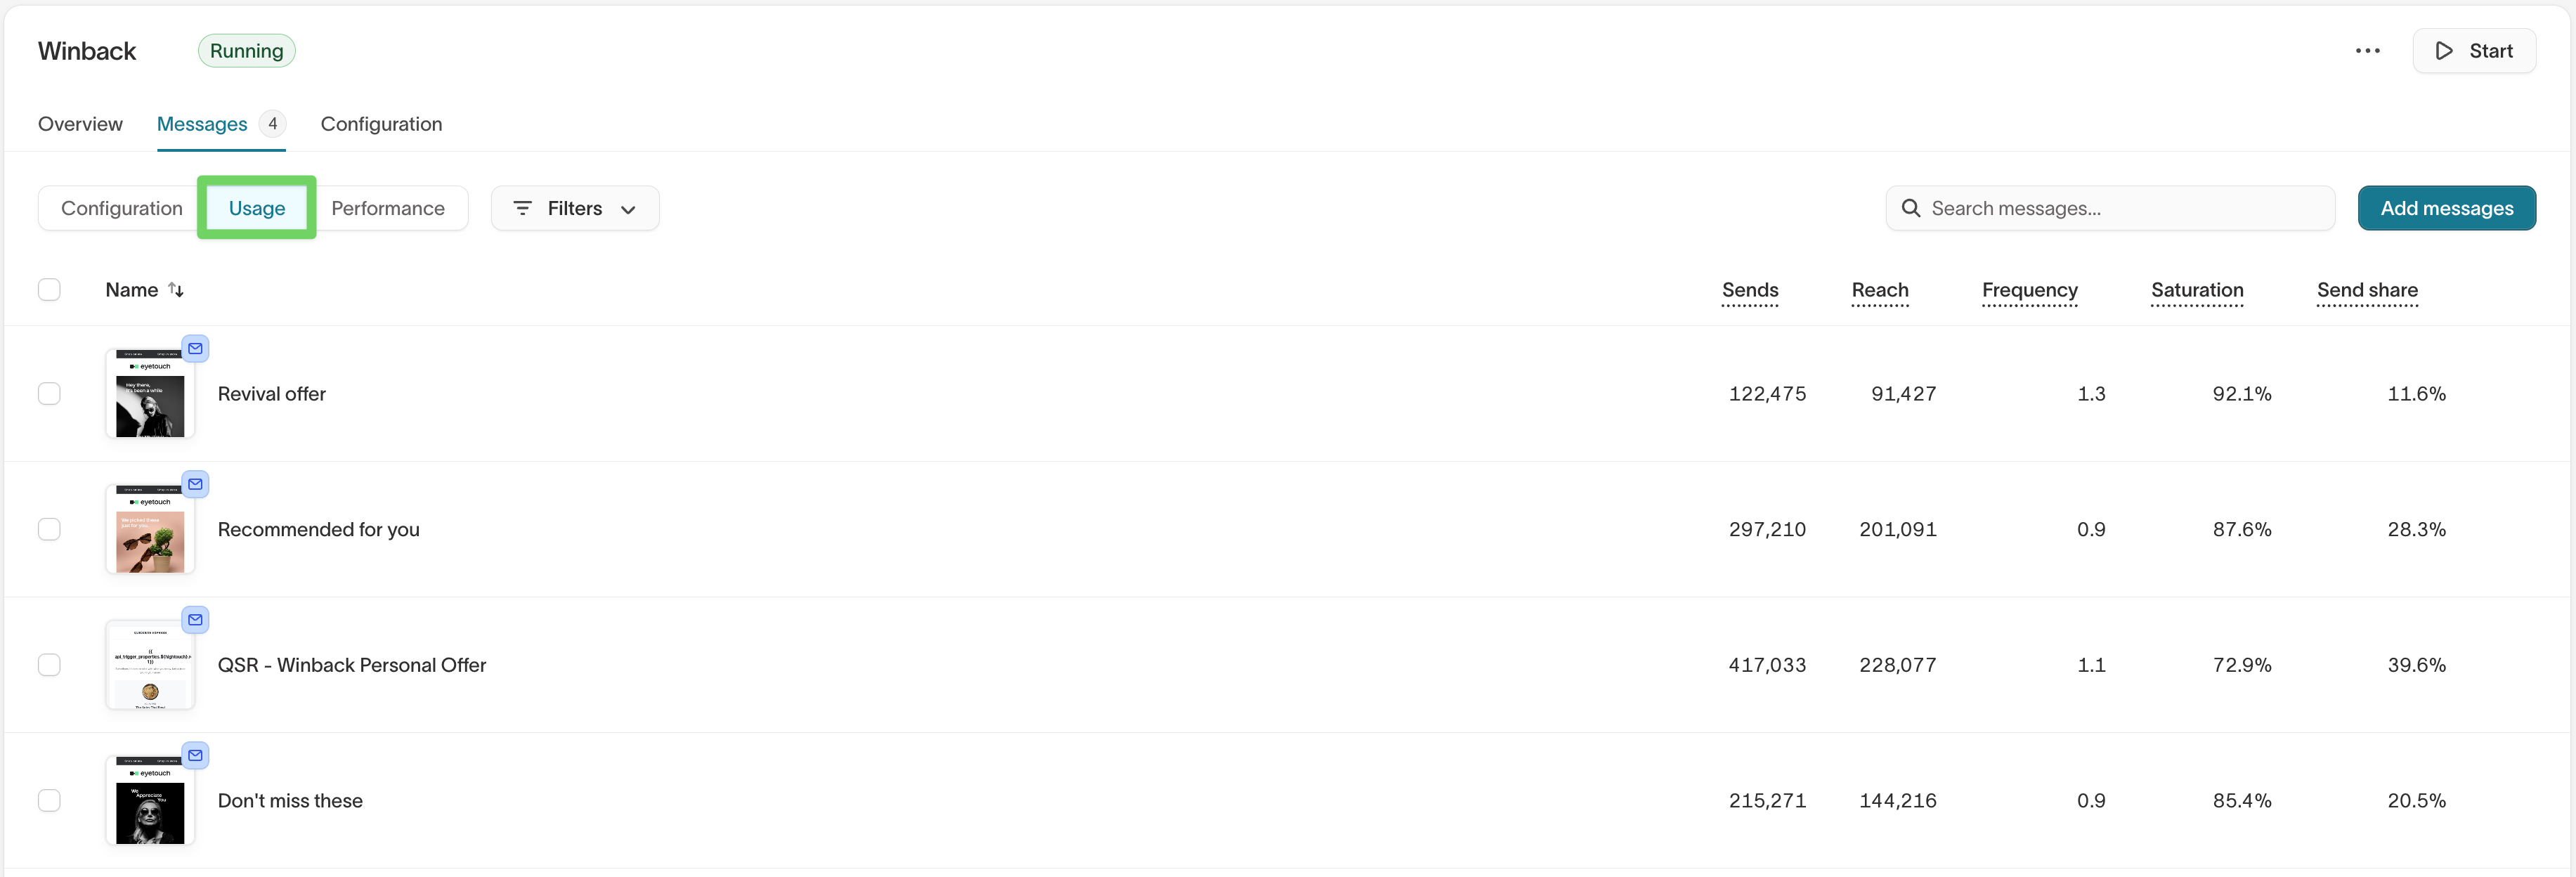
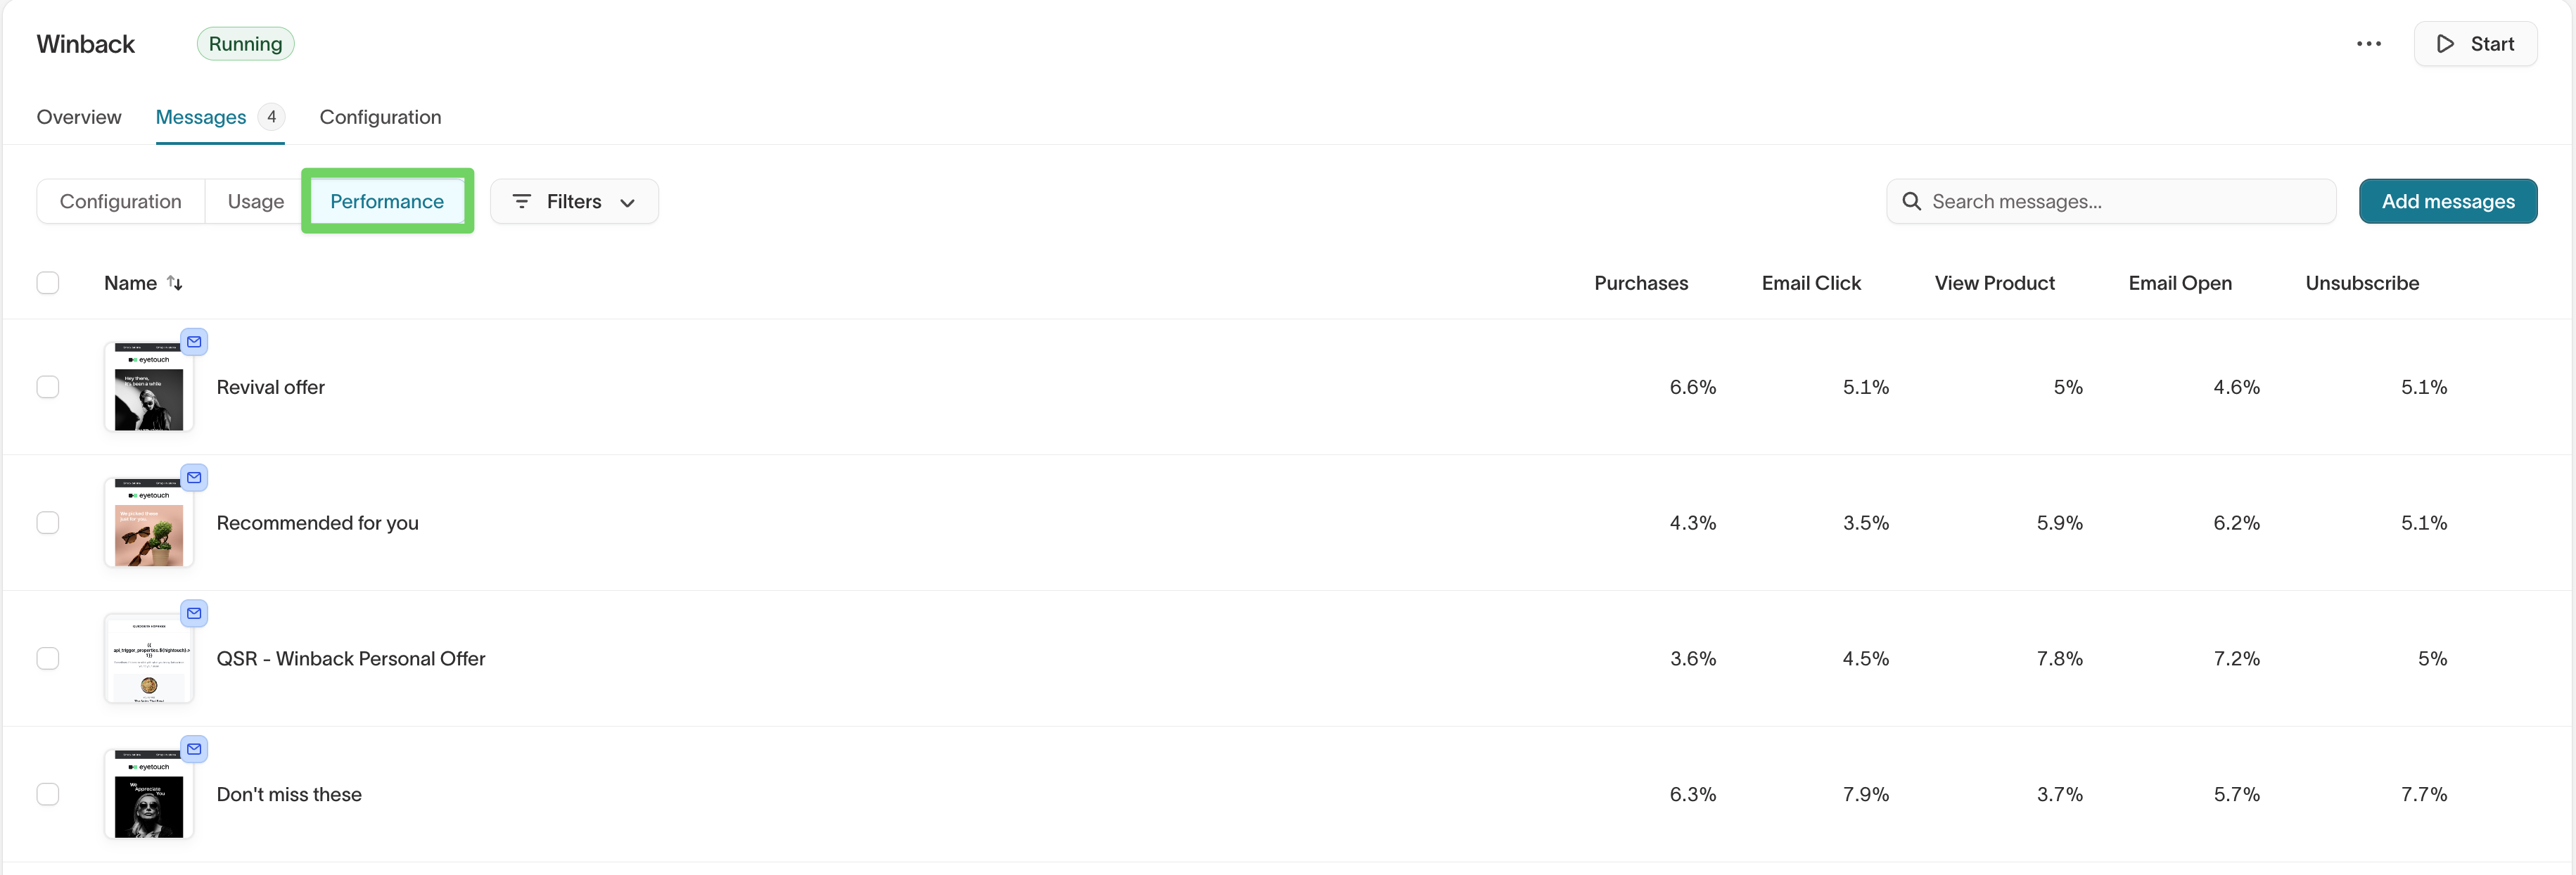
Use these views together to confirm setup and understand how messages perform over time.
Message content
Each message includes two parts: base content and optimized content.

Base content
Base content is the underlying message content defined in your marketing destination.
Examples include:
- An email built in Iterable, Braze, or Salesforce Marketing Cloud
- A push or in-app message defined in your destination
- Destination-managed layout, variables, or logic
When you add a message, you select the destination and the campaign, template, or send to use. That destination-managed content becomes the base content for the message.
AI Decisioning does not modify your base content. It uses your content as the foundation for optimized content and variants.
Optimized content
Optimized content includes the specific fields within a message that agents can vary and learn from over time.
Common optimized content types include:
- Subject
- Preheader
- Call to action (CTA)
- Other supported message fields
Each optimized content type can include multiple variants, which are evaluated against your agent’s goals.
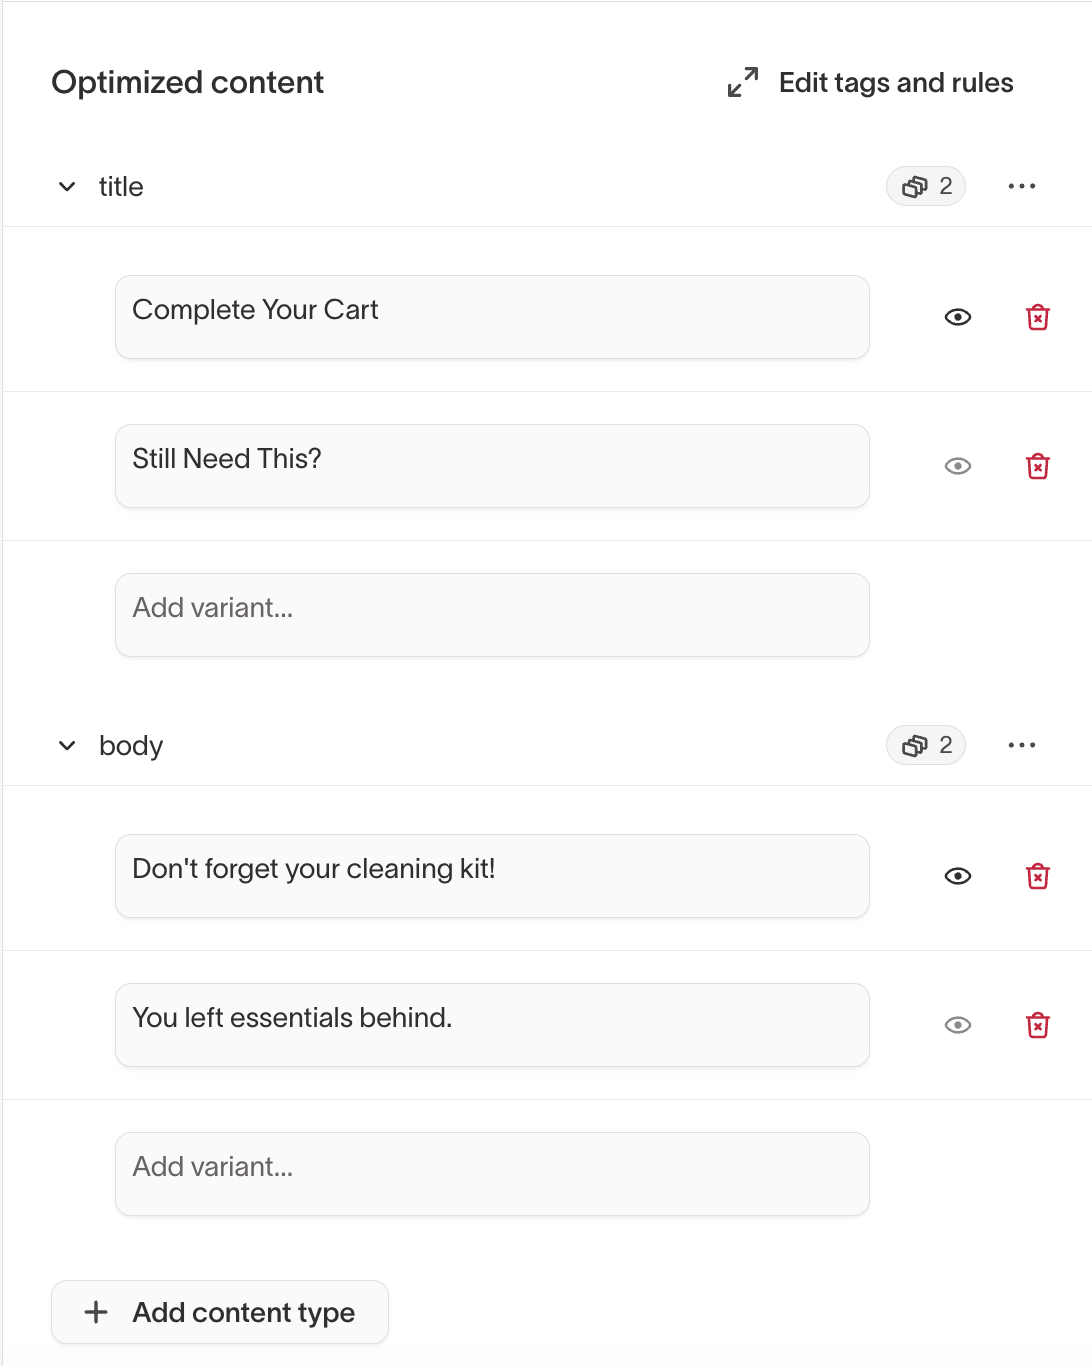
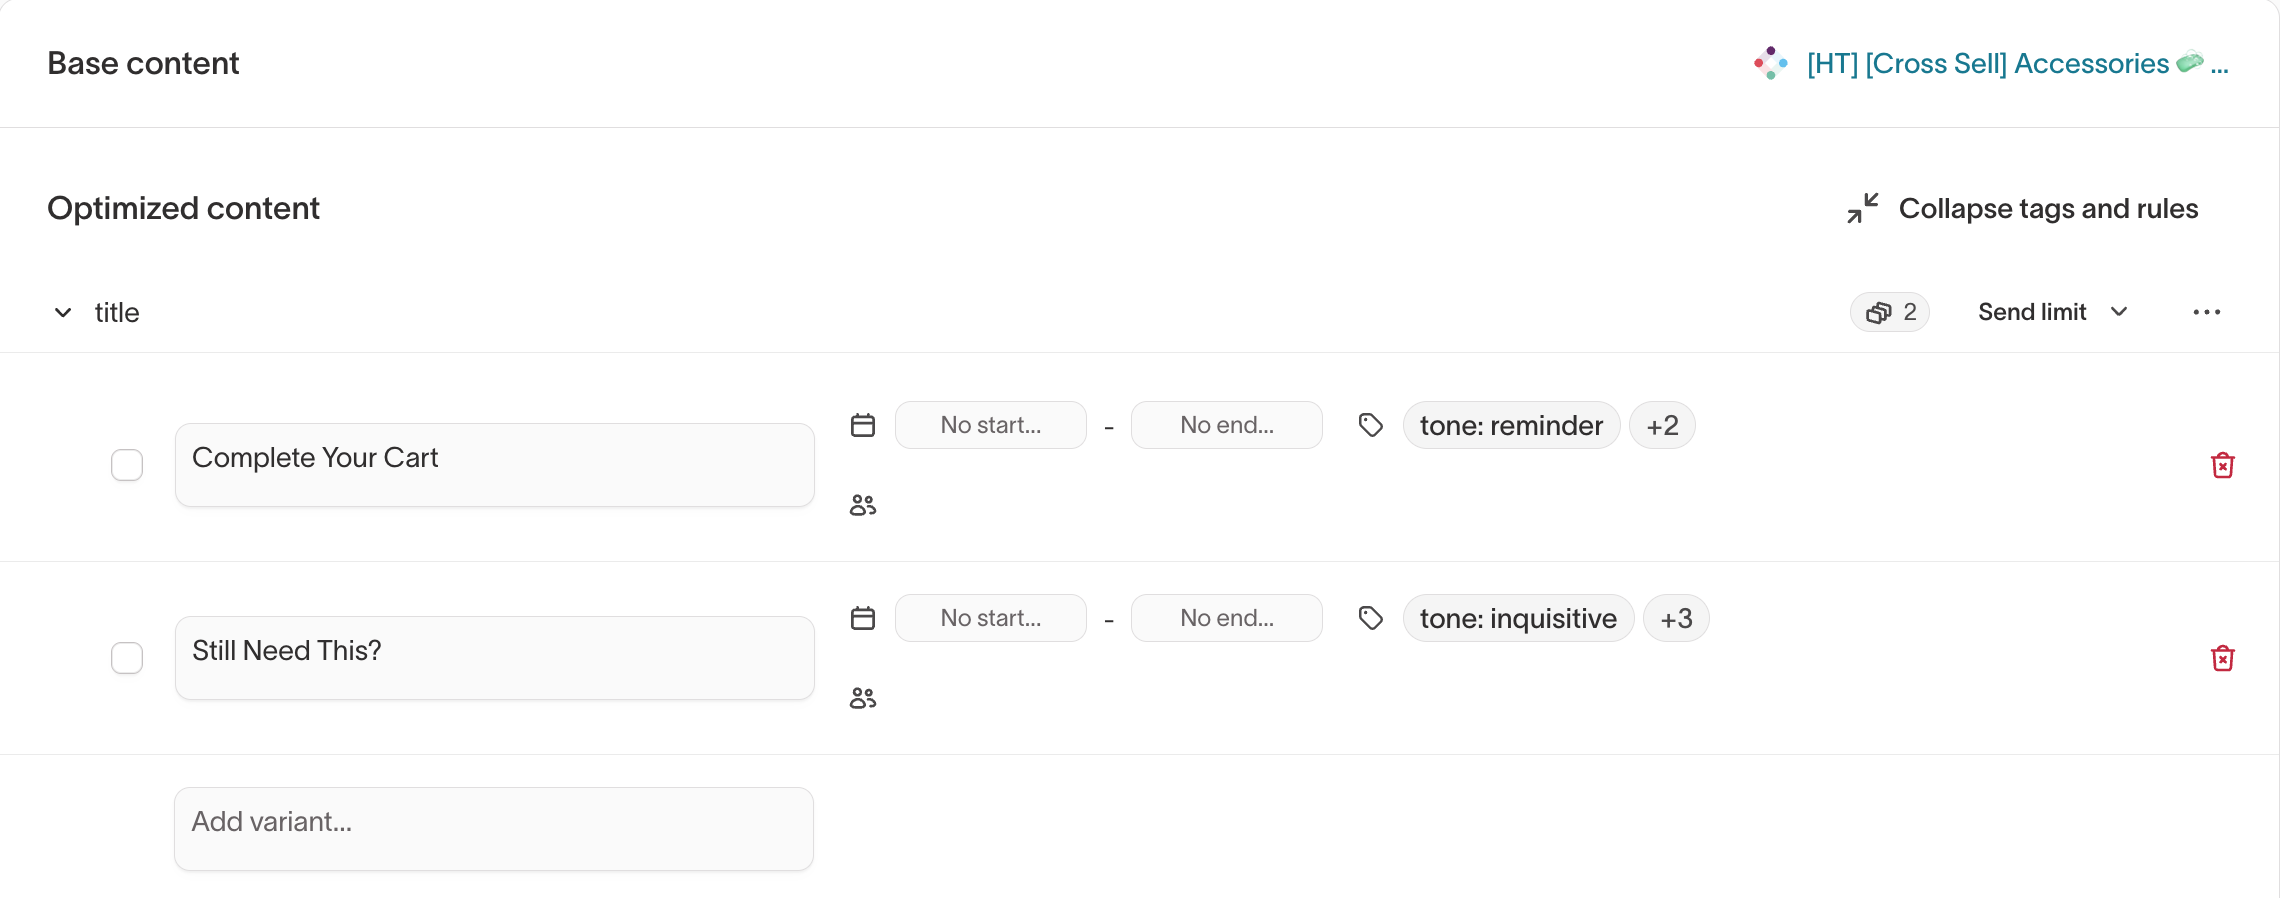
Variants
A variant is one version of an optimized content type (for example, a subject line option).
Variants are the individual options that agents compare and learn from over time.
Variants differ from traditional A/B tests:
- Traffic allocation adapts over time
- There is no fixed test window
- No manual winner selection is required
Add and manage variants
Variants are added inside an individual message, in the Content tab.
- Open an agent and go to the
Messagestab. - Select a message.
- Open the
Contenttab. - Expand an optimized content type (for example,
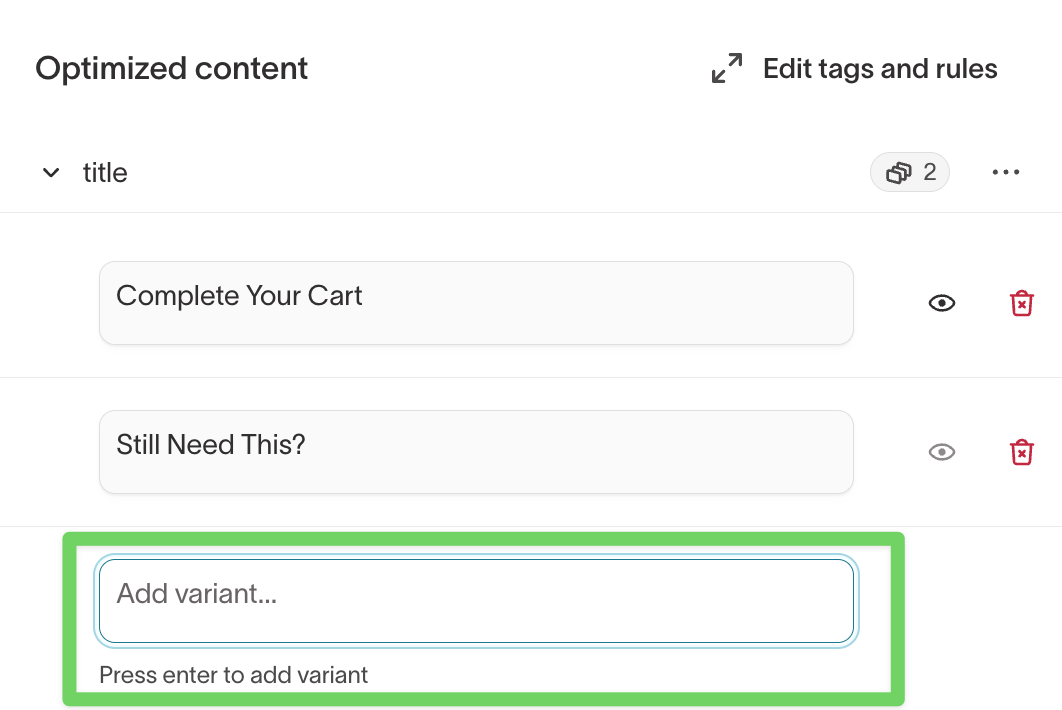
Subject). - Click
Add variant. - Enter the variant content.
You can add multiple variants to the same optimized content type.
Start with a small number of clear variants that differ meaningfully in tone, framing, or offer.
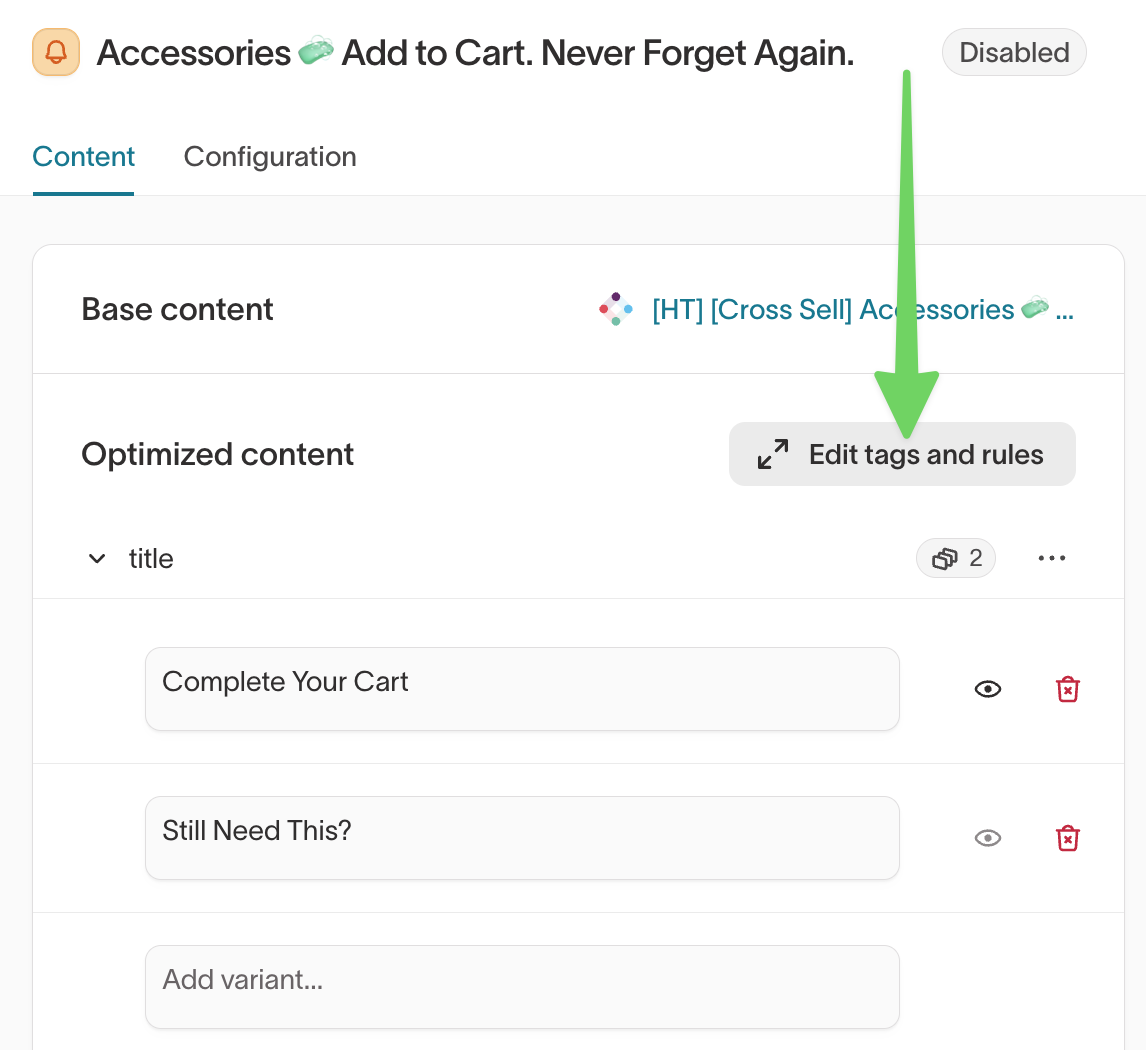
Variant-level controls
Each variant includes controls that determine when it is eligible to send.
To manage variant-level settings, open a message and go to the Content tab. Under Optimized content, click Edit tags and rules.
From here, you can add or update:
- Tags
- Audience rules
- Date rules
- Send limits
Audience rules
Audience rules limit a variant to specific users.
Examples:
- Show a loyalty-focused subject line only to returning customers
- Restrict a discount variant to lapsed users
Audience rules apply at the variant level, not the message level.

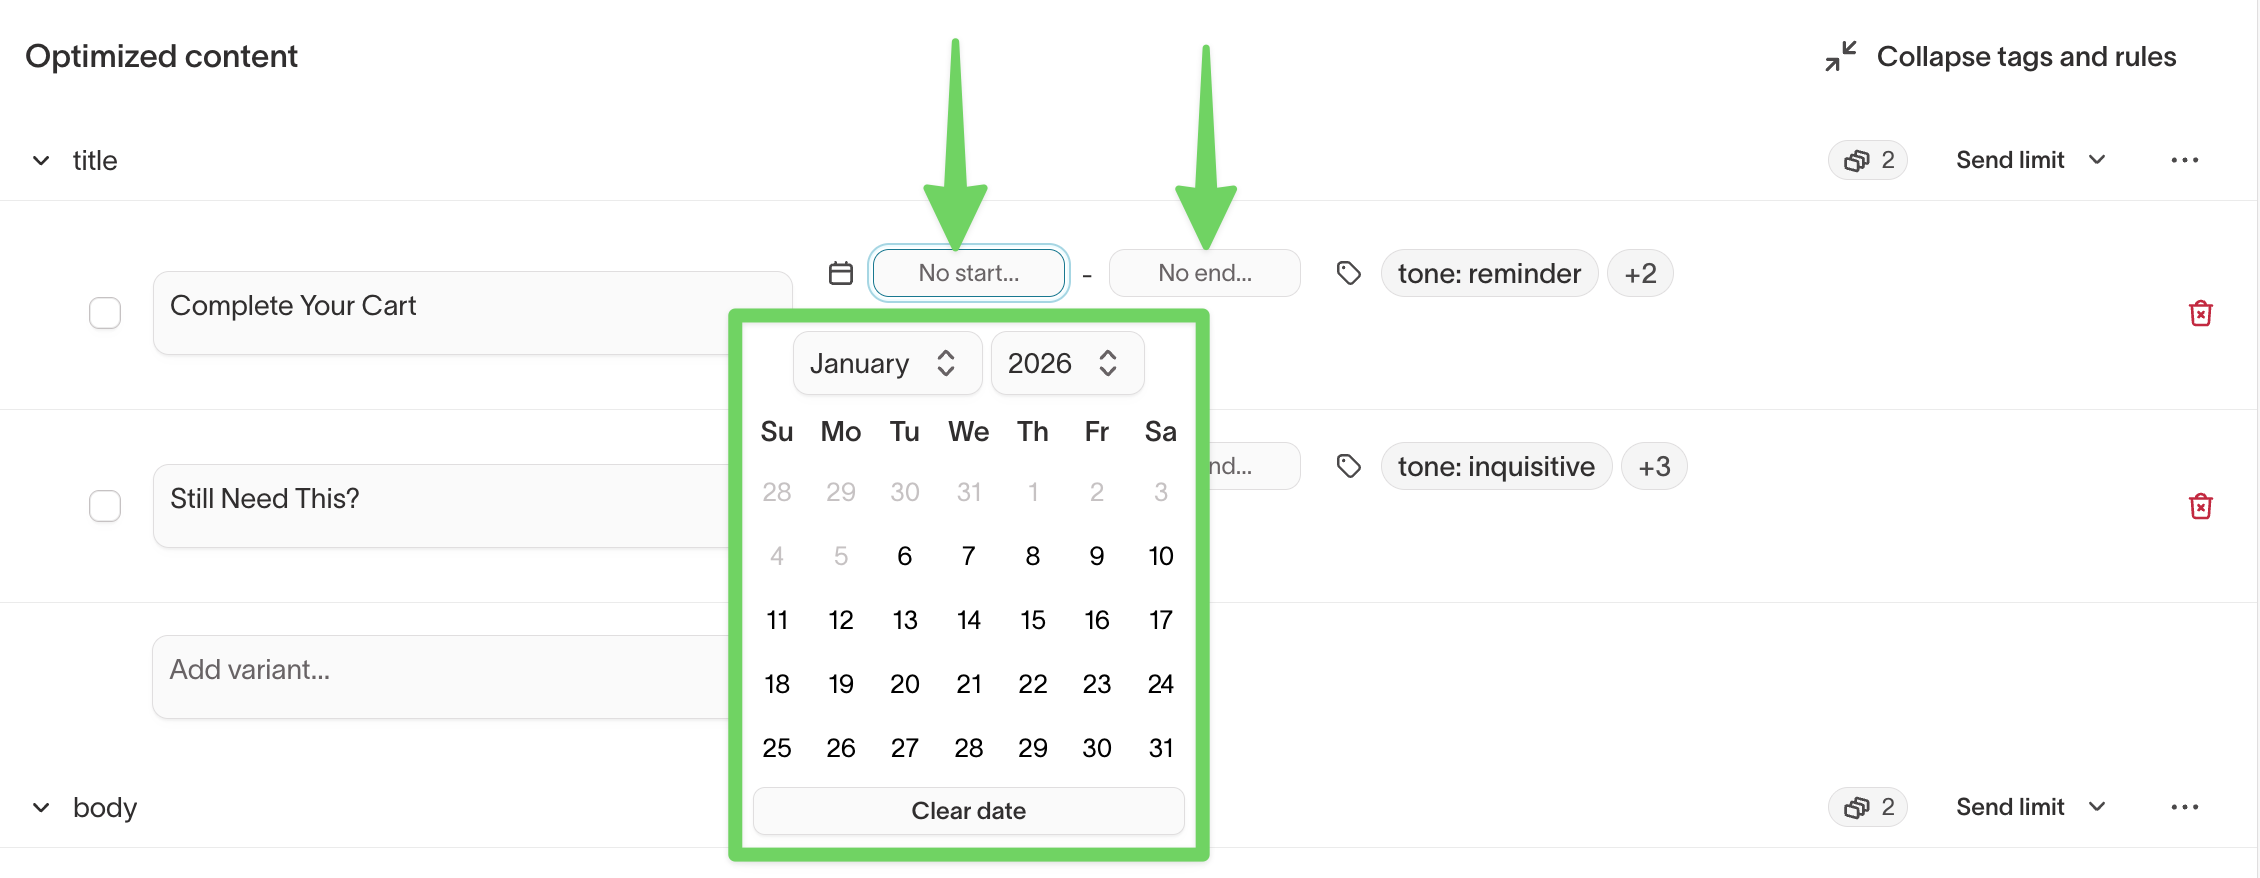
Date rules
Date rules control when a variant is active.
Use date rules to:
- Run seasonal or time-bound messaging
- Automatically retire expired content
- Stage future variants ahead of launch
Expired variants remain visible but are no longer eligible to send.
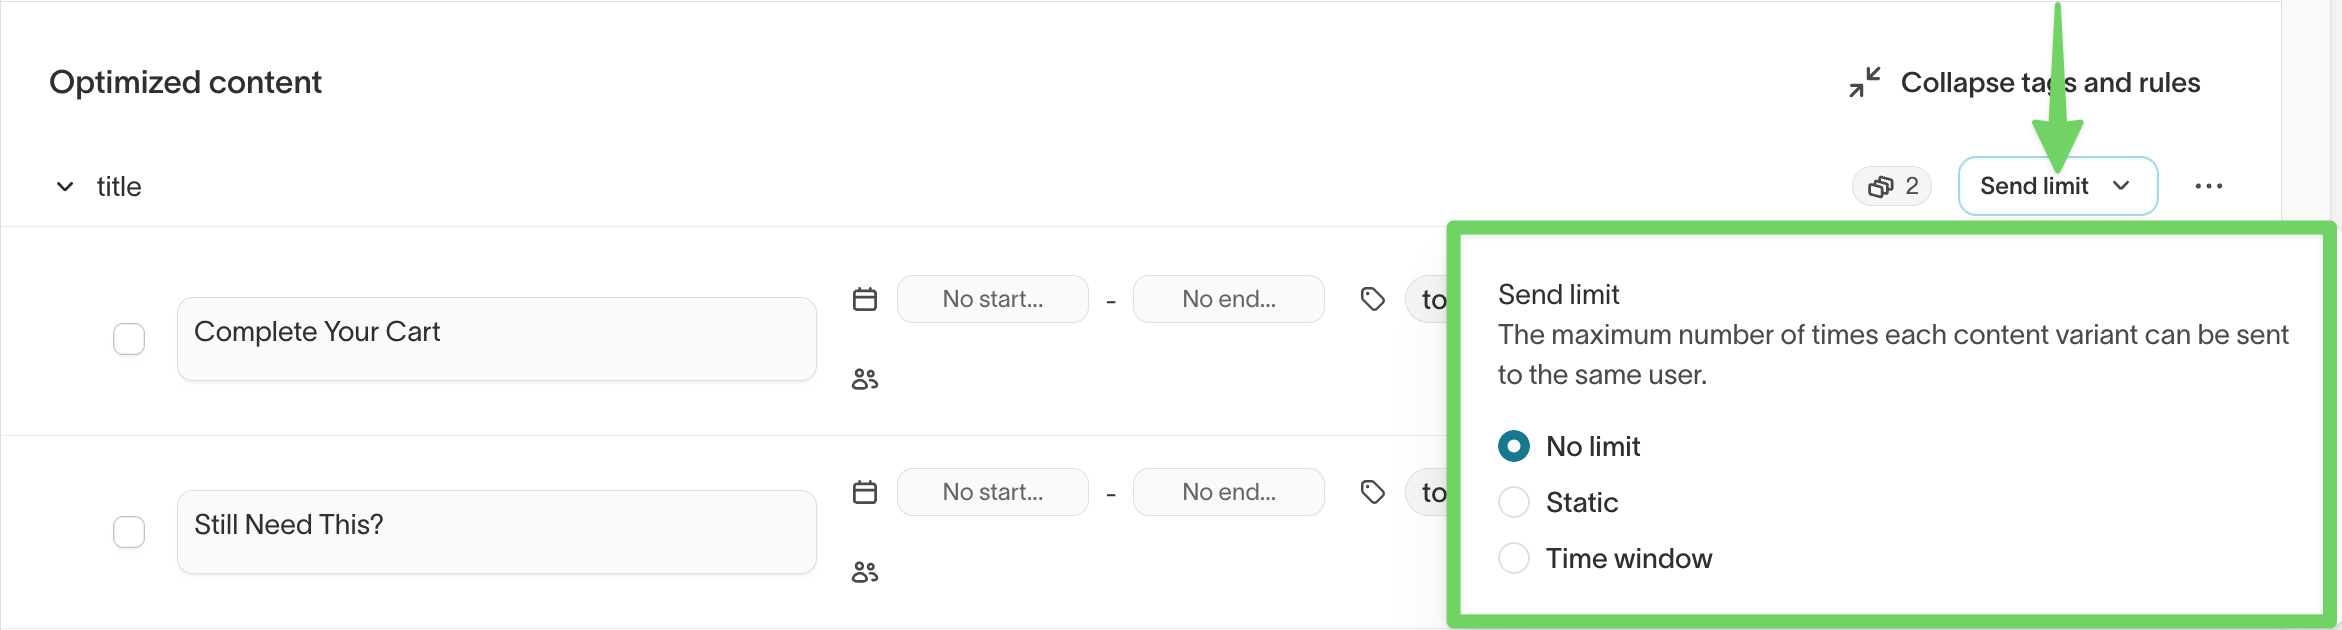
Send limits
Send limits control how often the same variant can be sent to a single user.
Available options include:
- No limit
- Static limit (for example, once per user)
- Time window (for example, once every 30 days)
Send limits apply to variants individually, not to the entire message.
Tags
Tags describe the intent or attributes of a variant, such as:
- Tone (
friendly,urgent) - Offer type (
discount,free gift) - Value proposition (
convenience,exclusivity)
Tags help agents group and analyze content and are used in Content Analysis and Insights.

See Tags → for guidance on tagging strategy.
AI Decisioning only compares variants that are eligible at the time of send. Audience rules, date rules, and send limits determine which variants are considered.
Localize message content
If your agent's localization is enabled, you can translate individual message variants so each user receives content in their own language. You provide the translations — Hightouch doesn't generate them — and AI Decisioning sends the one that matches each user's locale.
Localizing message content requires localization to be enabled first, at the agent level. See Enable localization.
Enable localization on a content type
- Open a message and go to the
Contenttab. - Next to an optimized content type (for example,
subject), select···. - Toggle on
Use localization.
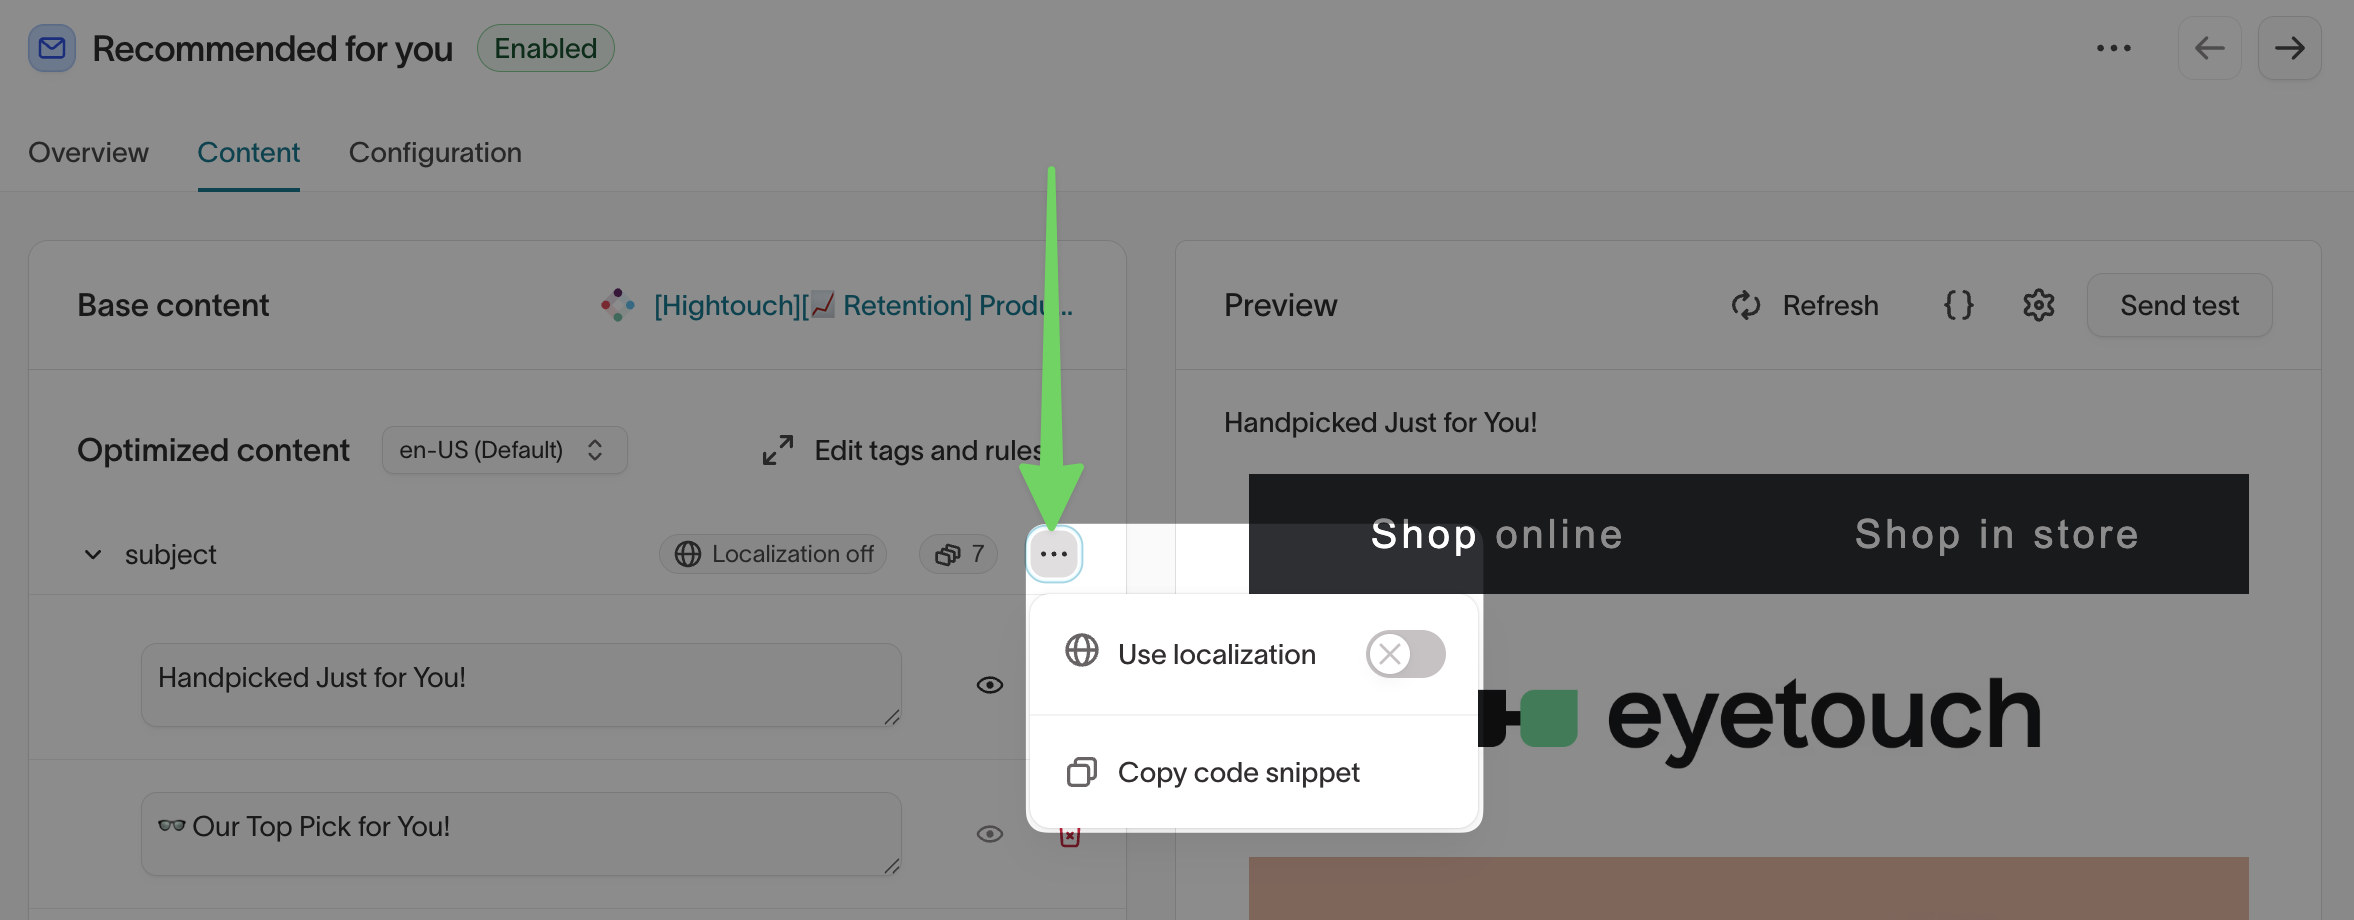
You can mix localized and non-localized content types on the same message. Leave fixed values that don't need translation, such as a promo code or product ID, non-localized.
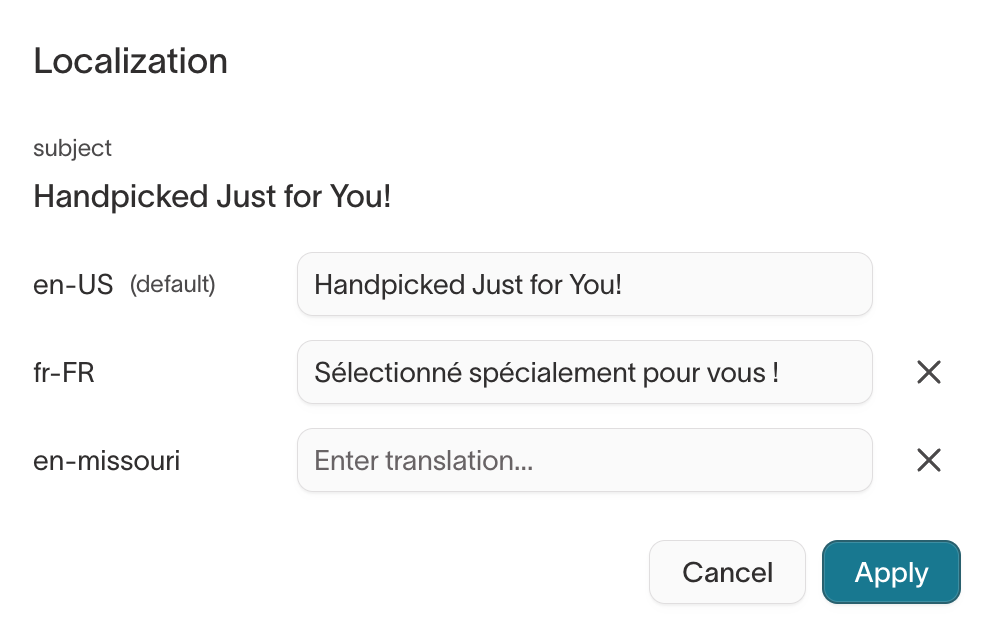
Add translations for each variant
Once localization is on for a content type, add a translation for every configured locale on each variant.
- To translate one variant, select the globe icon next to it to open the Localization dialog, enter a value for each locale, and select
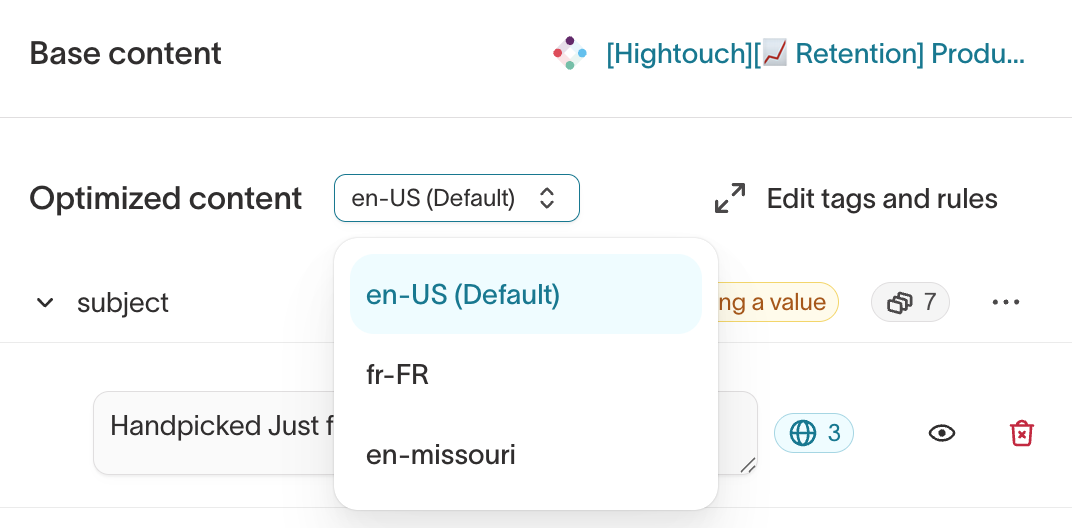
Apply. - To review or edit every variant in one language at a time, use the locale dropdown next to Optimized content to switch the table to that language.
Use CSV bulk-edit to add translations for many variants at once instead of editing them one by one.
Check translation status
Each localized content type shows a badge summarizing whether its variants are fully translated, and each variant shows its own badge — hover it to see which locales still need a value.
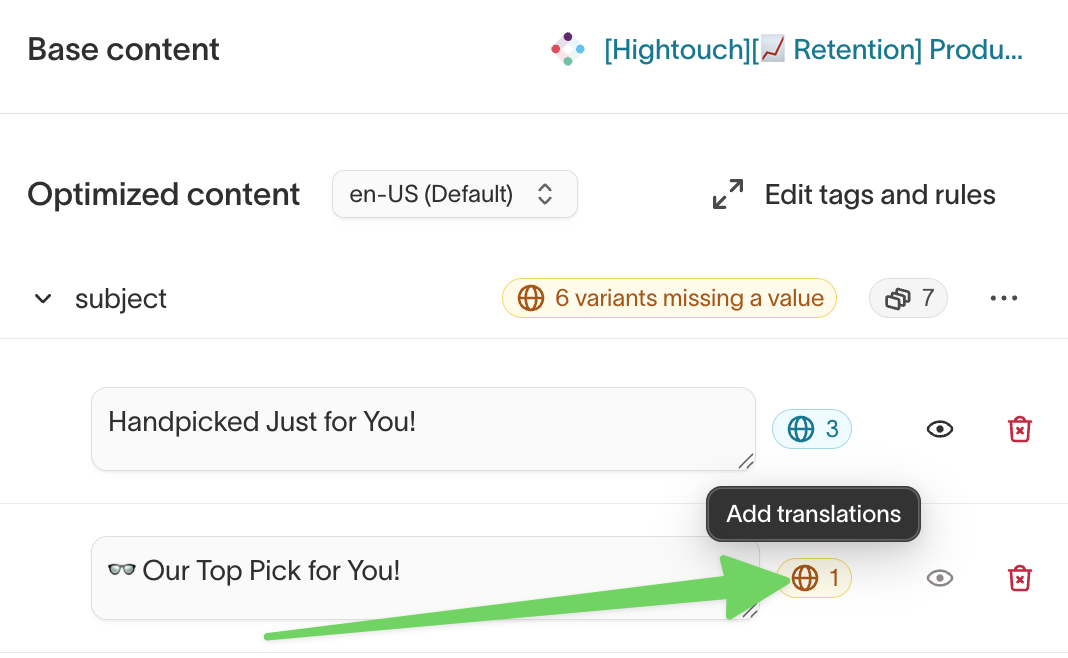
A Localization incomplete banner also appears at the top of the message until every localized variant has a translation for every locale.
Bulk-edit translations with CSV
Translations use the same CSV upload workflow as other message content. When localization is enabled, the CSV includes one column per configured locale, and the import review step shows a per-language diff for each row before you save.
Test translations before launch
Use Send a test on a message and select a sample user and a locale. The preview reflects exactly what AI Decisioning sends, so you can confirm each translation independently before launch.
Manage messages at scale
AI Decisioning supports two bulk workflows for managing messages:
- CSV upload for content and metadata updates
- Bulk actions for applying message guardrails
Use CSV upload for structured content changes and bulk actions for delivery controls.
Bulk upload and export messages (CSV)
Use bulk CSV upload to add or update messages in an agent at scale. This workflow is best for structured, repeatable updates that are easier to manage in a spreadsheet.
What you can manage with CSV upload
Using a CSV file, you can:
- Add new messages to an agent
- Update existing messages
- Add or modify:
- Message content
- Variables and variable options
- Message- and variant-level tags
- Translations for localized content types — the CSV includes one column per configured locale
What CSV upload does not support
CSV upload does not support message guardrails, including:
- Eligibility filters
- Send limits
- Campaign attribution
Apply these settings in the product UI using bulk actions.
Upload messages with CSV
- Go to
AI Decisioning → Agentsand select an agent. - Open the
Messagestab. - Click
Add messages, then selectBulk upload with CSV. - Download the provided CSV template.
- Edit the template with your updates.
- Upload the completed CSV to apply changes.
You must use the provided CSV template. Uploads will fail if required columns are missing or renamed.

Apply message guardrails in bulk
Use bulk actions to apply message-level guardrails to multiple messages at once.
Supported bulk guardrails
You can apply:
- Eligibility filters
- Send limits
- Campaign attribution values
Apply guardrails in bulk
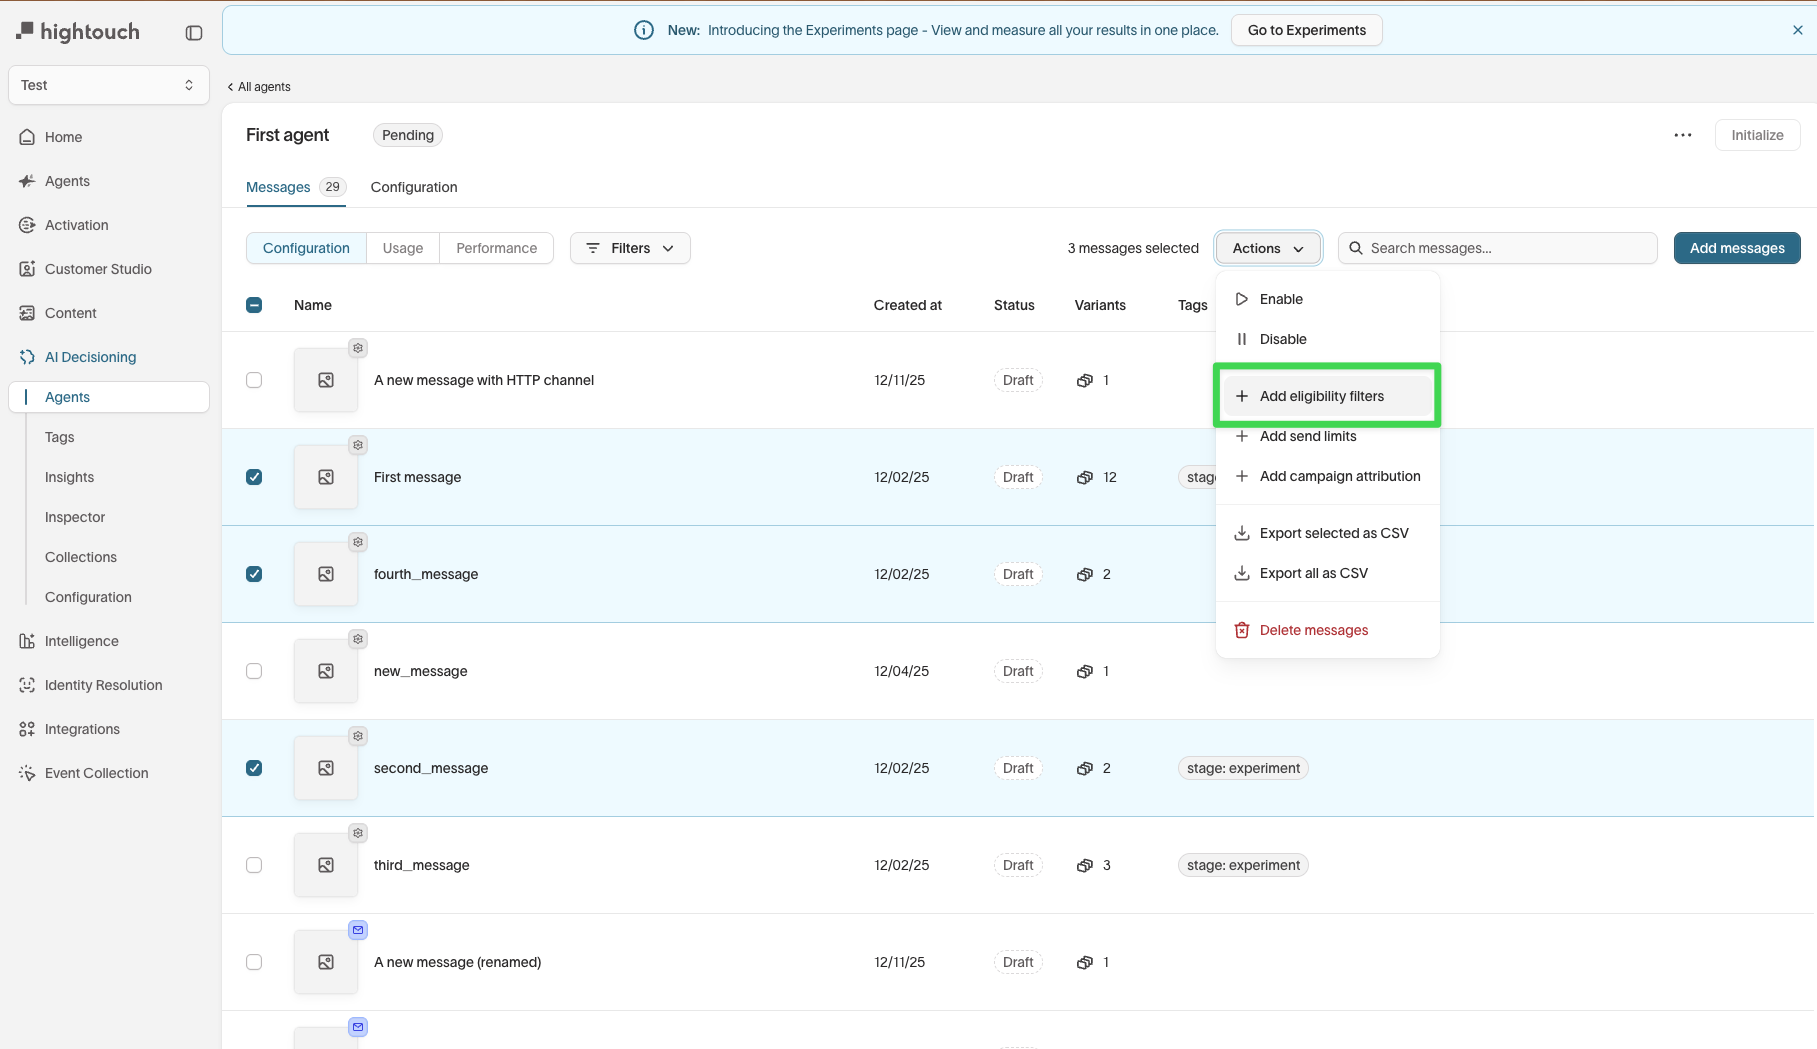
- Go to
AI Decisioning → Agentsand select an agent. - Open the
Messagestab. - Select one or more messages.
- Click
Actions. - Choose one of the following:
Add eligibility filtersAdd send limitsAdd campaign attribution
- Configure the settings and apply them.
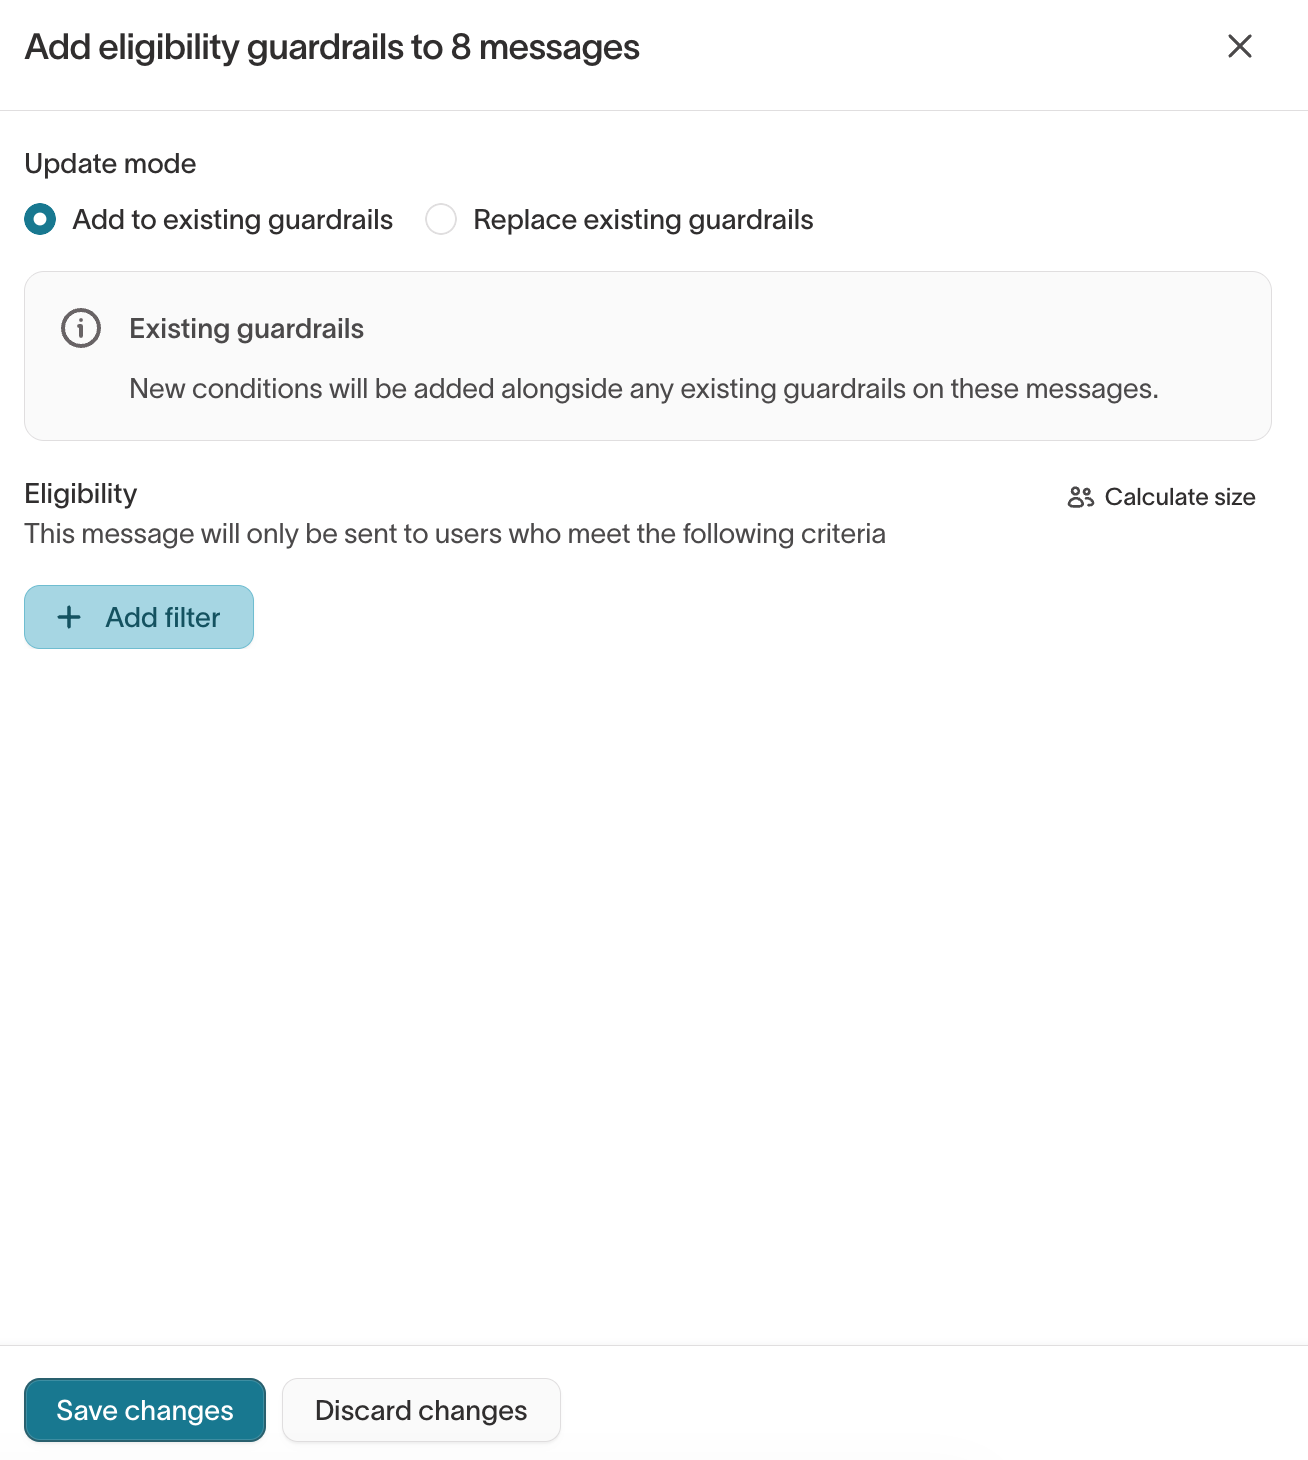
When applying eligibility filters in bulk, the Update mode setting controls how the new filters interact with existing values:
- Add to existing guardrails — new conditions are added alongside any existing guardrails on each selected message. Existing values are preserved.
- Replace existing guardrails — overwrites existing guardrail settings on each selected message with the new values.
Bulk actions update message configuration only. They do not change message content, variants, or tags.
Message configuration
The Configuration tab contains message-level settings that control tagging, offer attribution, collections, and advanced delivery guardrails. It also displays the goals inherited from the parent agent.
To access these settings, open an agent, go to the Messages tab, select a message, and open the Configuration tab.
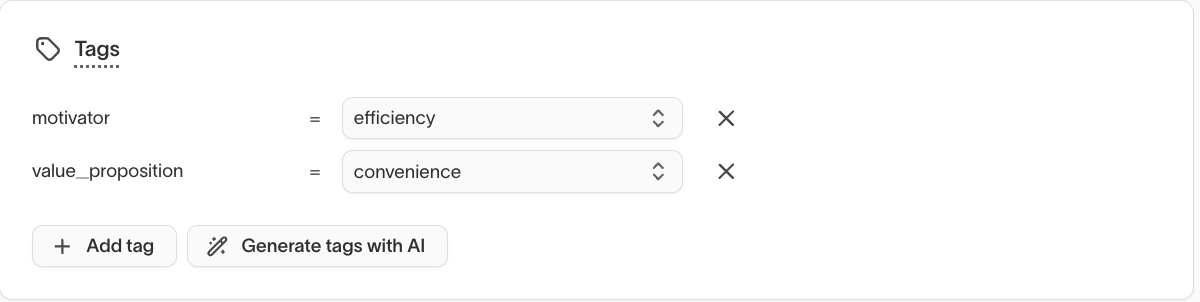
Tags
Tags are key-value pairs that describe a message's intent or attributes, such as motivator = efficiency or value_proposition = convenience.
Tags can be added manually or generated automatically using the Generate tags with AI button, which analyzes the message content and suggests relevant tags.
Message-level tags apply to the message as a whole and are separate from variant-level tags. Both are used in Content Analysis and Insights.
See Tags → for guidance on tagging strategy.
Offers
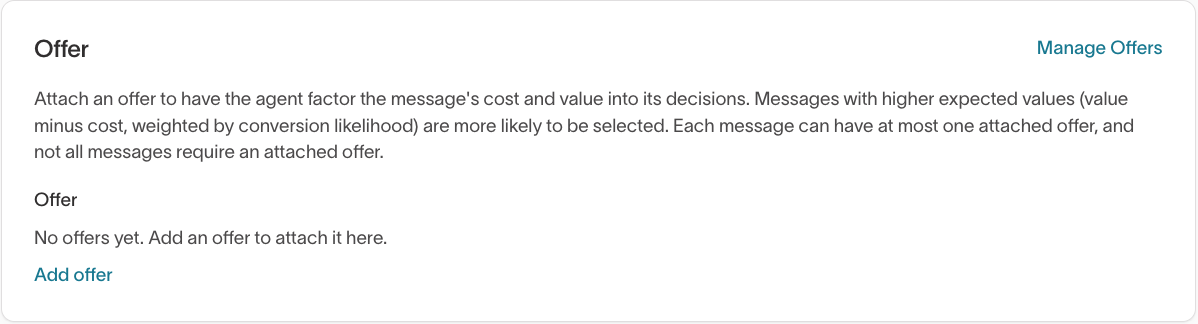
Attach an offer to have the agent factor the message's cost and value into its decisions. Messages with higher expected values (value minus cost, weighted by conversion likelihood) are more likely to be selected. Each message can have at most one attached offer, and not all messages require one.
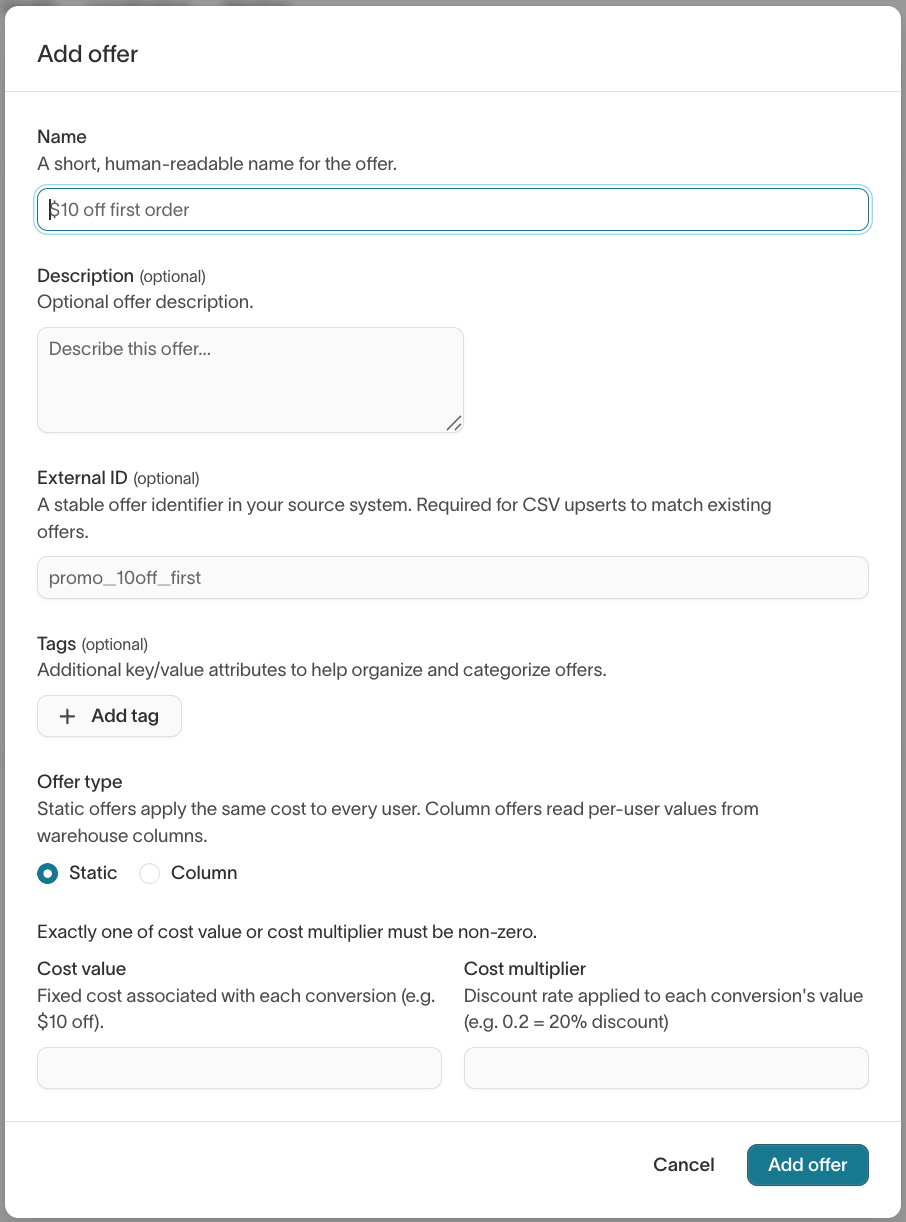
To attach an offer, click Add offer in the Offer section and configure the following:
- Name: A short, human-readable name (for example,
$10 off first order). - Description (optional): Additional context about the offer.
- External ID (optional): A stable identifier in your source system. Required for CSV upserts to match existing offers.
- Tags (optional): Key-value attributes to help organize and categorize offers.
- Offer type: Static offers apply the same cost to every user. Column offers read per-user values from warehouse columns.
- Cost value: A fixed cost associated with each conversion (for example, $10 off).
- Cost multiplier: A discount rate applied to each conversion's value (for example,
0.2= 20% discount).
Exactly one of cost value or cost multiplier must be non-zero.
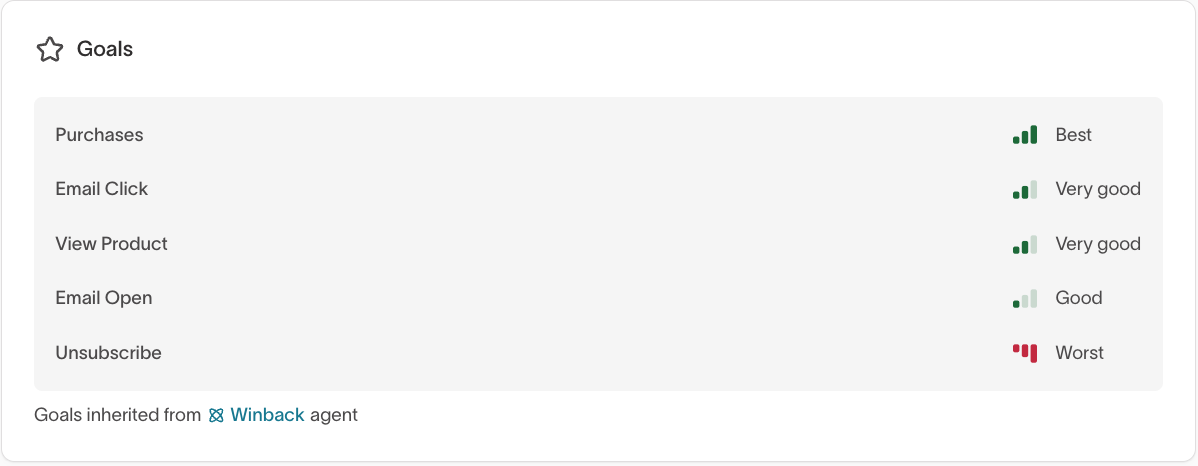
Goals
The Goals section displays the goals inherited from the parent agent, along with a performance rating for each goal (for example, Best, Very good, Good, Worst). These ratings reflect how well the message contributes to each goal relative to other messages in the agent.
Goals are configured at the agent level and cannot be edited from the message Configuration tab. See Agents → for details on goal configuration.
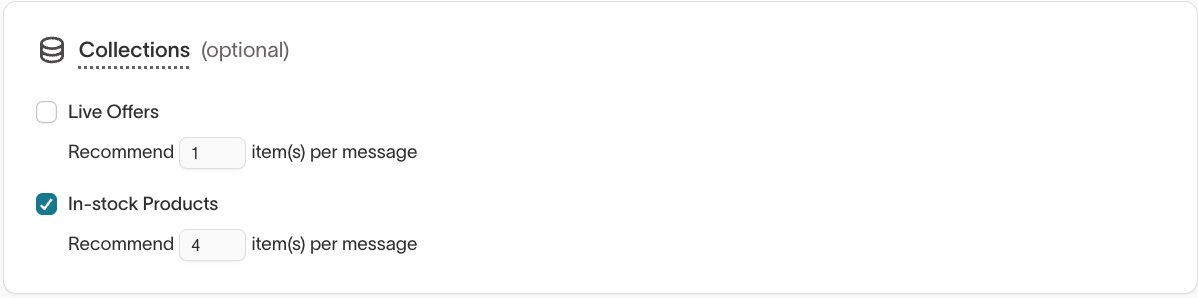
Collections
Collections let you attach item recommendations to a message. For example, you can include product recommendations from a "In-stock Products" collection alongside the message content.
To configure collections, select one or more available collections and set how many items to recommend per message (for example, Recommend 4 item(s) per message).
Collections are optional. See Collections → for details.
Advanced settings
The Advanced section contains delivery guardrails that control how, when, and to whom a message is sent. Expand the Advanced section to access these settings.
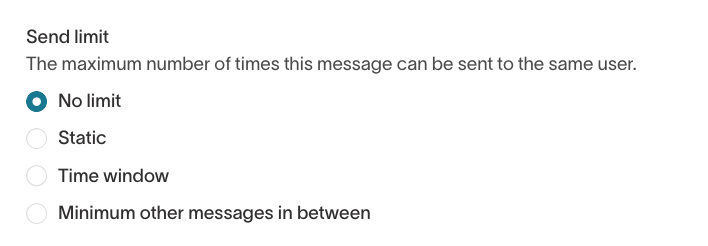
Send limits
Send limits control the maximum number of times a message can be sent to the same user.
Available options include:
- No limit: The message can be sent without restriction.
- Static: A fixed cap (for example, send at most 3 times per user).
- Time window: A rolling limit (for example, once every 30 days).
- Minimum other messages in between: Requires a set number of other messages to be sent before this message can be sent again.
Message-level send limits apply to all variants of the message. They are separate from variant-level send limits, which apply to individual variants.
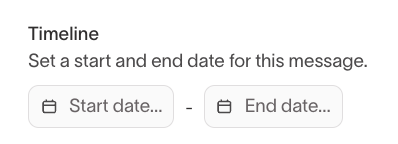
Timeline
Set a start and end date for a message. Use timeline settings to stage messages ahead of a launch or automatically stop a message after a campaign ends.
If no dates are set, the message is eligible to send as long as it is enabled.
Delivery windows
Delivery windows let you restrict when a message can be sent by specifying allowed days and time slots. This gives you direct control over message timing without relying on complex channel or schedule configurations.
To set a delivery window:
- Toggle on Delivery windows.
- Select the days and time blocks during which the message is allowed to send.
Time blocks that are not selected are blocked, meaning the agent will not send the message during those windows.
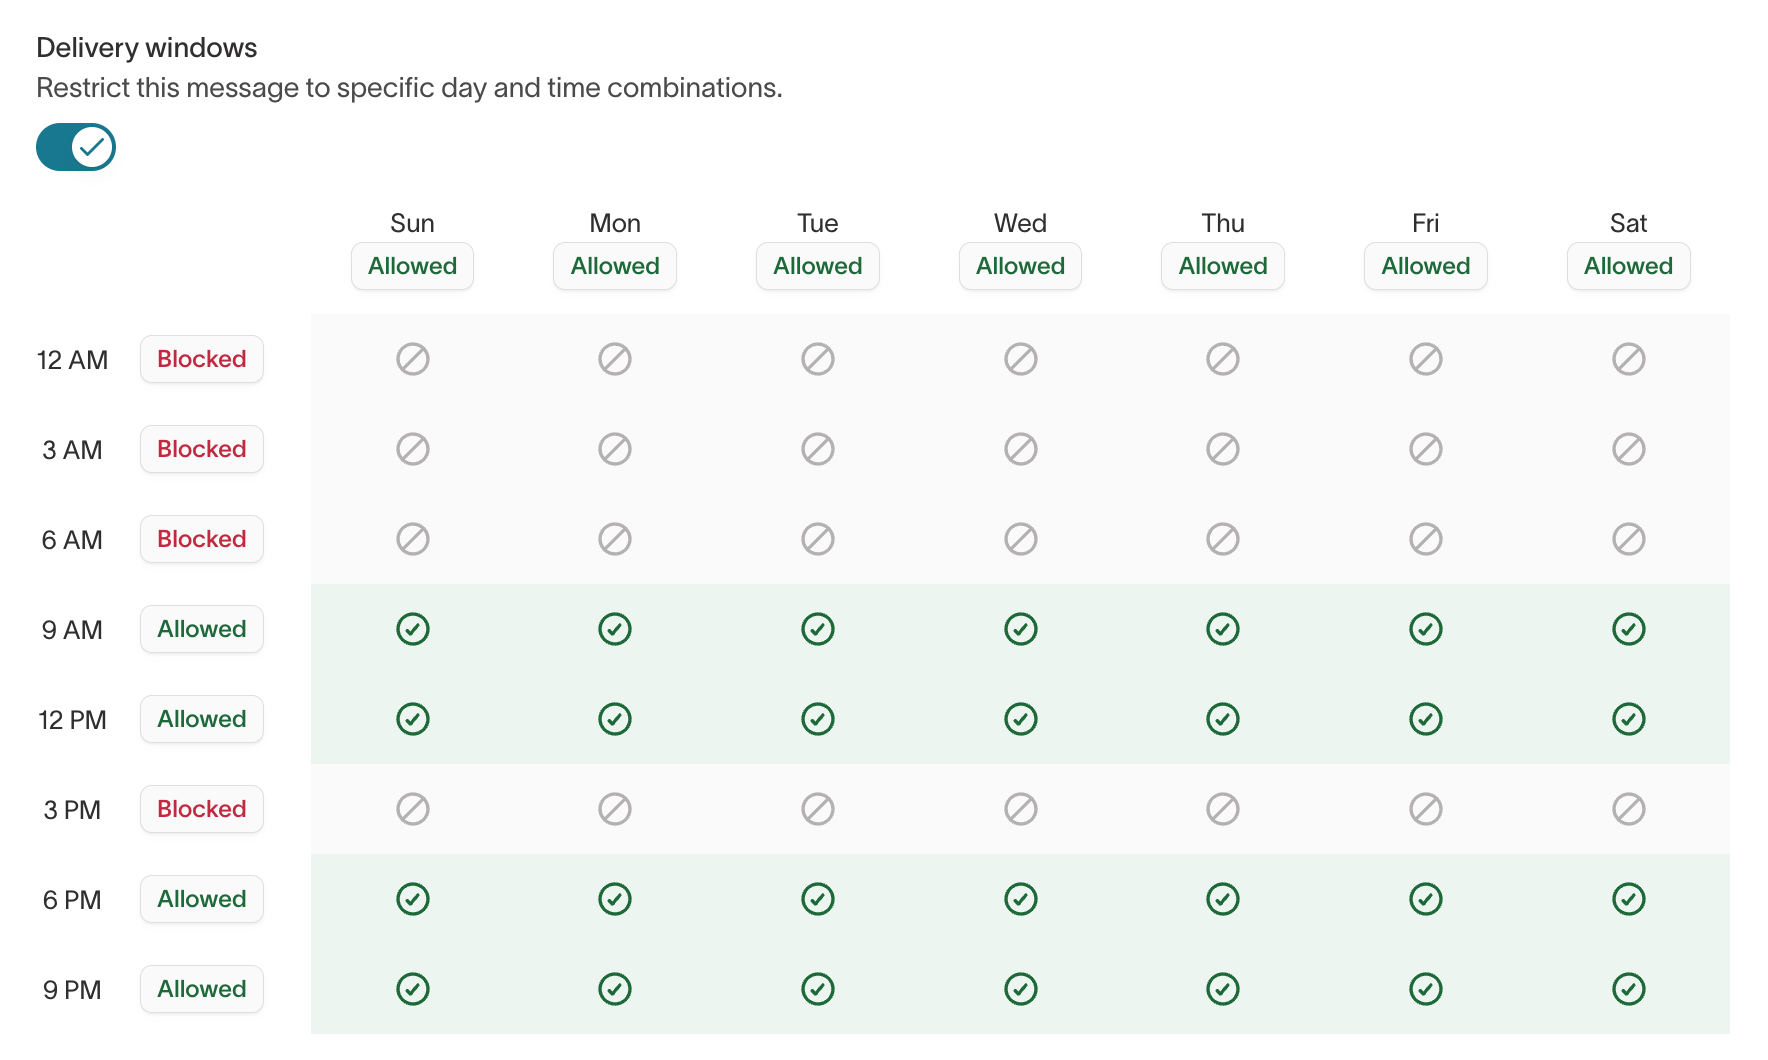
Use delivery windows to send promotional emails only during morning hours or restrict campaigns to specific days, such as midweek-only sends.
Eligibility
Eligibility filters control which users can receive the message. The base eligibility filter is inherited from the agent and cannot be edited at the message level. You can add additional filters to further restrict the audience.
Click Calculate size to estimate how many users match the current eligibility criteria.

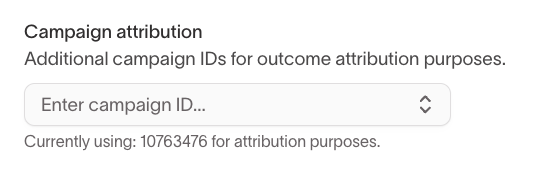
Campaign attribution
Add additional campaign IDs for outcome attribution purposes. This lets you associate message performance with specific campaigns in your destination, even if the message is used across multiple campaigns.
For a step-by-step checklist to verify all Configuration tab settings before launch, see the QA guide →.
How Messages connect to Content Analysis
As your agent runs, message and variant data feeds into Content analysis and suggestions, where you can:
- Review content similarity before launch
- Identify overlapping or redundant variants
- Understand which themes or tones perform best
- Decide when to add, refresh, or retire content
See Content analysis and suggestions → for guidance.