| Audience | Marketers, business users |
| Prerequisites |
|
Agents are the foundation of AI Decisioning. Each agent defines who to target, what to optimize for, and when messages can be sent.
What you'll learn
After reading this article, you’ll know how to:
- Create a new agent
- Configure your agent
- Understand how agents use messages
- Manage offers to factor cost and value into decisions
- Monitor agent health and pipeline runs
- Set up alerting for agent issues
- Translate content variants across locales
- Monitor and manage active agents
Overview
An Agent in AI Decisioning combines your audience, messages, and goals into a single adaptive campaign.
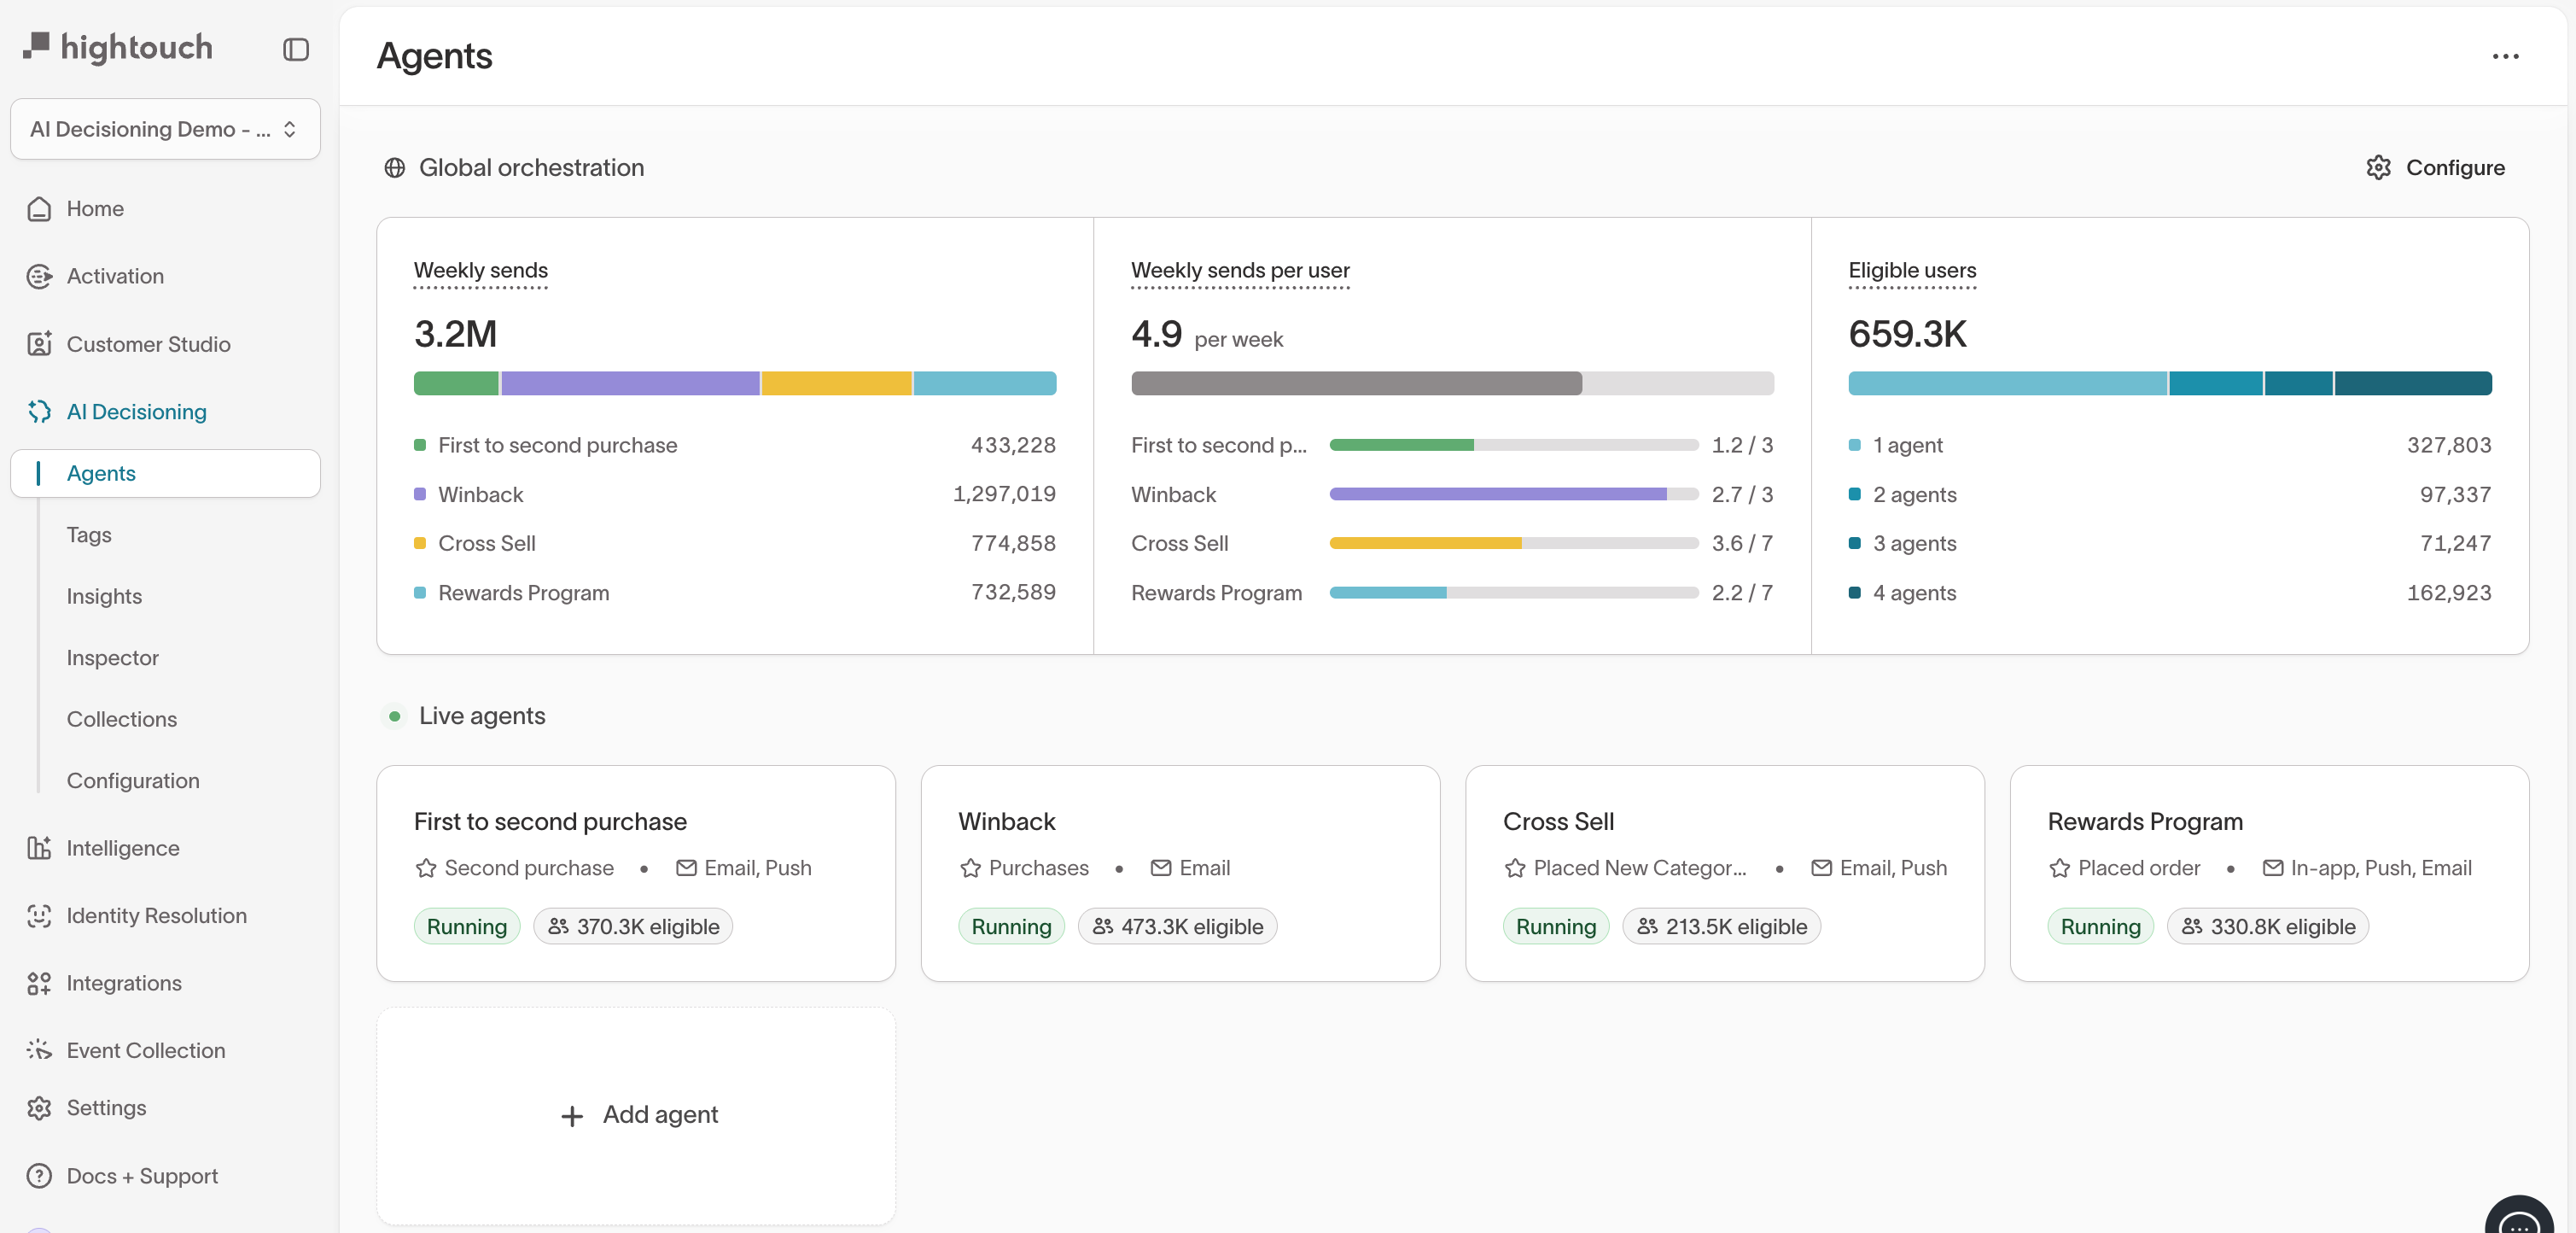
Agents use reinforcement learning to decide which message, timing, and channel will drive the best outcome for each user. They operate continuously, learning from real user outcomes such as clicks, purchases, or sign-ups.
Each new message helps the model understand which creative and timing combinations perform best for different audiences.
Agents don’t replace your content or rules—they learn within the goals, audiences, and guardrails you define.
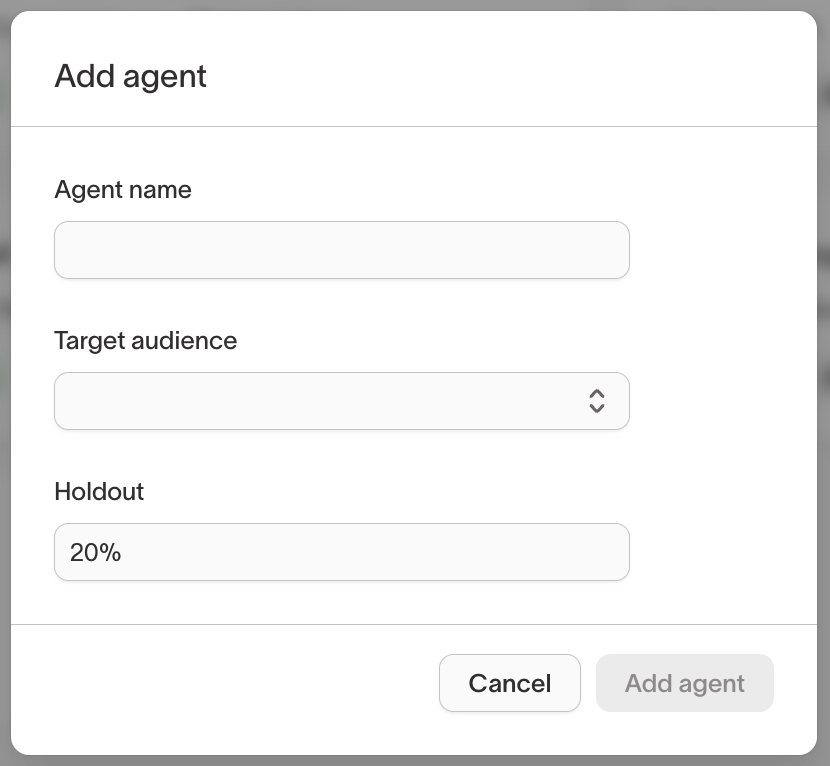
Create a new agent
- Go to
AI Decisioning →Agents. - Click
+ Add agent.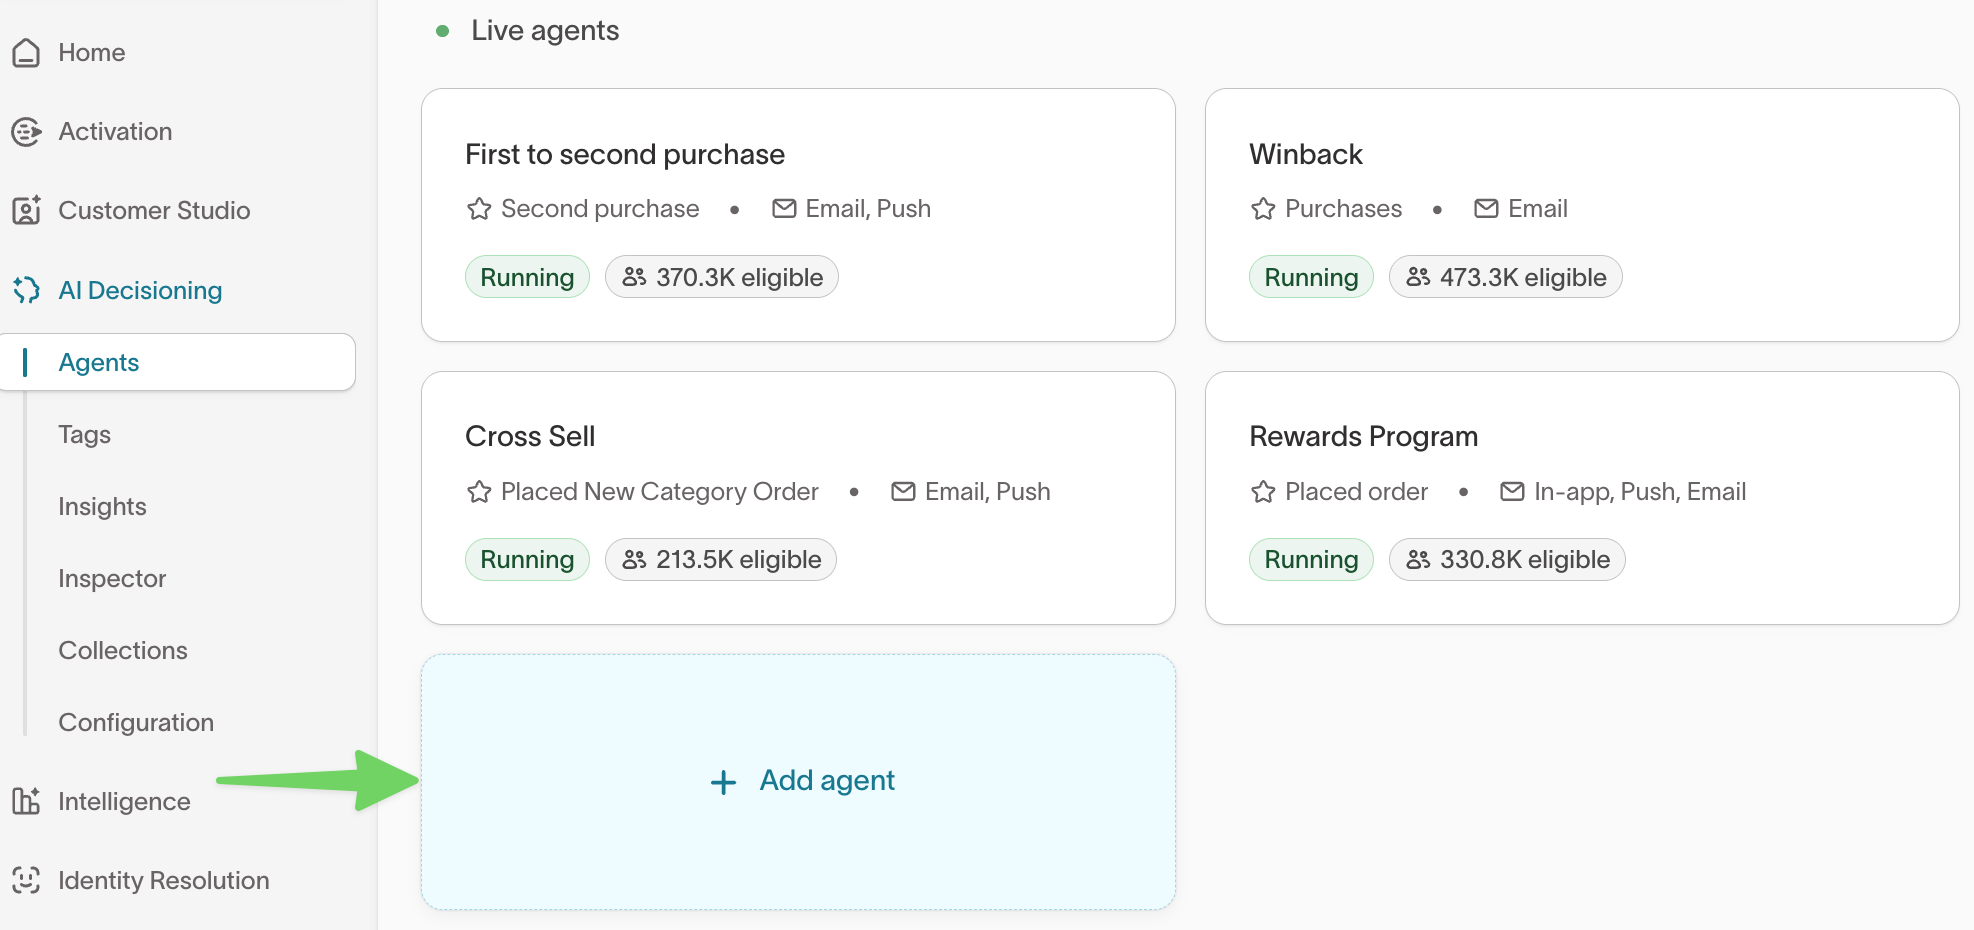
- Enter a name that reflects your campaign’s purpose, such as
Win-back customersorSubscription renewals. - Choose a target audience from Customer Studio → Audiences.
- (Optional) Add a holdout group to measure incremental lift (for example,
20%). - Click
Add agent.
Configure your agent
After creation, click your agent to open the Configuration tab.
From here, you can set audience eligibility, messages, goals, Smart Suppression, and scheduling preferences.
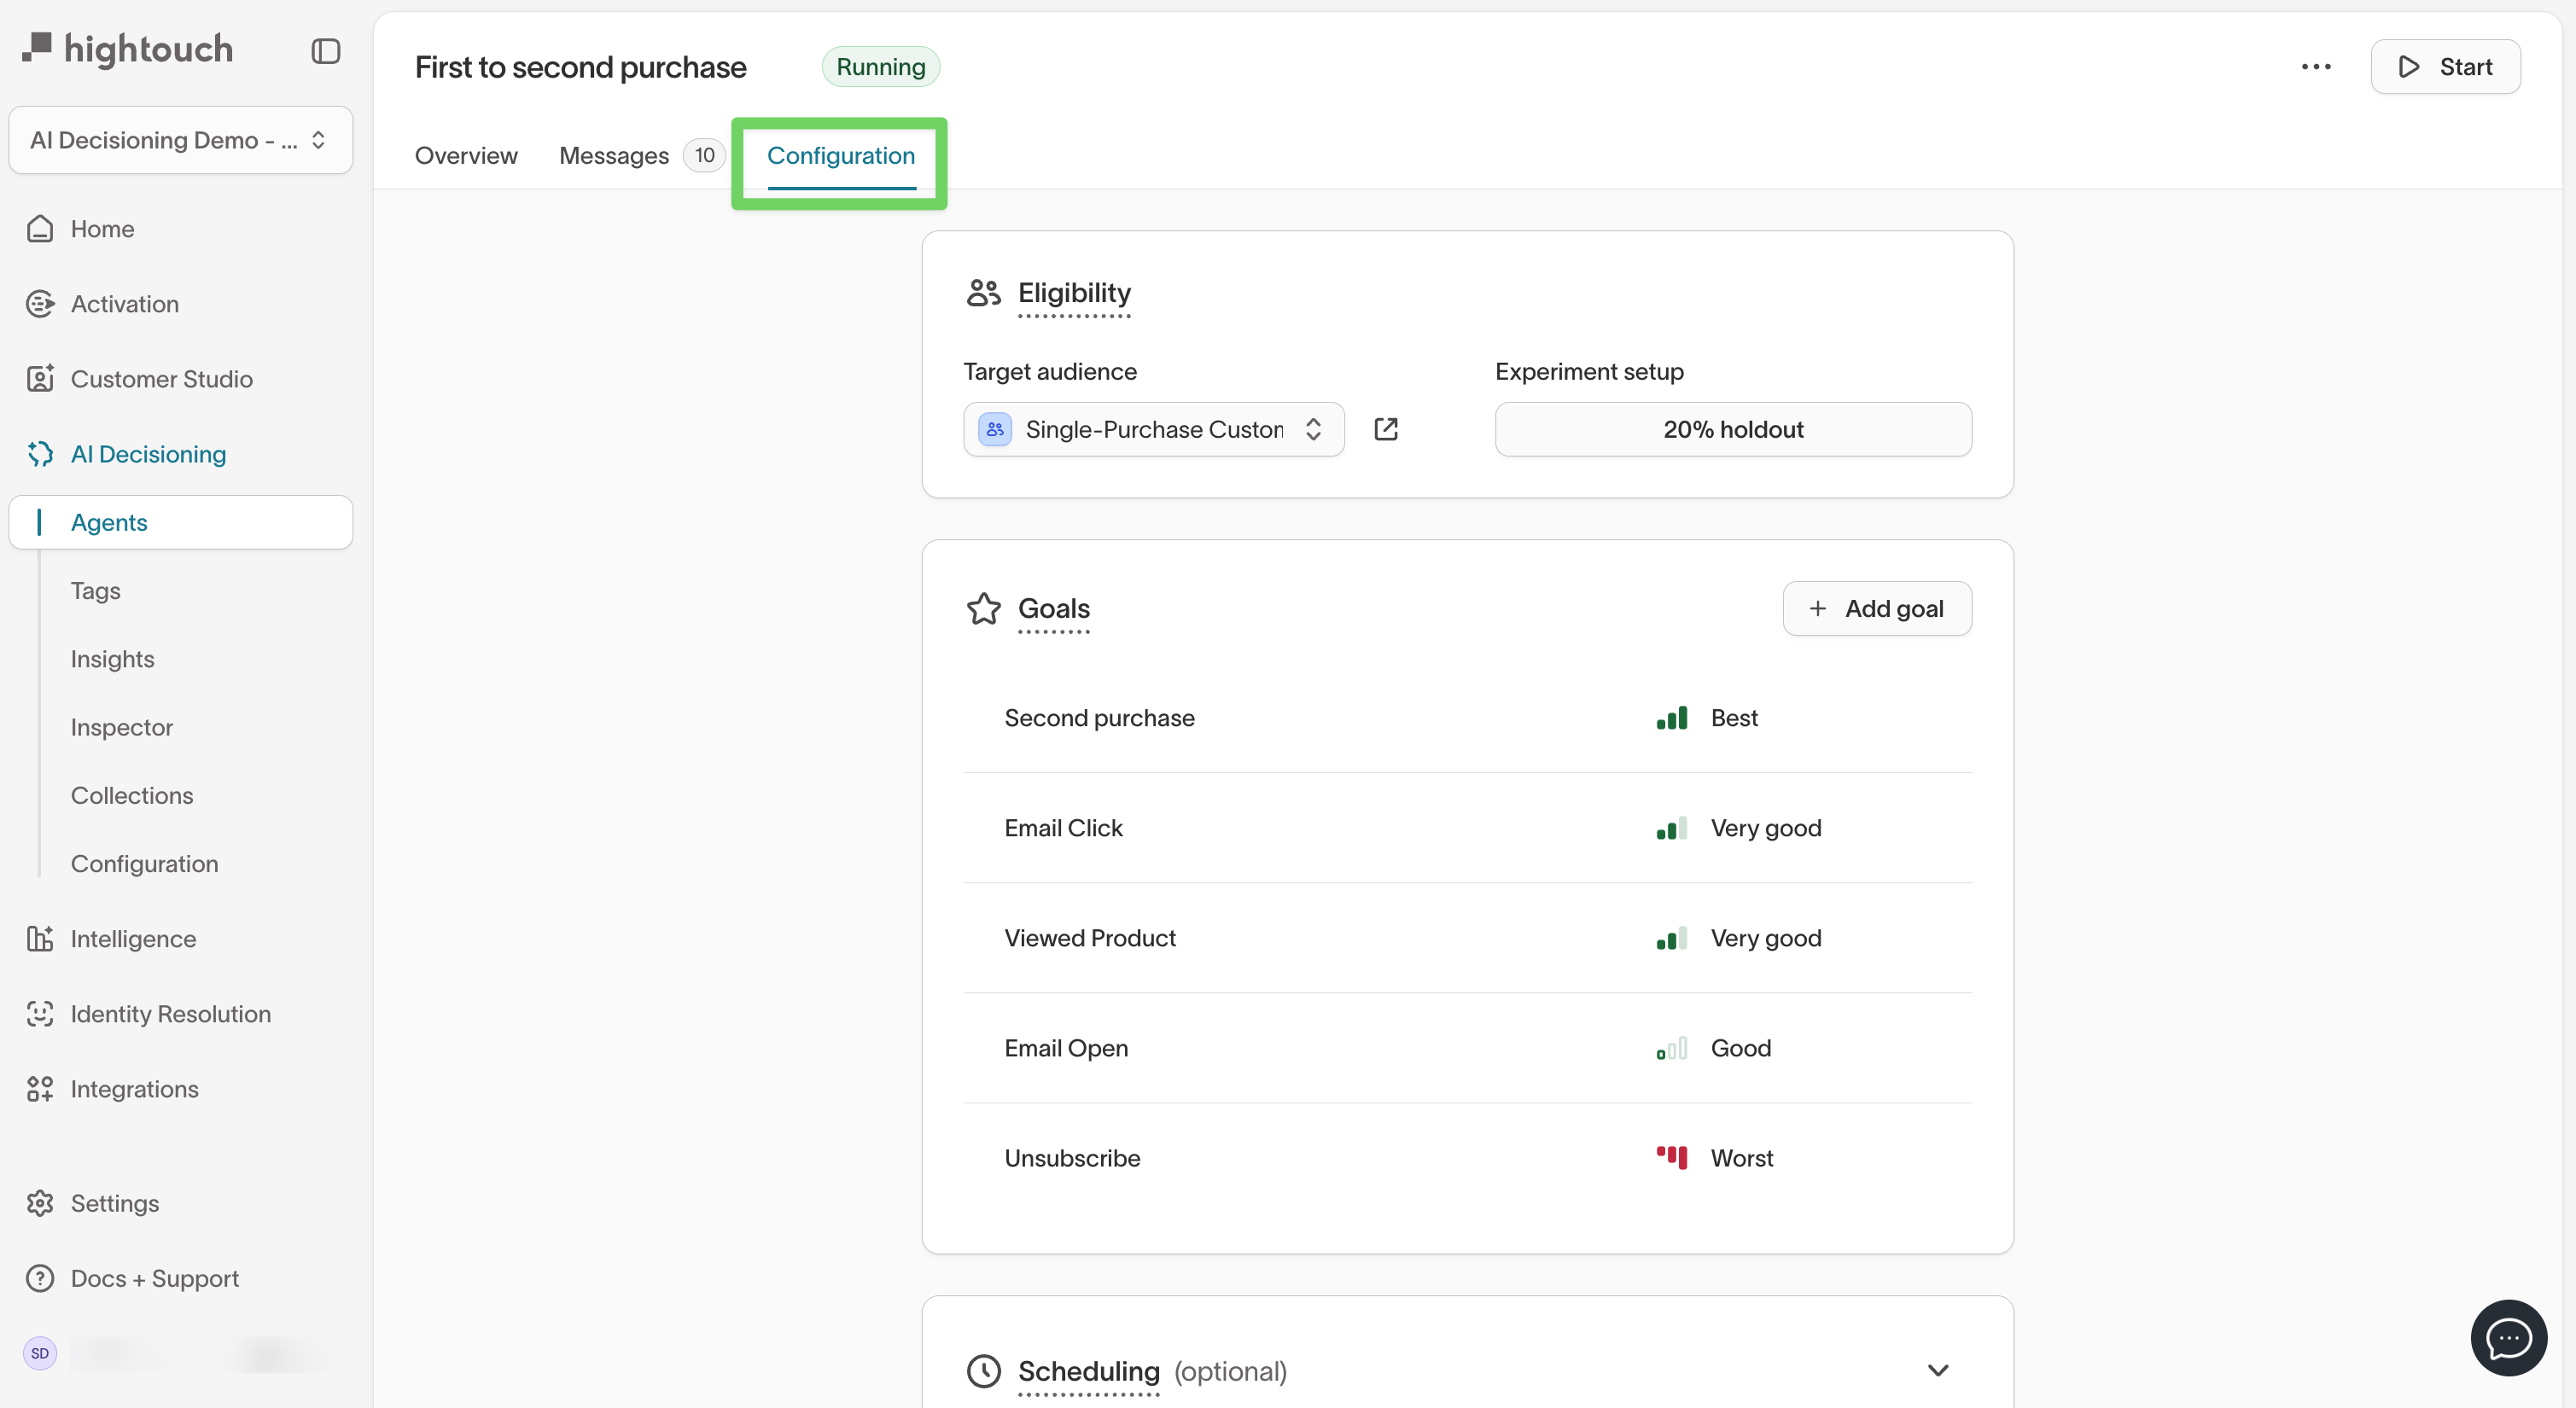
Step 1: Set audience eligibility
This section shows the audience your agent targets and any experimental setup, such as a holdout group.
| Setting | Description |
|---|---|
| Target audience | The audience defined in Customer Studio. |
| Holdout group | The control group used to measure true lift (for example, 20%). |
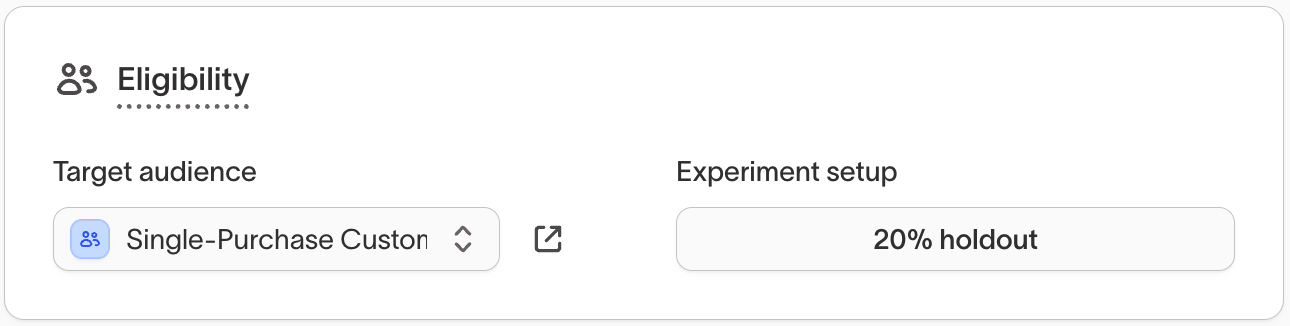
Holdouts let you compare users who receive messages with users who don’t, so you can measure incremental lift.
Step 2: Add and manage goals
Goals define what your agent optimizes toward.
Each goal represents a measurable event (like a purchase or click) and includes a priority level—helping AID decide which outcomes matter most.
To add a goal:
-
In your agent’s
Configurationtab, underGoals, click+ Add goal.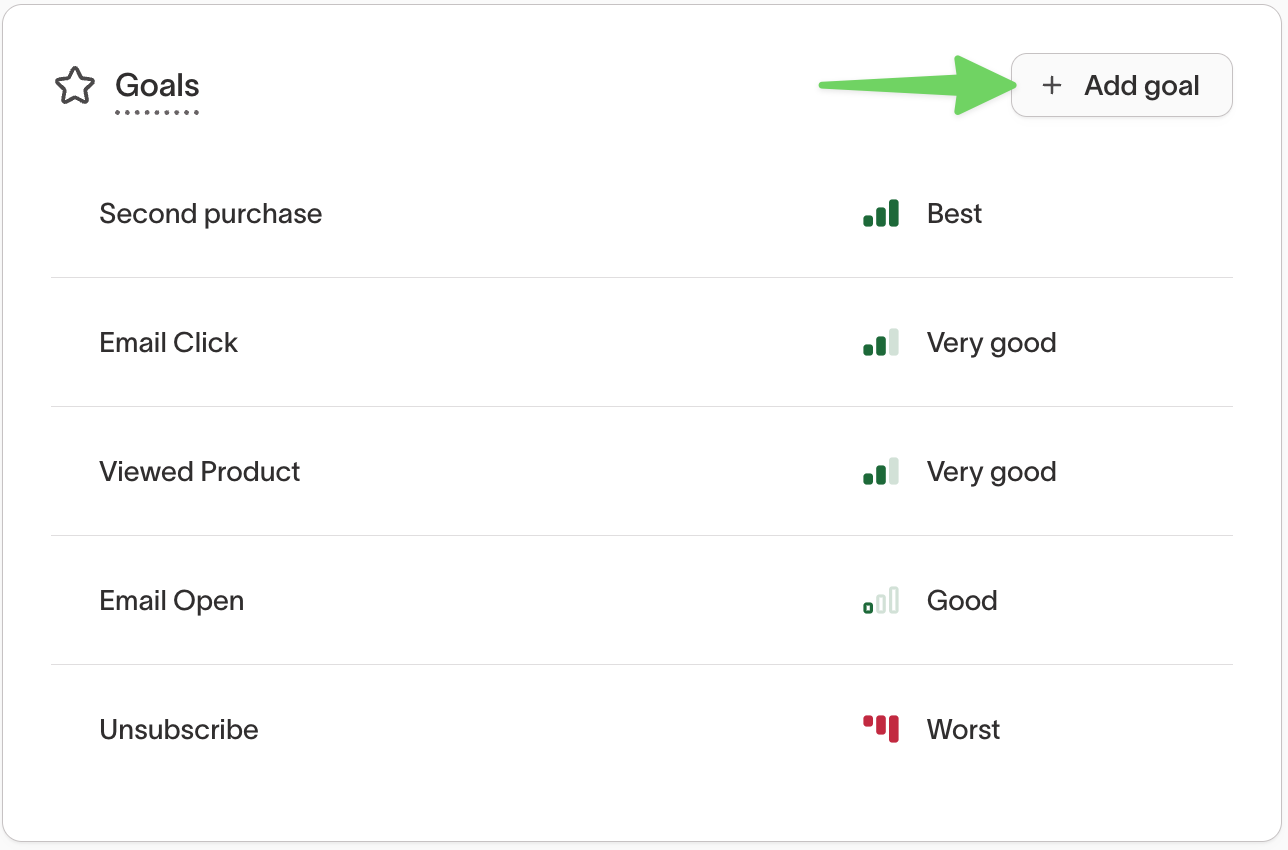
-
Configure the goal.
- Select an event model (for example,
Purchase event,Viewed Product, orRedeemed offer). - (Optional) Add a filter to refine the event, such as
Performed → Where property is campaign = Summer Sale. - (Optional) Select related collections (for example,
Live Offers,In-stock Products) to attribute conversions to catalog items.
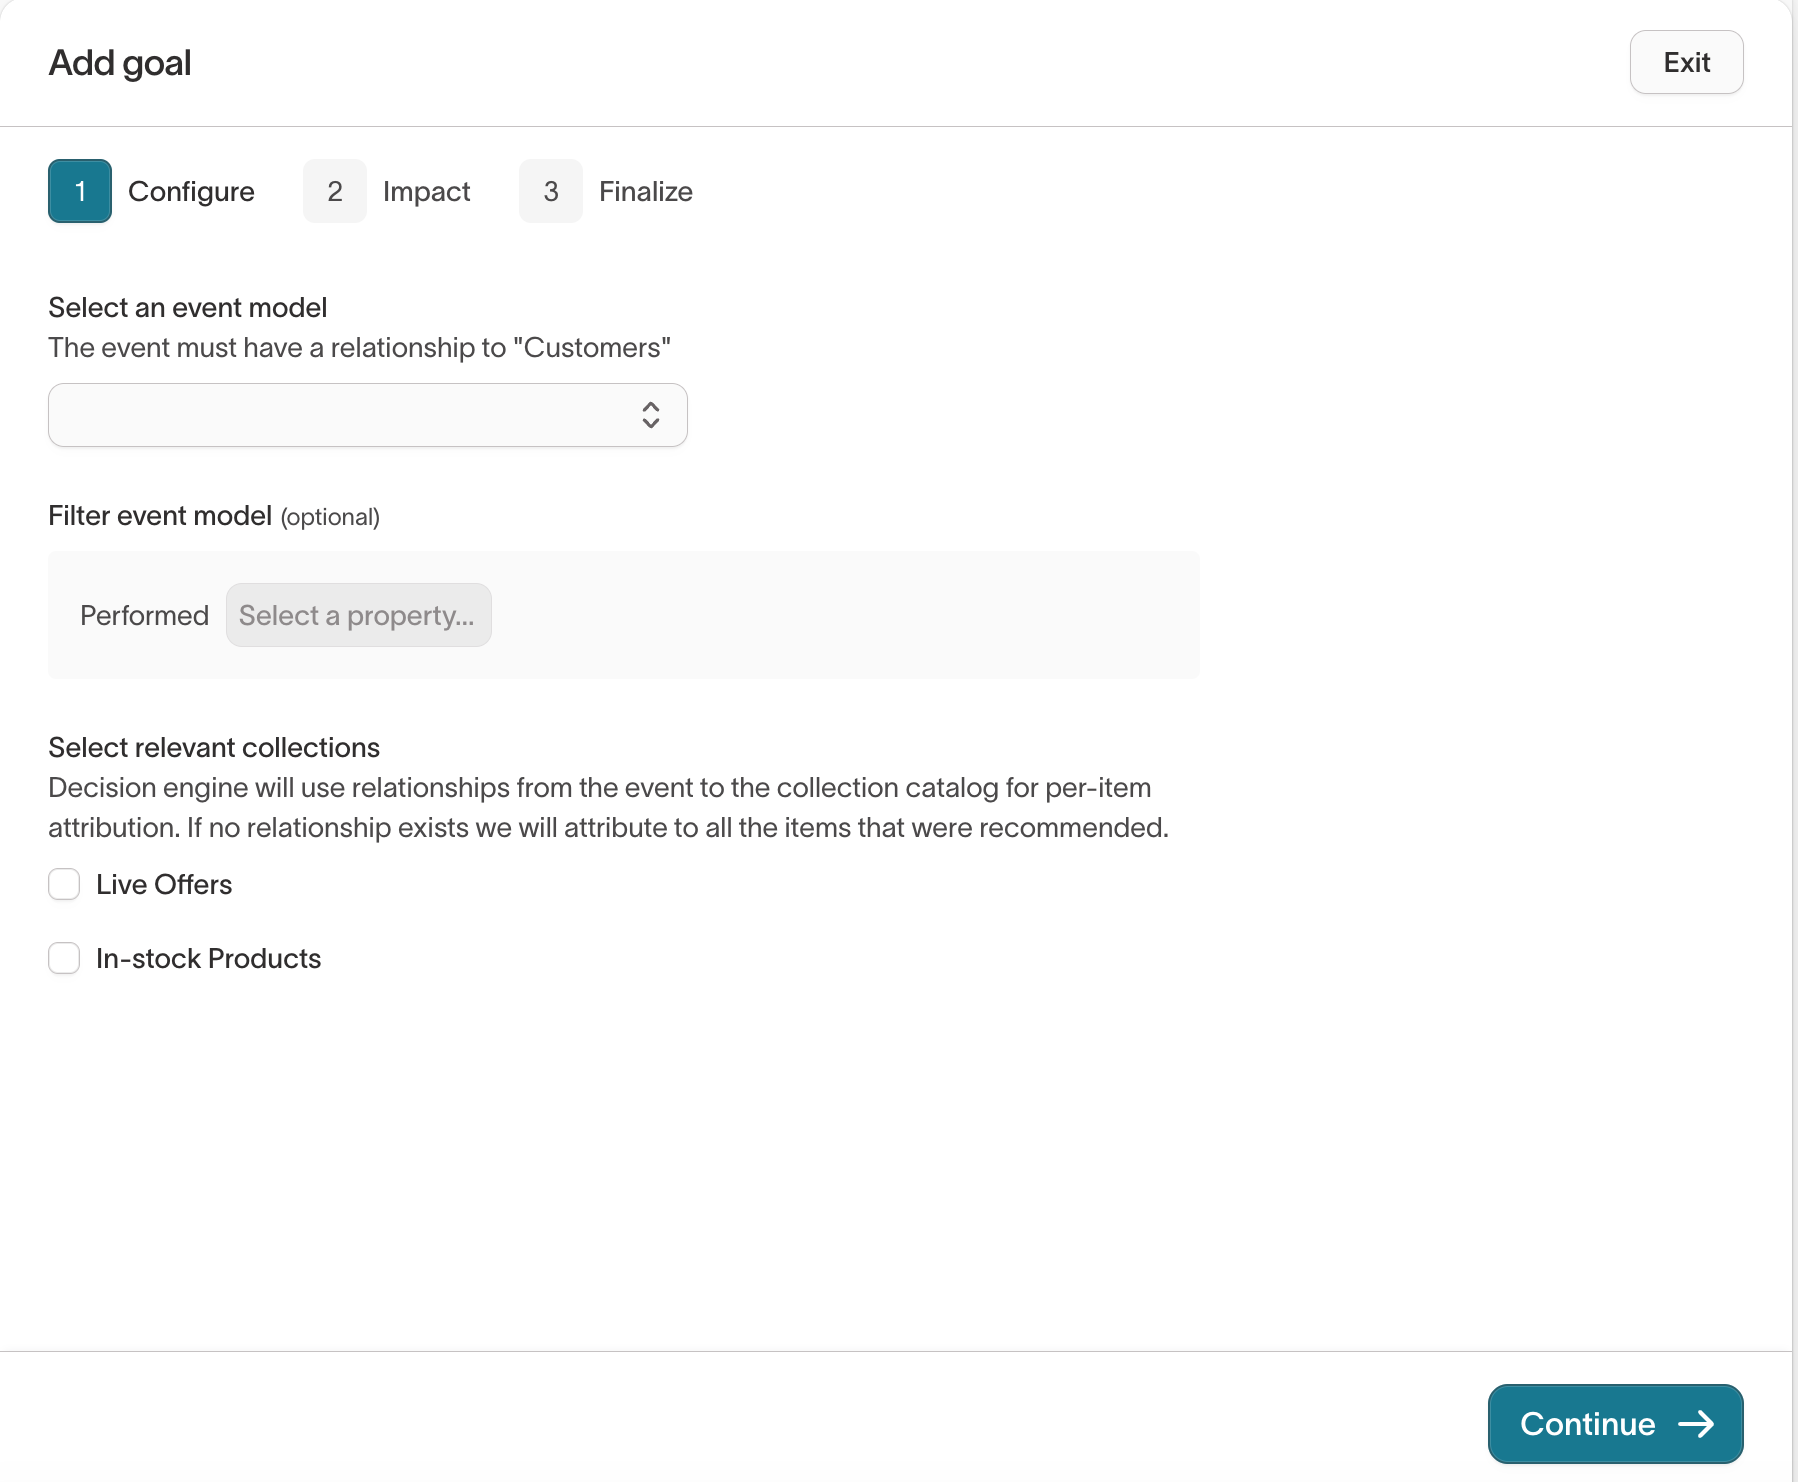
- Select an event model (for example,
-
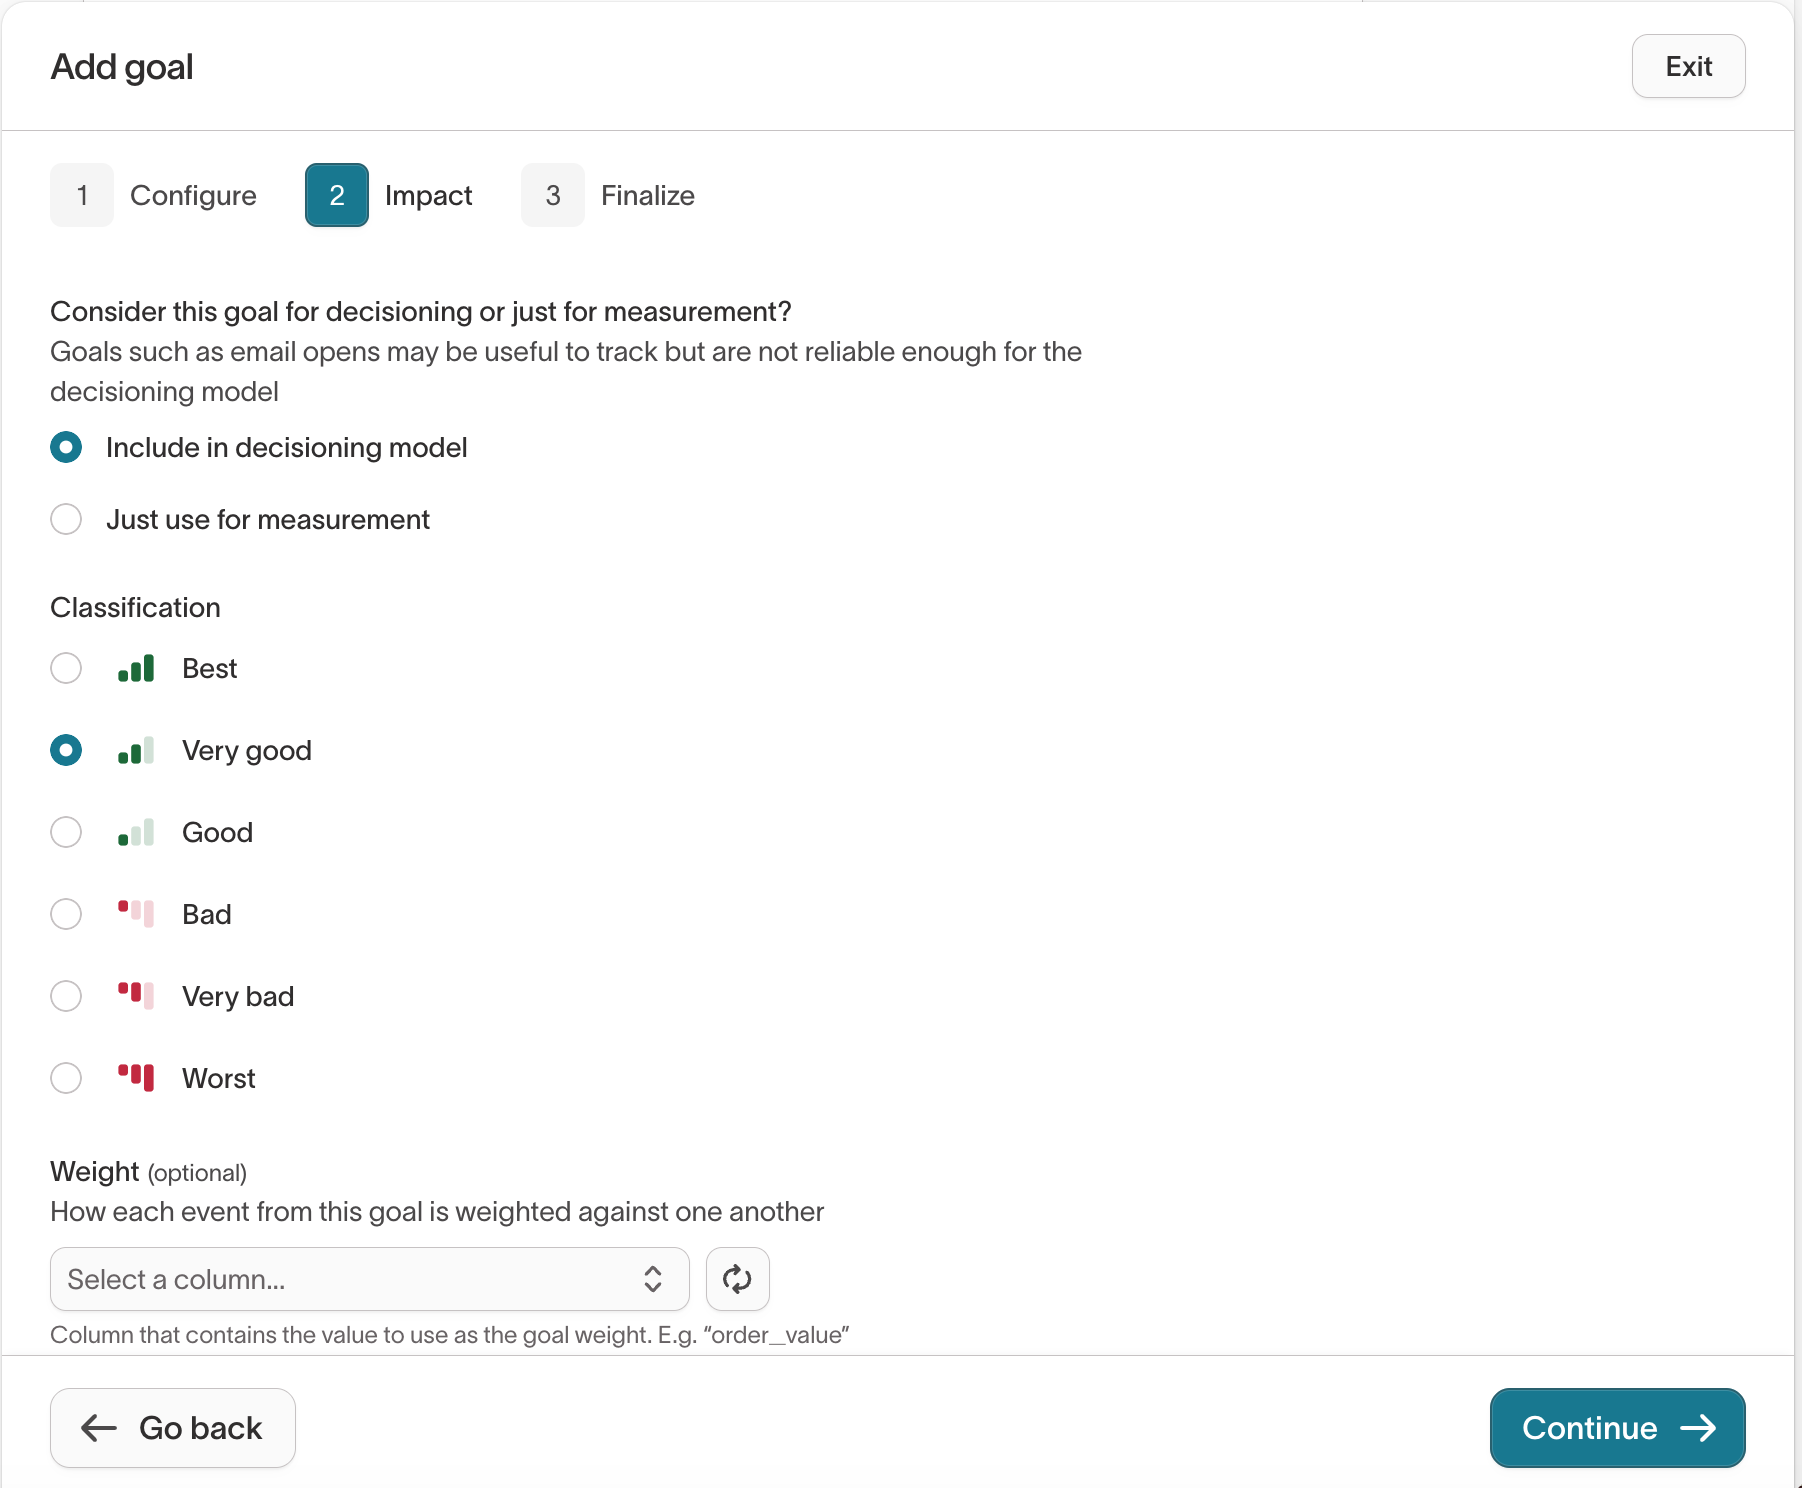
Click
Continueto move to theImpactstep.- Choose whether to include this goal in decisioning or track it for measurement only.
- Select a classification:
Best— Primary success metricVery good/Good— Positive supporting outcomesBad/Very bad/Worst— Negative outcomes such asUnsubscribe
- (Optional) Add a weight column to scale results by value (for example,
PriceorOrder Value).
-
Click
Continueto finalize.- Enter a clear, descriptive goal name (for example,
Redeemed offer). - Click
Add goalto save.

- Enter a clear, descriptive goal name (for example,
Goals replace the older “Outcomes” field from earlier versions of AI Decisioning. Each agent learns continuously based on these metrics.
Start with one clear Best goal (for example, purchase) before adding
supporting or negative signals.
Step 3 (optional): Configure scheduling
Use the Scheduling panel to control how often and when your agent sends messages.
| Setting | Description |
|---|---|
| Send frequency | Limits how often a user can receive messages (for example, 3x per week). |
| Quiet hours | Prevents sends during off-hours (for example, weekends or late nights). |
| Blackout dates | Pauses messaging during specific holidays or events. |
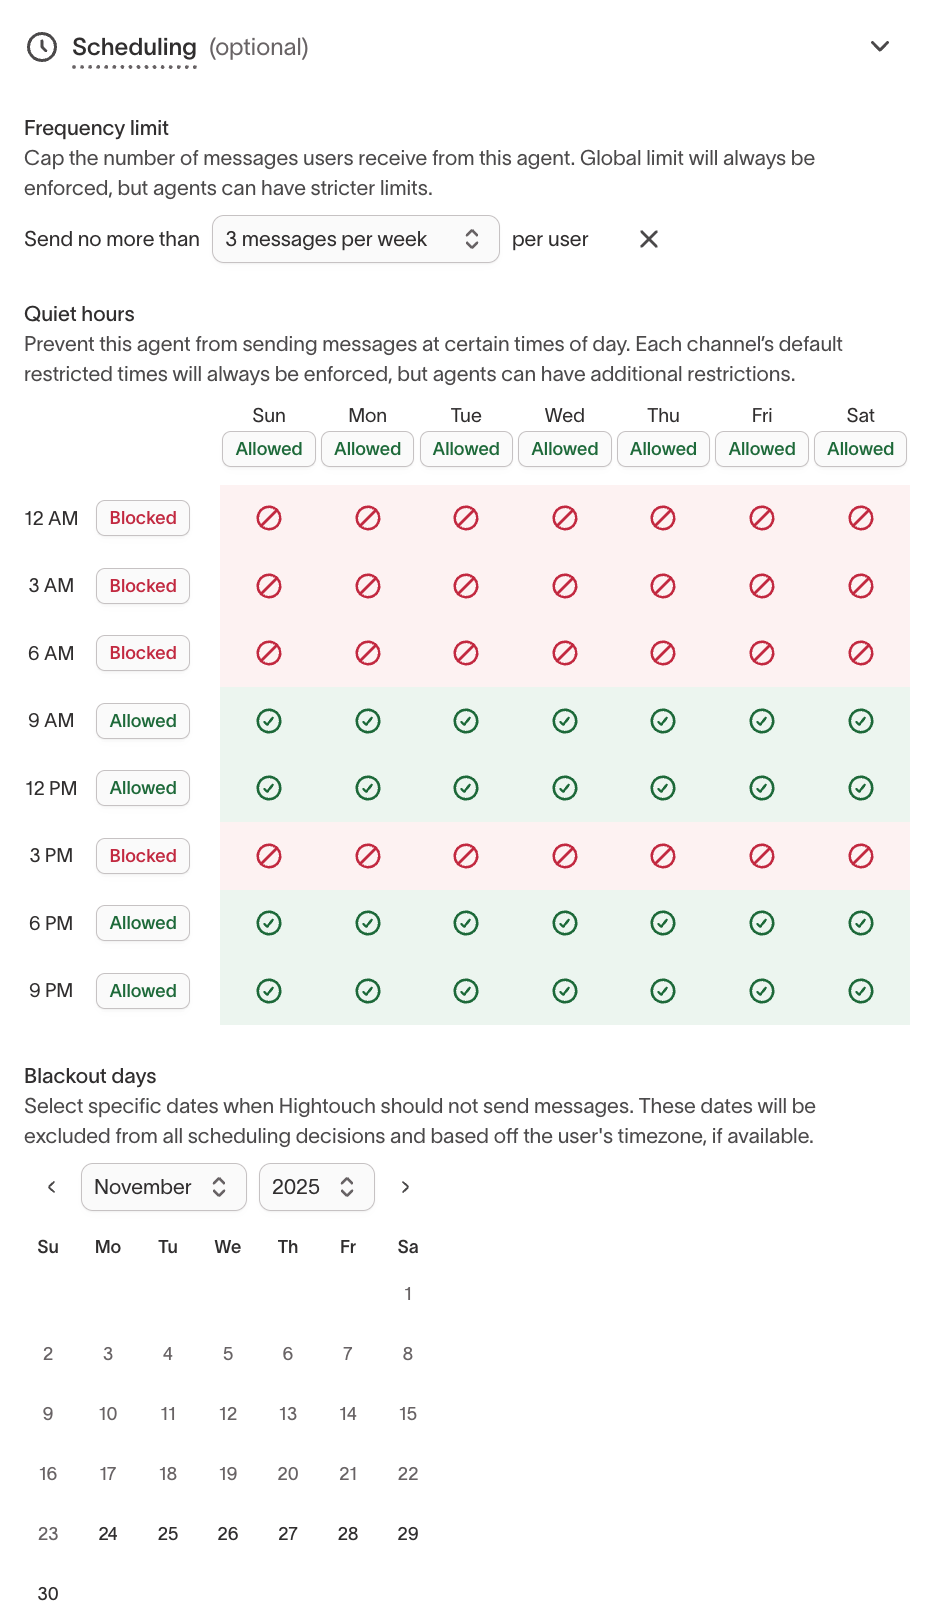
Use scheduling rules to maintain consistency across agents. Combine with Smart Suppression to control both when and whether messages are sent.
Step 4 (optional): Enable Smart Suppression
Smart Suppression predicts which messages are most likely to drive incremental conversions and holds back the rest. It uses the goals you’ve already configured to evaluate each send.
- In Configuration, scroll to Smart suppression (optional).
- Select Enabled.
- Set the percentage of eligible users to send to (for example, send messages to the top 67%).
- Select Save changes. A predicted performance curve appears once the model has enough data, typically after about two weeks.
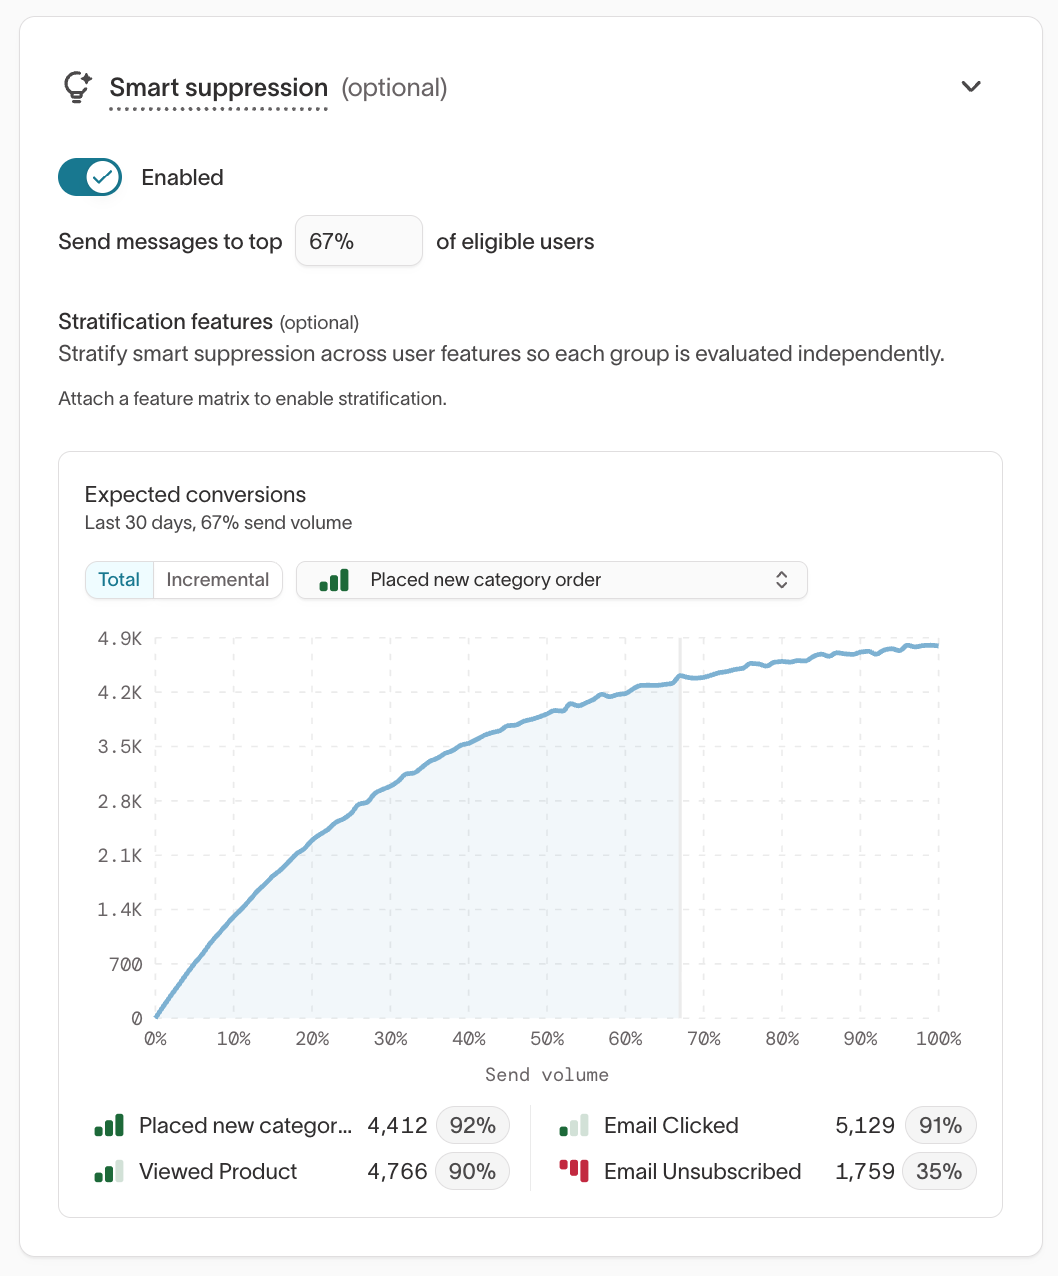
For detailed guidance, see Smart Suppression → Enable Smart Suppression.
Step 5 (optional): Advanced settings
Use Advanced settings to connect your agent with your organization’s downstream campaign tracking.
| Setting | Description |
|---|---|
| Customer managed campaign attribution | Enter one or more campaign IDs from your ESP or internal tracking system to tie AID results to your own reporting. |
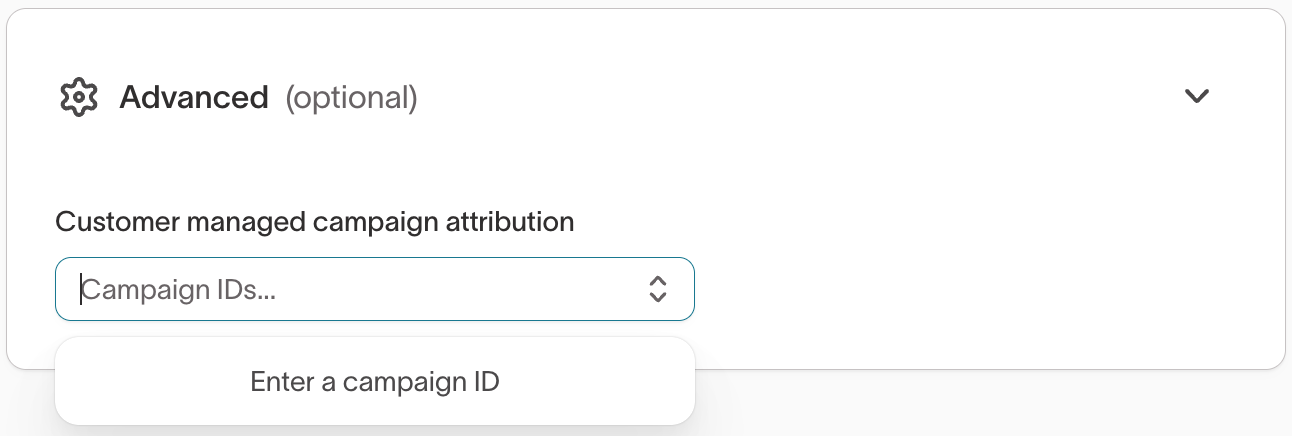
Campaign IDs help maintain consistent reporting between Hightouch and your connected destinations. For example, you can enter Braze, Iterable, or SFMC campaign identifiers to align AID outcomes with your existing analytics.
Monitor and manage agents
Once your agent is running, open the Overview tab to review live performance and experiment results.
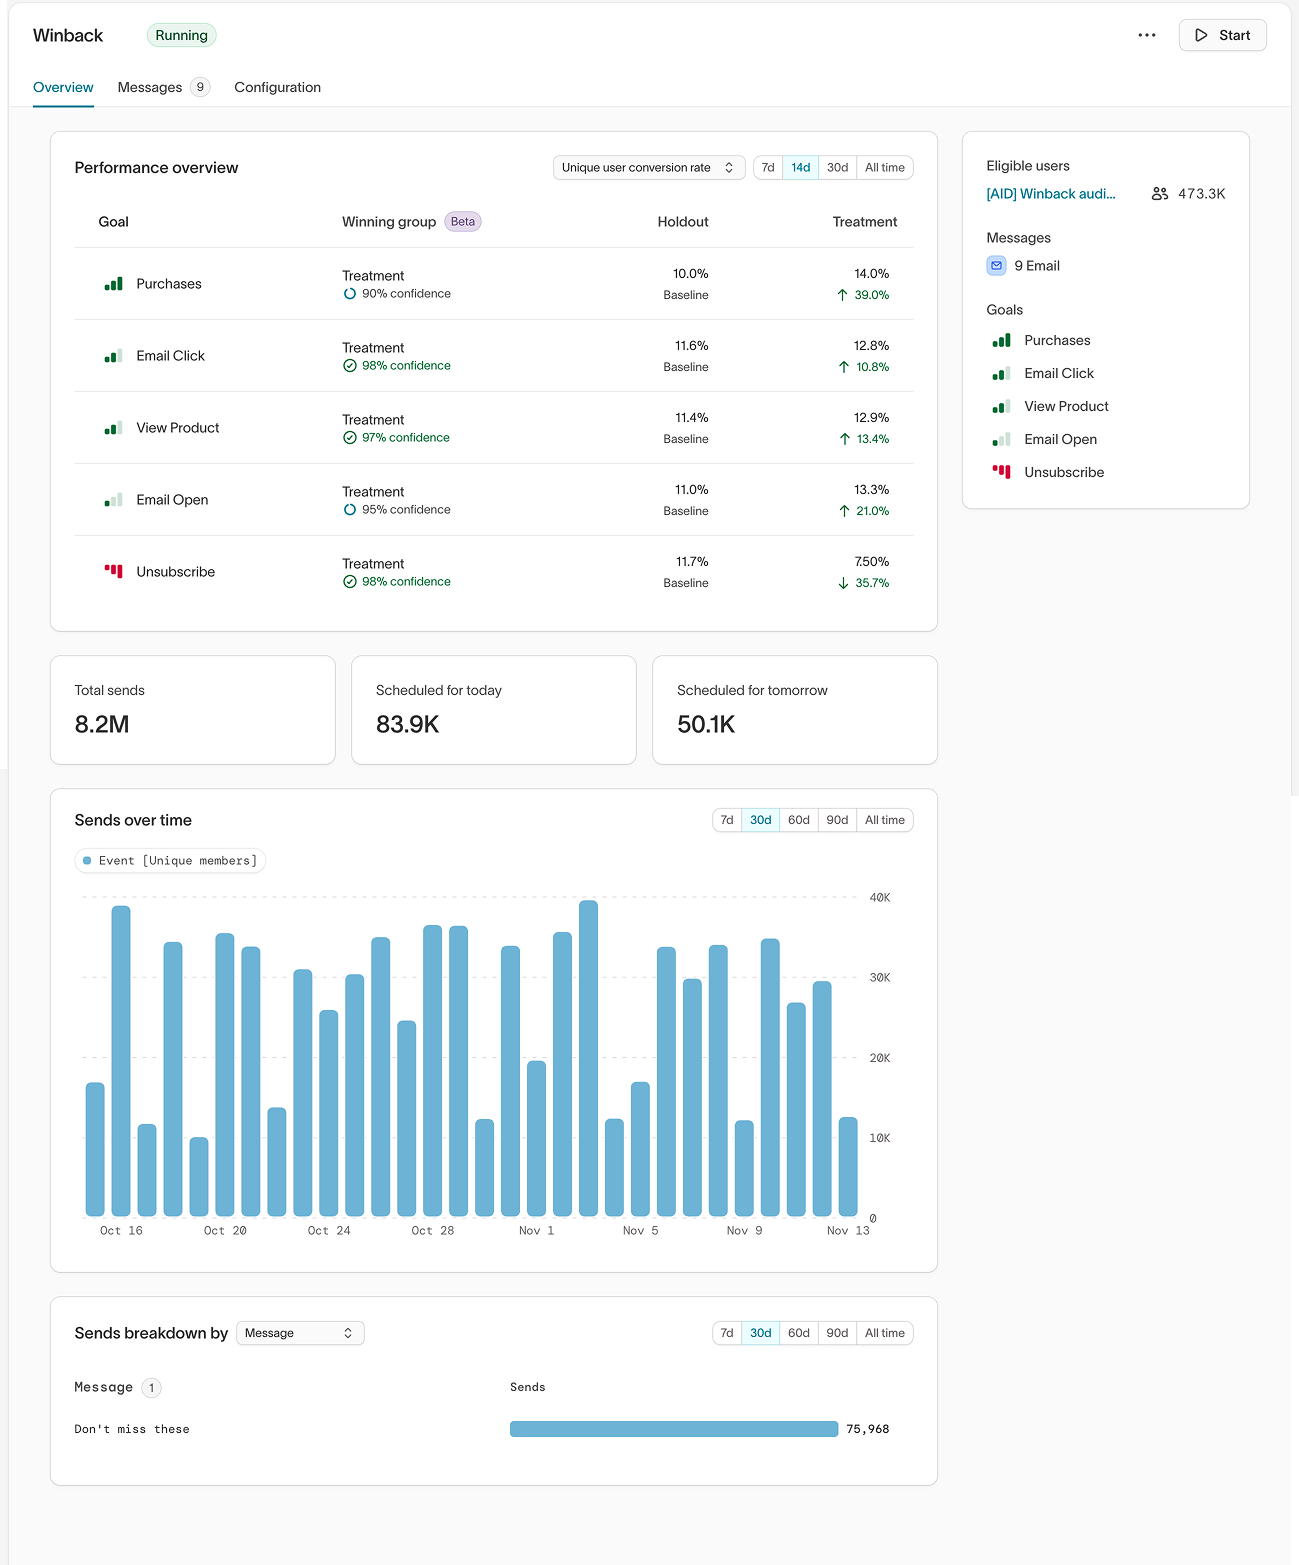
The Overview includes several key panels:
| Section | Description |
|---|---|
| Eligible users | Shows the number of users who currently qualify for your agent’s audience and can receive messages, excluding holdouts and ineligible users. |
| Performance overview | Shows conversion and engagement metrics for each goal, including the current winning group, holdout, and treatment performance with confidence intervals. |
| Sends summary | Displays total sends and messages scheduled for today and tomorrow. |
| Sends over time | Charts daily send volume to help you spot delivery trends and campaign pacing. |
| Sends breakdown by message | Compares message-level send volume and engagement across your agent. |
Use this view to monitor how your messages are distributed, which goals are performing best, and how holdout results compare to treatment performance.
Performance updates automatically as your agent runs. Confidence levels appear once enough event data has been collected for statistical analysis.
Use Insights for deeper breakdowns of message performance, goal impact, and timing analysis across agents.
Messages
Messages define what an agent can send and where those messages are delivered.
Each message connects an agent to a destination (such as Braze, Iterable, or Salesforce Marketing Cloud). Agents evaluate messages continuously to determine which content, timing, and channel perform best for each user.
Message setup includes:
- Connecting the agent to a destination
- Adding optimized content and variants
- Applying message- and variant-level guardrails
For step-by-step instructions, see Messages →.
Offers
The Offers tab lets you create and manage offers that agents can factor into their decisioning. When an offer is attached to a message, the agent weighs the message's expected value (value minus cost, weighted by conversion likelihood) alongside engagement signals when choosing what to send.
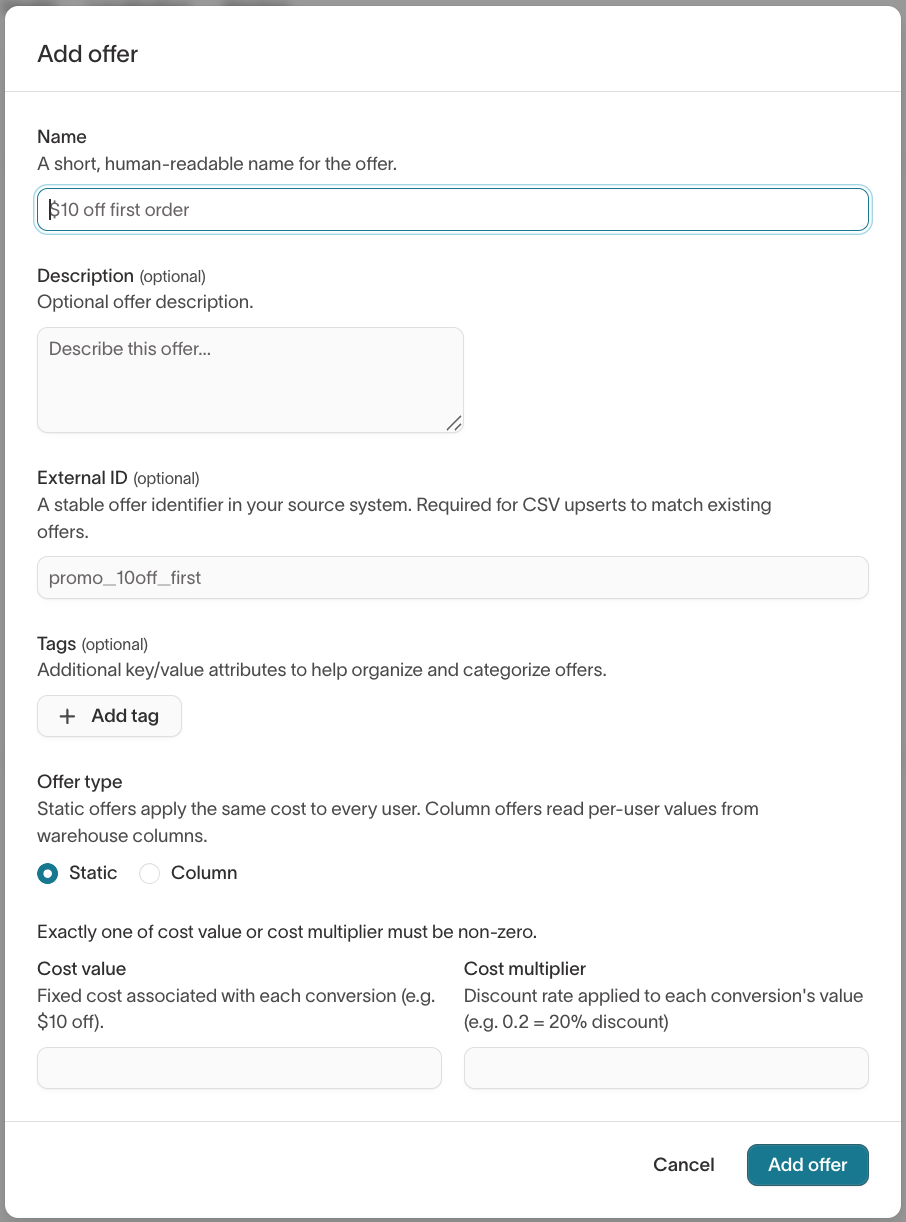
To create an offer:
- Open an agent and go to the
Offerstab. - Click
+ Add offer. - Configure the offer:
- Name: A short, human-readable name (for example,
$10 off first order). - Description (optional): Additional context about the offer.
- External ID (optional): A stable identifier in your source system. Required for CSV upserts to match existing offers.
- Tags (optional): Key-value attributes to help organize and categorize offers.
- Offer type: Static offers apply the same cost to every user. Column offers read per-user values from warehouse columns.
- Cost value: A fixed cost associated with each conversion (for example, $10 off).
- Cost multiplier: A discount rate applied to each conversion's value (for example,
0.2= 20% discount).
- Name: A short, human-readable name (for example,
- Click
Add offer.
Exactly one of cost value or cost multiplier must be non-zero.
Once created, attach offers to individual messages from the message Configuration tab. Each message can have at most one attached offer, and not all messages require one.
Use offers when your agent needs to balance engagement with cost efficiency — for example, choosing between a high-discount winback offer and a lower-cost loyalty reminder.
Health
The Health tab gives you real-time visibility into your agent's pipeline runs, channel delivery rates, and outcome data freshness. From a single view, you can monitor message generation status, diagnose pipeline failures, and catch data issues before they affect optimization.
For full details, see Agent health →.
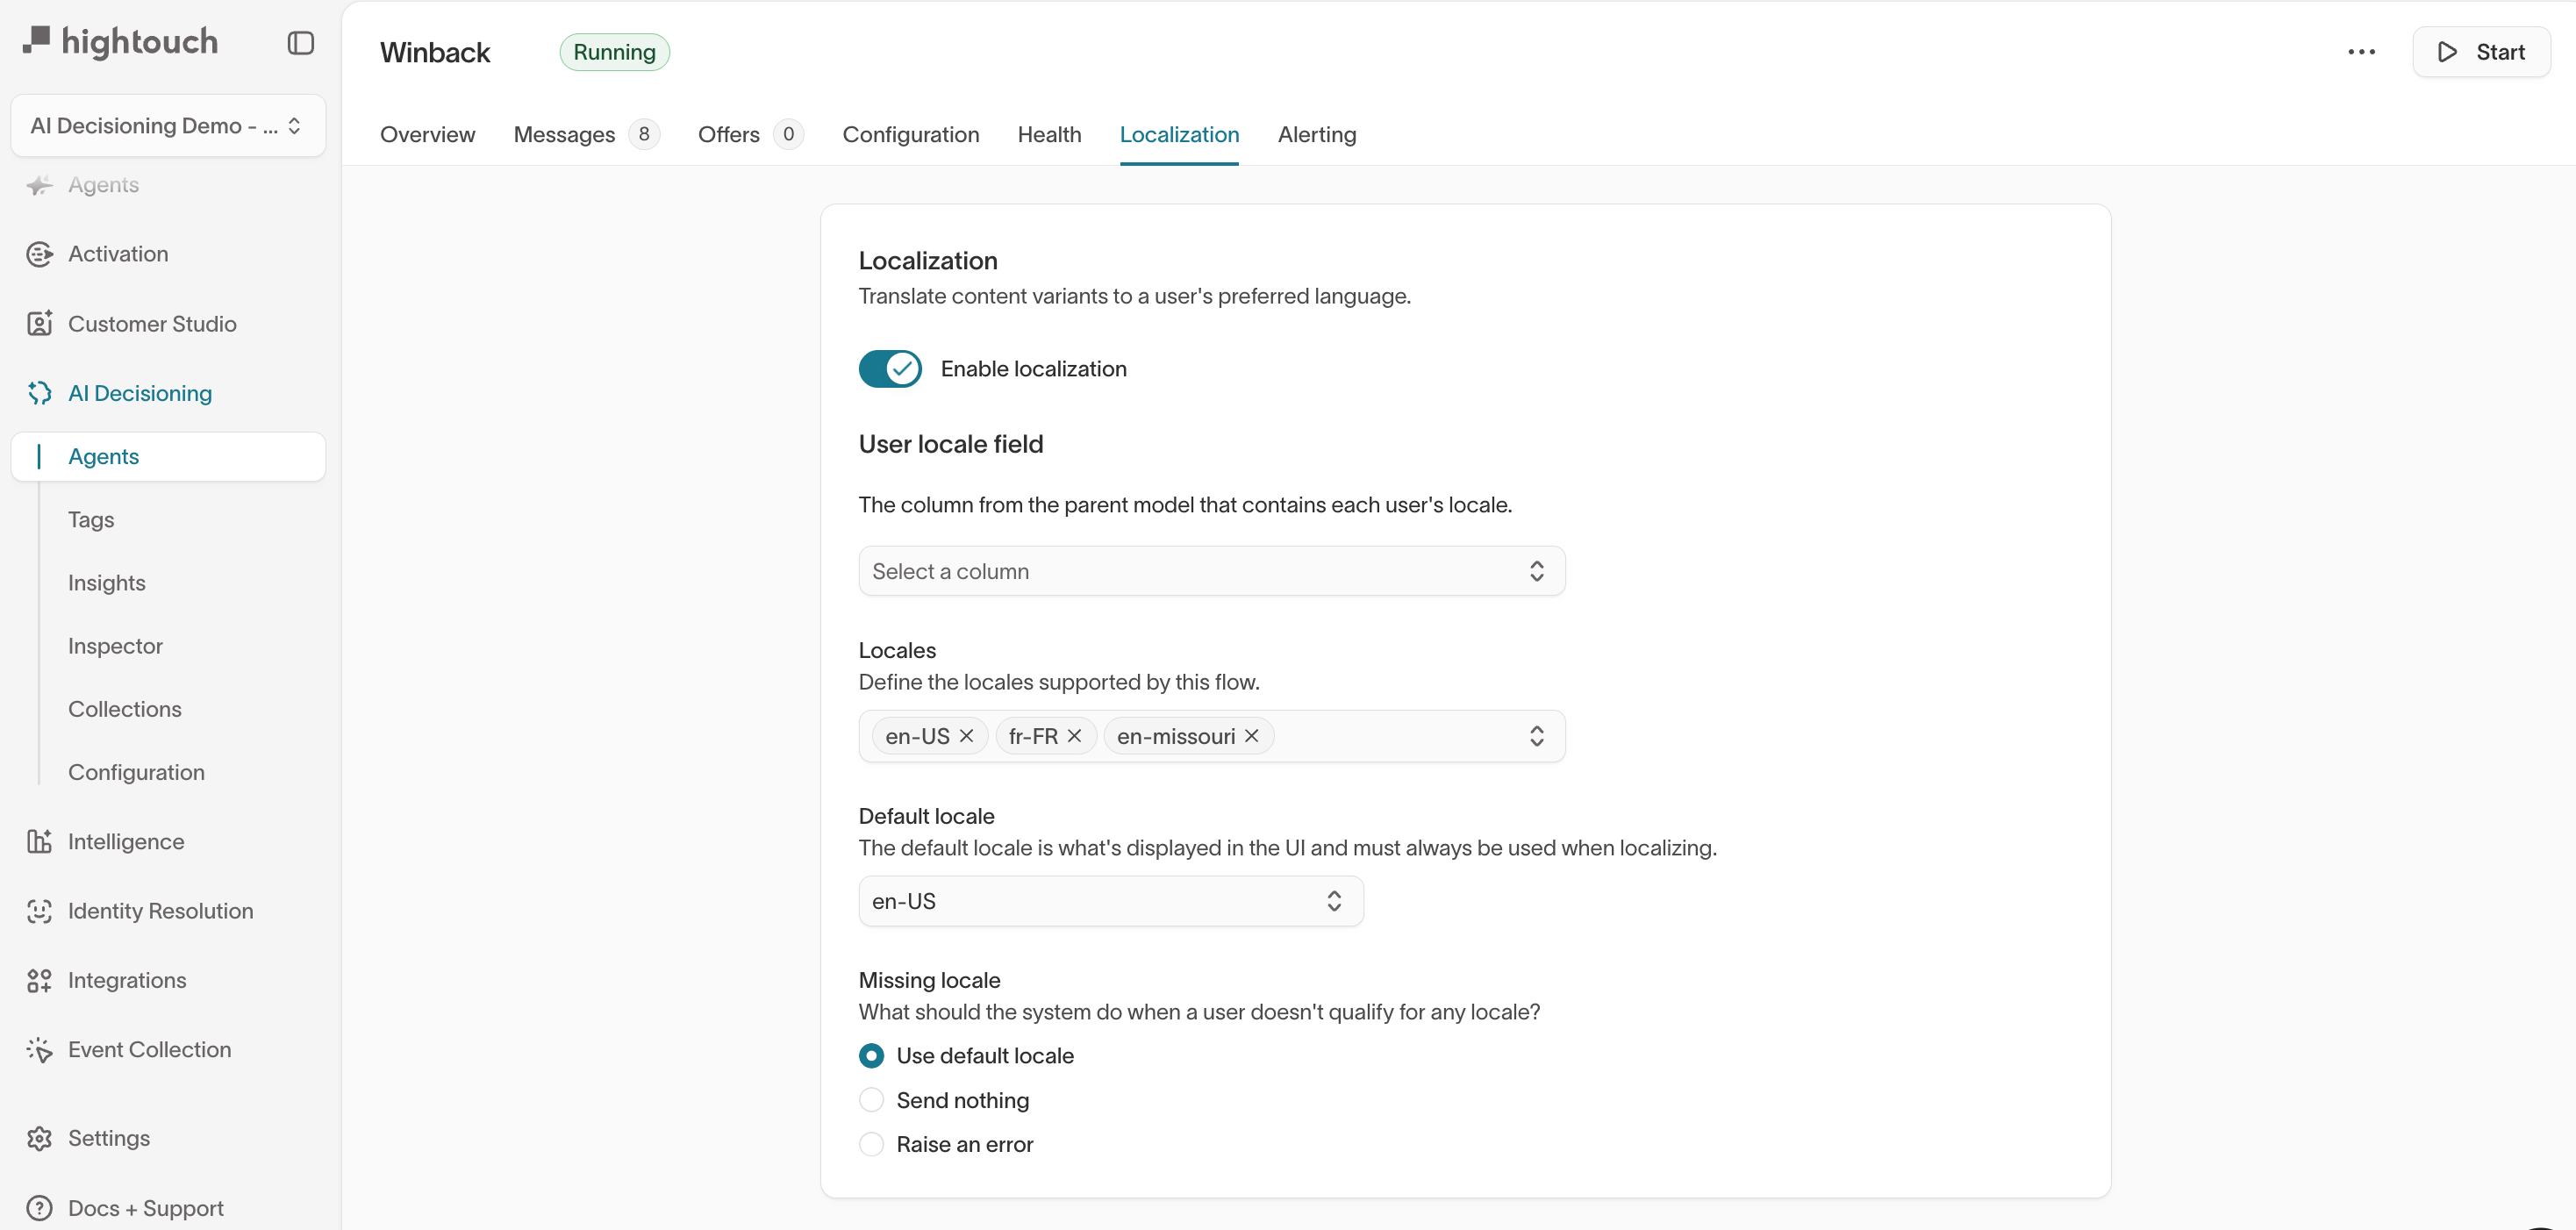
Localization
The Localization tab lets you translate content variants to a user's preferred language. When enabled, the agent serves localized versions of your message content based on each user's locale. Localization is opt-in per agent — existing agents keep working as-is until you enable it.
To configure localization:
- Open an agent and go to the
Localizationtab. - Toggle on Enable localization.
- Configure the following settings:
- User locale field: Select the column from your parent model that contains each user's locale (for example,
localeorlanguage). - Locales: Define the locales supported by this agent. Suggestions are pulled from values that already exist in your warehouse, but you can add any string (for example,
en-US,fr-FR, or a non-ISO value likemx). - Default locale: The locale displayed in the UI. It's used for users whose locale is missing or unsupported when the missing-locale behavior is set to Use default locale.
- Missing locale: Choose what the system should do when a user doesn't qualify for any locale:
- Use default locale — Send the default locale content
- Send nothing — Skip the user
- Raise an error — Flag the issue for review
- User locale field: Select the column from your parent model that contains each user's locale (for example,
Locale values in your User locale field column must exactly match the
locales you configure here, including case and separators. A user whose value
doesn't match any configured locale is treated as missing a locale.
Start with a small number of high-value locales and expand as you validate translation quality and conversion impact. Adding a locale later doesn't retroactively translate existing content — each localized variant needs a value for the new locale before it's eligible to send in that language.
Once localization is enabled, translate individual message variants on the Content tab of each message.
Alerting
The Alerting tab lets you set up automated notifications for engine run failures, long-running or stalled agents, and unexpected drops in recommendation volume. Every agent comes pre-configured with a default run failure monitor — no setup is required for monitoring to begin. You can add notification channels (Slack, Email, PagerDuty, SMS, or Webhook) and configure severity levels and thresholds.
For full details, see Agent alerting →.
Troubleshooting
| Issue | Likely cause | Resolution |
|---|---|---|
| Agent isn’t sending messages | The target audience is empty, or the destination connection is paused. | Check audience eligibility in Configuration → Eligibility, and confirm destination status under Integrations. |
| Messages not appearing in ESP | Message or automation identifier mismatch. | Verify the correct destination and automation identifier when adding messages. |
| No performance data visible | The agent is new, paused, or running only a holdout group. | Wait 24–48 hours after activation, or adjust your holdout percentage to include active treatments. |
| Smart Suppression chart missing | Suppression is off or not enough send data has been collected. | Enable Smart suppression and allow at least 2 weeks of message activity for predictions to populate. |
| Goals not updating or showing results | The event model or schema changed in your workspace. | Reopen the goal configuration, reselect the event model, and save the update so the agent can rebuild its data relationships. |
If you recently updated goals, audiences, or connected destinations, allow time for the agent to refresh data before performance metrics stabilize.
What’s next
- Messages: Create and manage message variants →
- Agent health: Monitor pipeline runs and delivery rates →
- Agent alerting: Get notified about run failures and volume drops →
- QA guide: Validate messages before launch →
- Smart Suppression: Control send volume based on predicted impact →
- Tags: Add and analyze message tags →
- Insights: Measure agent and message performance →
- Collections: Attach item recommendations to messages →
- Workspace configuration: Global defaults, channels, scheduling, and feature matrices →