How to Join User Information from Page Views to Conversion Events for Facebook CAPI
Learn how you can join your page view data to your conversion event data and upload it to Facebook's Conversion API.
Made by: Hightouch


Sending data-rich conversion events to Facebook’s (now Meta’s) Conversions API (CAPI) is imperative for optimizing ad targeting, and increasing return on ad spend (ROAS). Specifically, you need to include relevant customer information as part of the conversion event payload so that Meta can optimize ad placement. If there was a page view event that led to the conversion event, it’s imperative to include the relevant clickID in the conversion event payload.
Without including the preceding page view or click event ID, you won’t have the necessary information to measure your ad performance and perform attribution correctly. And Meta won’t have the necessary information to optimize and personalize ads.
To learn more about the importance of event enrichment, check this Facebook CAPI guide for marketers.
Including the requisite user info and click ID for page views that led to a conversion event can be challenging, particularly if the conversion event is a server event or if it happens on a browser/device blocking Meta’s Pixel.
This playbook walks you through two options for joining page view data to your conversion event data, whether you’re tracking conversions with an event tracker or storing them as transactions in a database.
By following along, you’ll audit your event pipeline and learn how you can automatically sync complete event payloads to Meta’s Conversions API using Hightouch. Even though this playbook is specific to Meta’s Conversions API, the process is similar to other conversion APIs like the Google Ads Conversion API. Other ad platforms have specific expectations for event payloads, and you’ll need to adjust your sync configuration accordingly.
“Thanks to Hightouch, I no longer have to wake up on Saturdays and Sundays to upload manual CSV files. With Hightouch, we can trust that the same data that lives in our internal reports is the same data that is getting passed to our ad platforms.”

Mallory Reese-Bagley
Sr. Marketing Operations Manager at Lucid
Let’s say you’re a digital marketer working for a subscription-based fitness platform. Your team invests in paid marketing channels, and you own the campaigns on Google, Facebook, and other ad platforms.
You become aware that conversion events, whether subscription or merchandise purchases, aren't adequately attributed to pages viewed from ad clicks. Your team is using Heap to track all events, and subscriptions and merchandise purchases are stored in your database, but they’re not connected to the ad clicks. As a result, you think your Facebook ads could be better optimized, but you don't even have a complete picture of how to attribute conversions to ads and page views.
This playbook assumes:
- You’re either using an event tracker like Heap or Mixpanel to track conversion events, or you’re storing conversions as transactions in a data table (e.g.,
PurchasesorSubscriptions.) - You’re using a data warehouse as your source of truth for customer, event, and transactional data.
There are two types of events you need to audit:
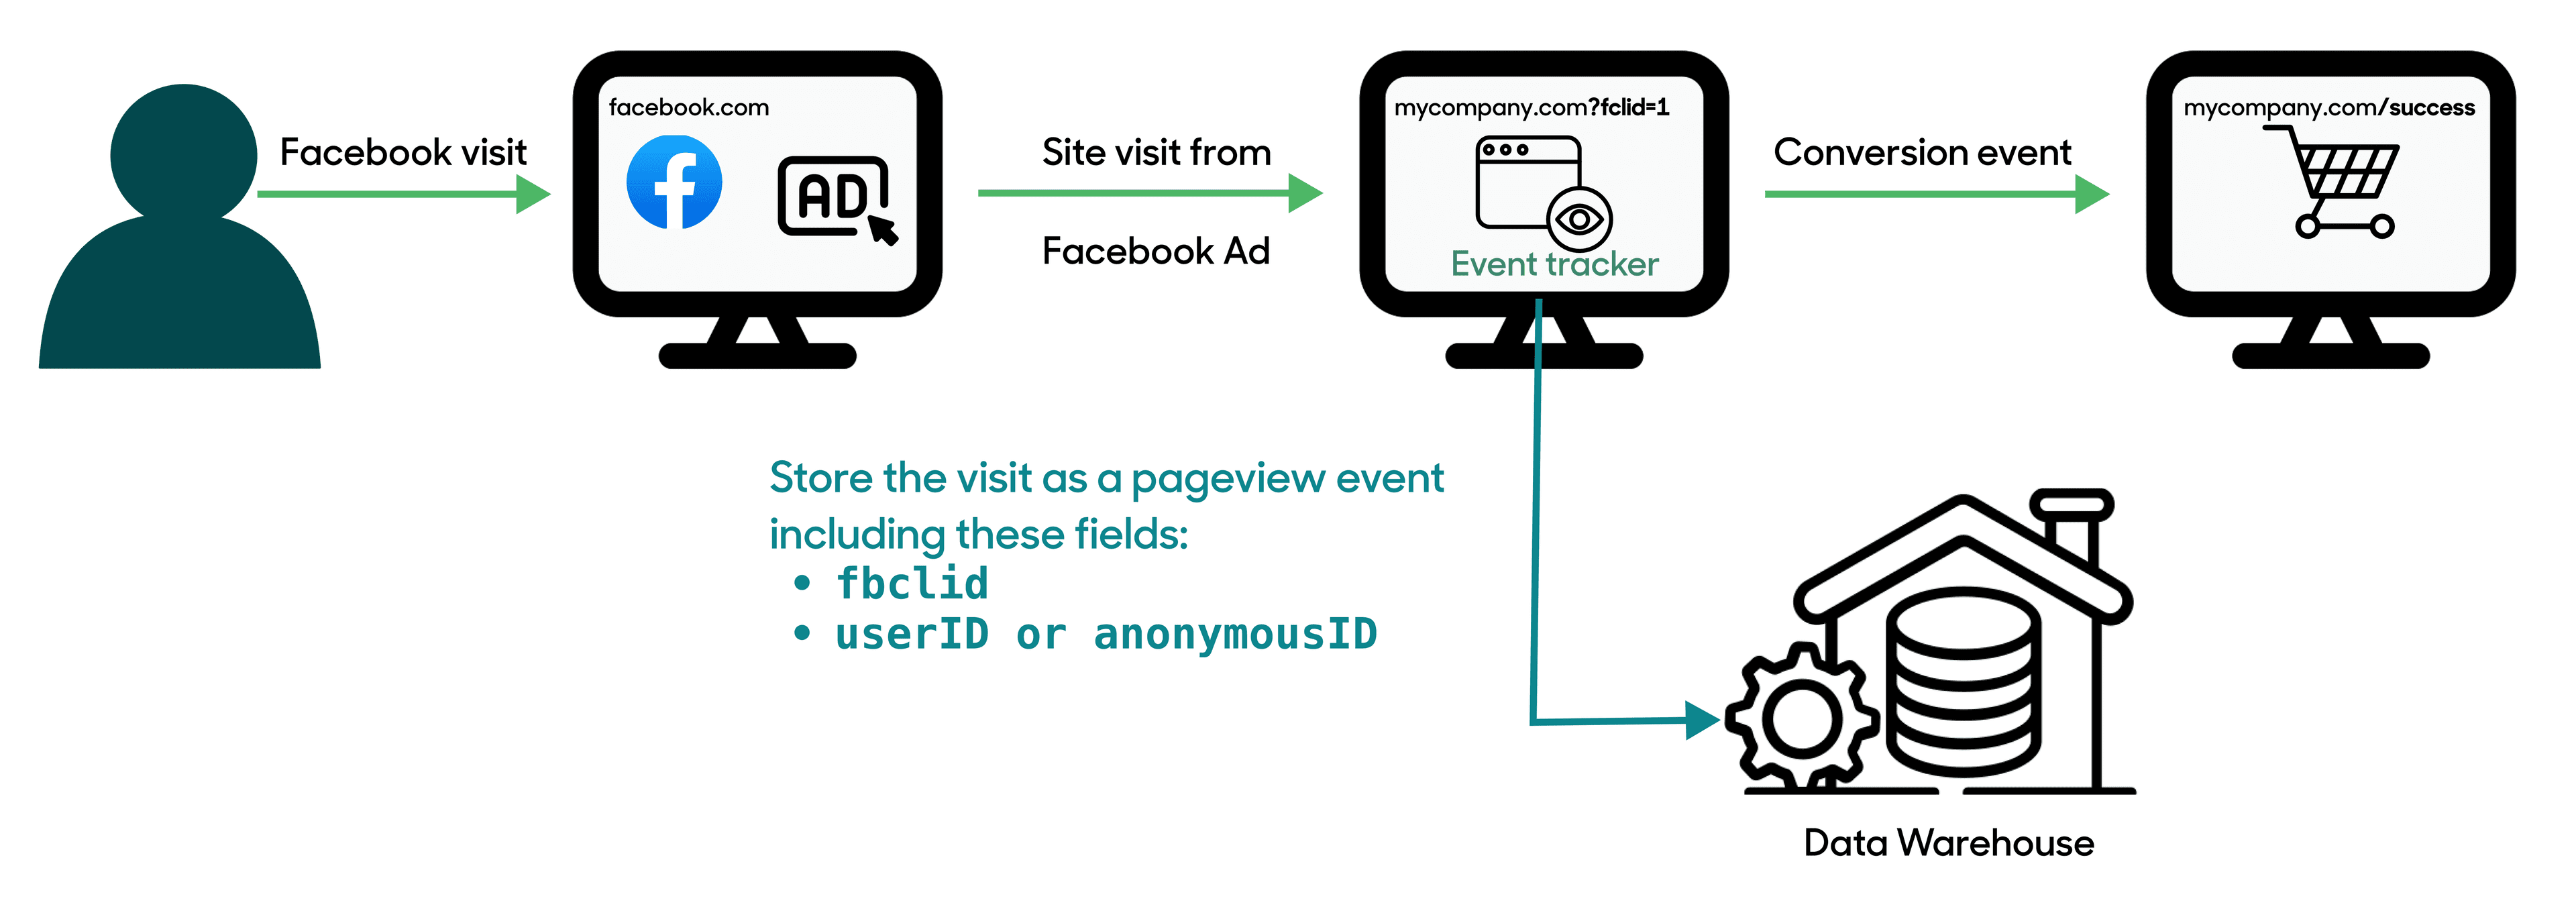
- The page view event that happens when a user visits your site from a Facebook ad
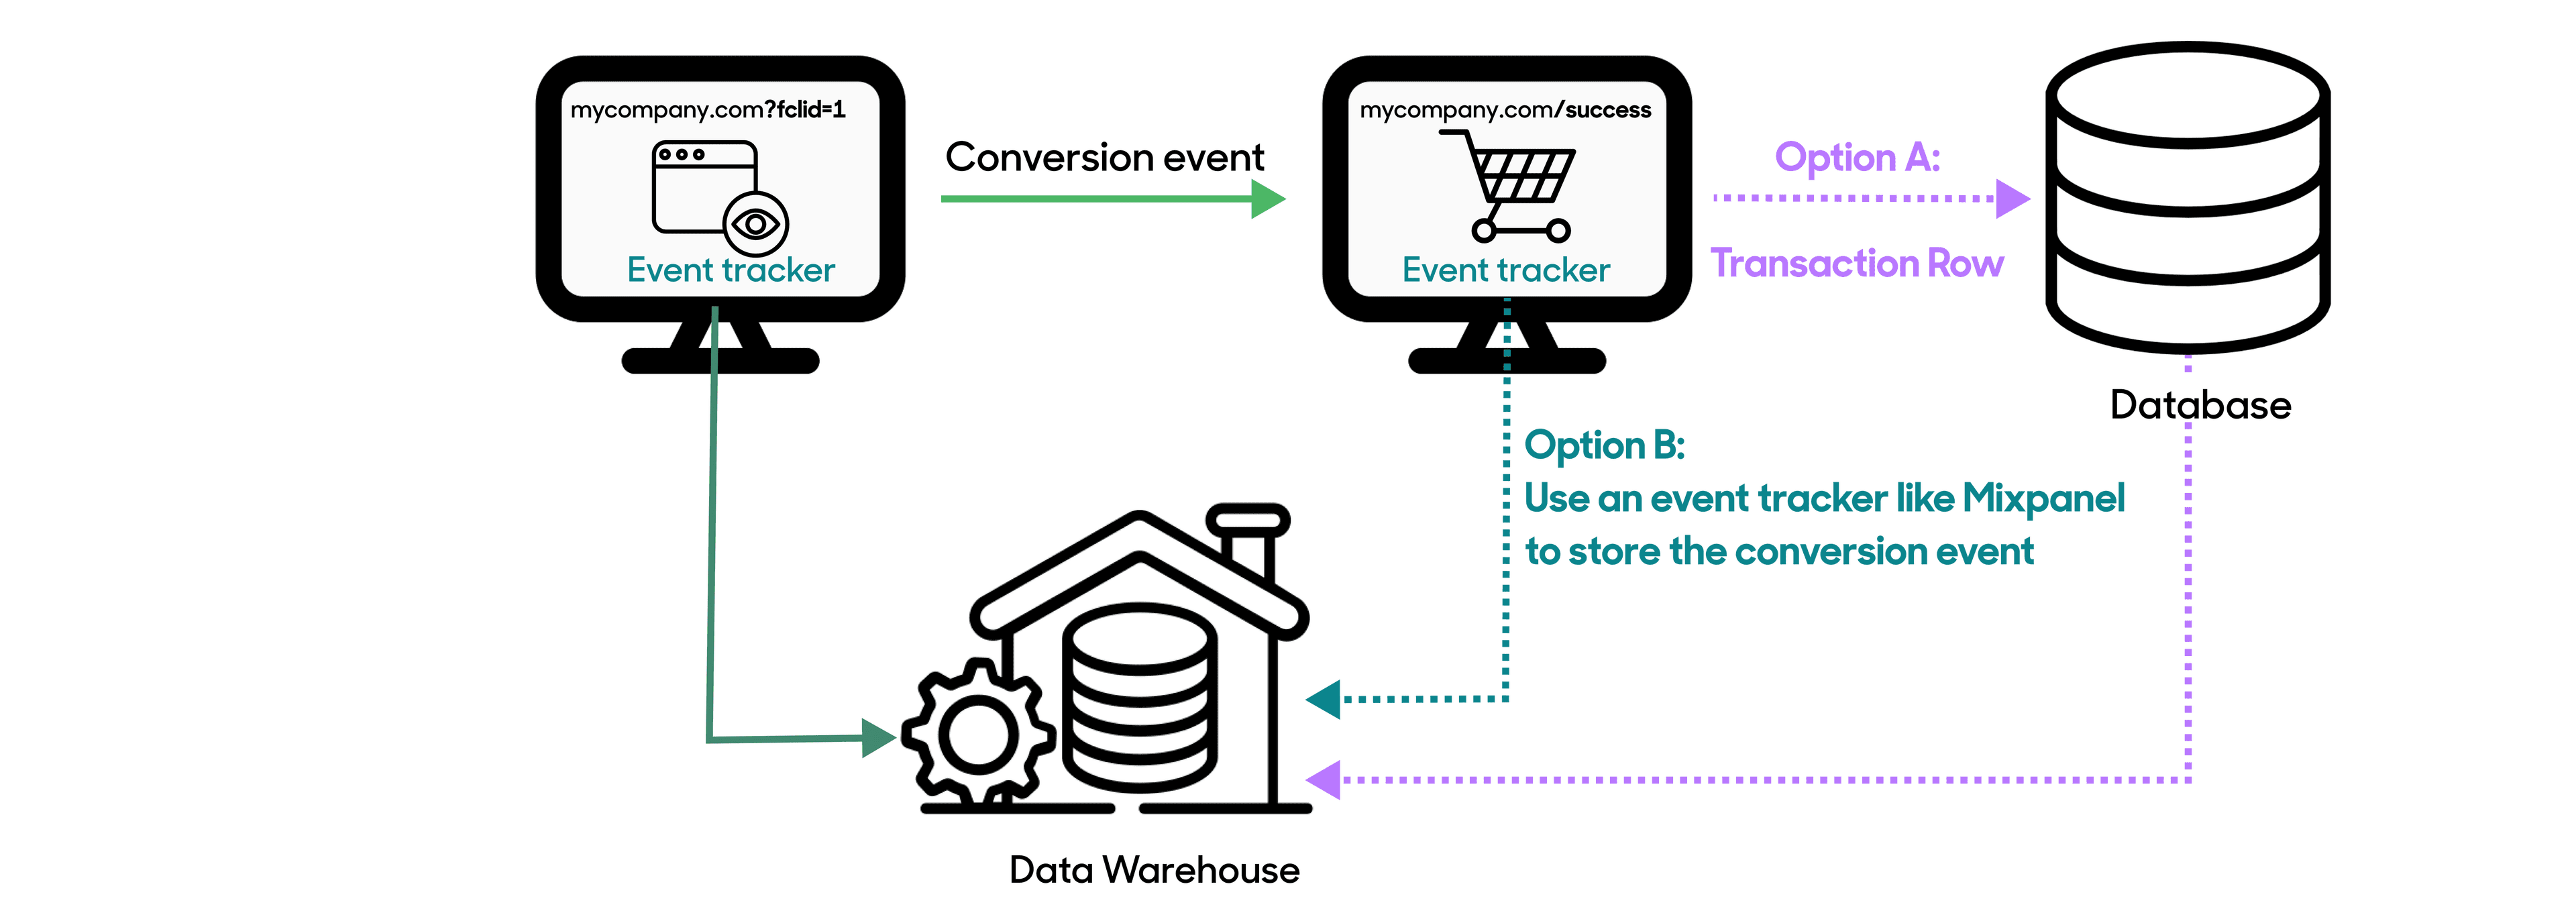
- The conversion event that happens when a user makes a purchase after the page view event.

You may be using an event tracker for both options, or you may use an event tracker for one and only store conversion events within a database for the other.
Whatever event tracking system you’re using, it’s best to push your event data into your warehouse. Many event trackers include integrations to deliver your data directly to your warehouse. For example, Heap includes a Snowflake integration.
To properly attribute conversions, you need to include the following fields:
fbclid- Some sort of
userID

Every time a user clicks on an ad on Facebook, the link usually includes a fbclid query parameter. When the user lands on the target website, if the website has a Meta Pixel that uses first-party cookies, the Pixel automatically saves the fbclid query parameter.
In many cases, a Pixel won’t be running, or a user will have cookies disabled. That’s when an event tracker comes in handy.
Using an event tracker, you can include the fbclid query parameter in the URL as a property on your events
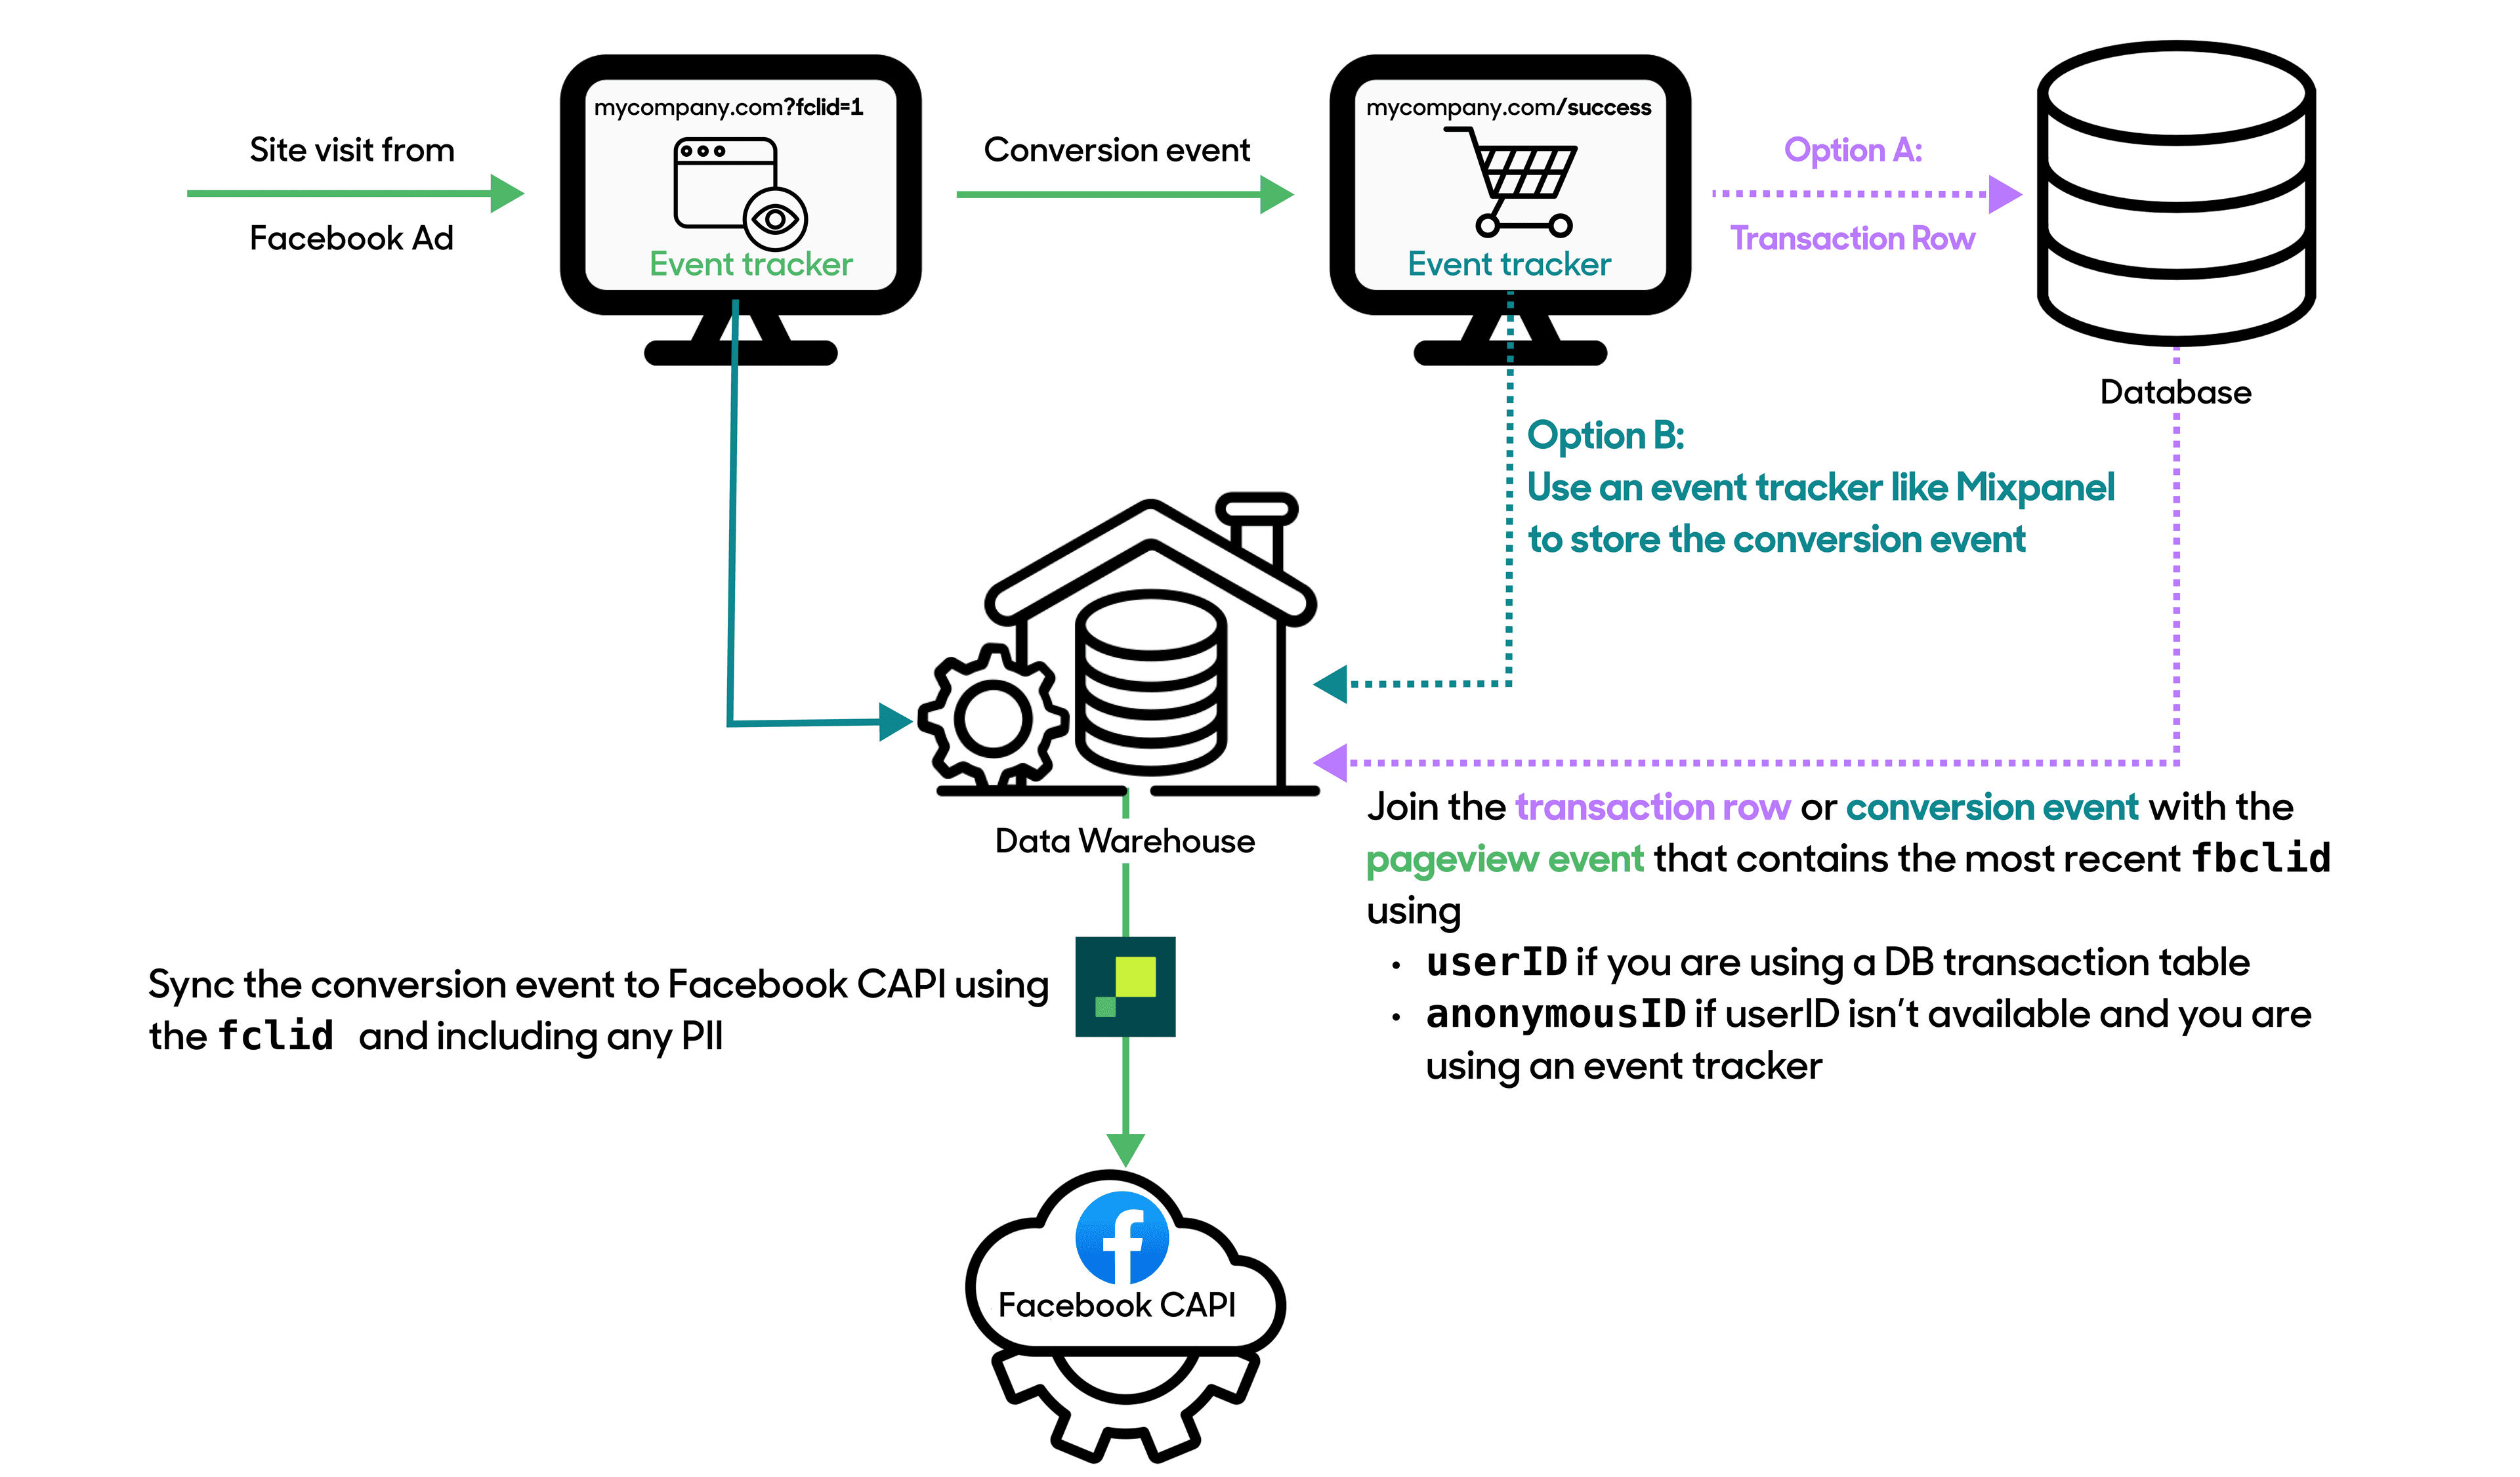
To later tie together the ad click/page view to a conversion event, you need to track the user generating the click event. You can use a userID if the user is logged in when they land on your site and then use your userID as an external_id when sending the conversion event to Facebook CAPI.
Most users aren’t signed in when they land on your website from an ad for the first time. This is something you can overcome by assigning and tracking an anonymousID that you’ll later join with a known userID once the user has provided personal information such as an email address or name to make the transaction.
There are two options for how to get your conversion event data to your data warehouse:
- By piping rows stored server-side on a transaction table
- By using the same event tracker, you used to track page view events

Either way, each conversion event should include a userID or other personal information (e.g., email, name, address, etc.) so you can associate it with the fbclid from the preceding page view event.
Whether you’re using a transactional database or event tracker to store your conversion information, each conversion event should end up in your warehouse with the most recent related fbclid leading to the purchase.
If a known user made the page view event (e.g., it included a userID or some other identifier as part of the page view event payload), you can join the conversion event on that field. If the user was anonymous, you need to engage in user identity resolution. Event trackers like Heap and Mixpanel include examples of how to do this in your data warehouse.
You should also include any other PII data you’ve collected on the user, for example:
- Phone Number
- First Name
- Last Name
- Gender
- Data of Birth
- City
- State
- Zip Code
- Country
- Client IP Address
- Client User Agent
- Facebook Login ID
- Subscription ID
All of these values should be included in the conversion event payload you send to CAPI, if you have them. The more first-party identifiers you include, the higher the event match quality will be.

Once you’ve completed these two steps, it’s time to move into Hightouch to send all your conversion event data to Facebook CAPI.
A source is where your organization's business data lives. In this case, your data warehouse (e.g., the place you’ve joined event and customer information.)
- Go to the Sources overview page and click the Add source button.
- Select your data warehouse as the source.
- Enter the relevant credentials. These differ depending on the source. Refer to the relevant source documentation for further details.
- Click Continue. Before continuing, Hightouch validates that you have the necessary access and permissions. If the test fails, you need to confirm and re-enter your credentials.
- Give your source a Source name.
- Click Finish.
Once you've finished, your source appears on the Sources overview page and can be used to set up models.
Models define what data to pull from your source. To set up a new model, follow these steps:
- Go to the Models overview page and click Add model.
- Select the source you’ve just connected.
- Choose a modeling method. Since all of your information should be joined in one table, you can use the visual table selector to define it. Alternatively, you can write SQL to include only the columns you want, or rely your existing dbt models or even your Looker Looks.
- Before continuing, you must Preview your model to ensure it's querying the data you're interested in. By default, we limit the preview to the first 100 records. Once you've validated your data, click Continue.
- Give your model a name (e.g., Complete conversion events.)
- Select a Primary key. A primary key should be a column with unique identifiers. Since all event-type syncs are
insertonly, it’s imperative that your primary key is truly unique. We recommend creating a hashed value of all columns so that no events are omitted. If you use a column likefbclidas the Primary Key, you’ll miss multiple purchases made by the same user from the same ad. - Click Finish.
Once you've finished, your model appears on the Models overview page and can be used to set up the sync. To set up the sync, you first need to connect Facebook CAPI.
- Go to the Destinations overview page and click the Add destination button.
- Select Facebook Conversions and click Continue.
- Follow the directions on Hightouch’s Facebook Conversion documentation.
- Click Continue. Before continuing, Hightouch validates that you have the necessary access and permissions. If the test fails, you need to confirm and re-enter your credentials.
- Give your destination a Destination name, such as “Facebook CAPI”.
- Click Finish.
Now you can finally start syncing your data!
Syncs declare how your source data should appear in your destination. They’re the final piece of the puzzle after setting up a source, model, and destination.
- Go to the Syncs overview page and click the Add sync button.
- Select the model you previously created for this purpose.
- Select the Facebook Conversions API you previously created.
- Configure how you want to sync data to your destination. Be sure to include at least the following fields:
event_nameevent_timeuser_data: All customer information parameters included in your data model. Note that Hightouch automatically hashes PII fields as Facebook requires.- As part of the
user_data, be sure to includefbc: Click IDand any other IDs. - You can use Hightouch’s advanced mapper to format your
fbclidinto thefbc, which is the format that Meta expects for this identifier.

Select a “Template” value and enter fb.{{ row['subdomainIndex'] }}. }} {{ row['creationTime'] }}. }} {{ row['fbclid'] }} as the value. Note that you’ll need to include these fields or equivalents in your source data. subdomainIndex is defined 0, 1, or 2, depending on where your cookie exists. If you’re generating this field on a server use “1”. creationTime is the timestamp of the event.
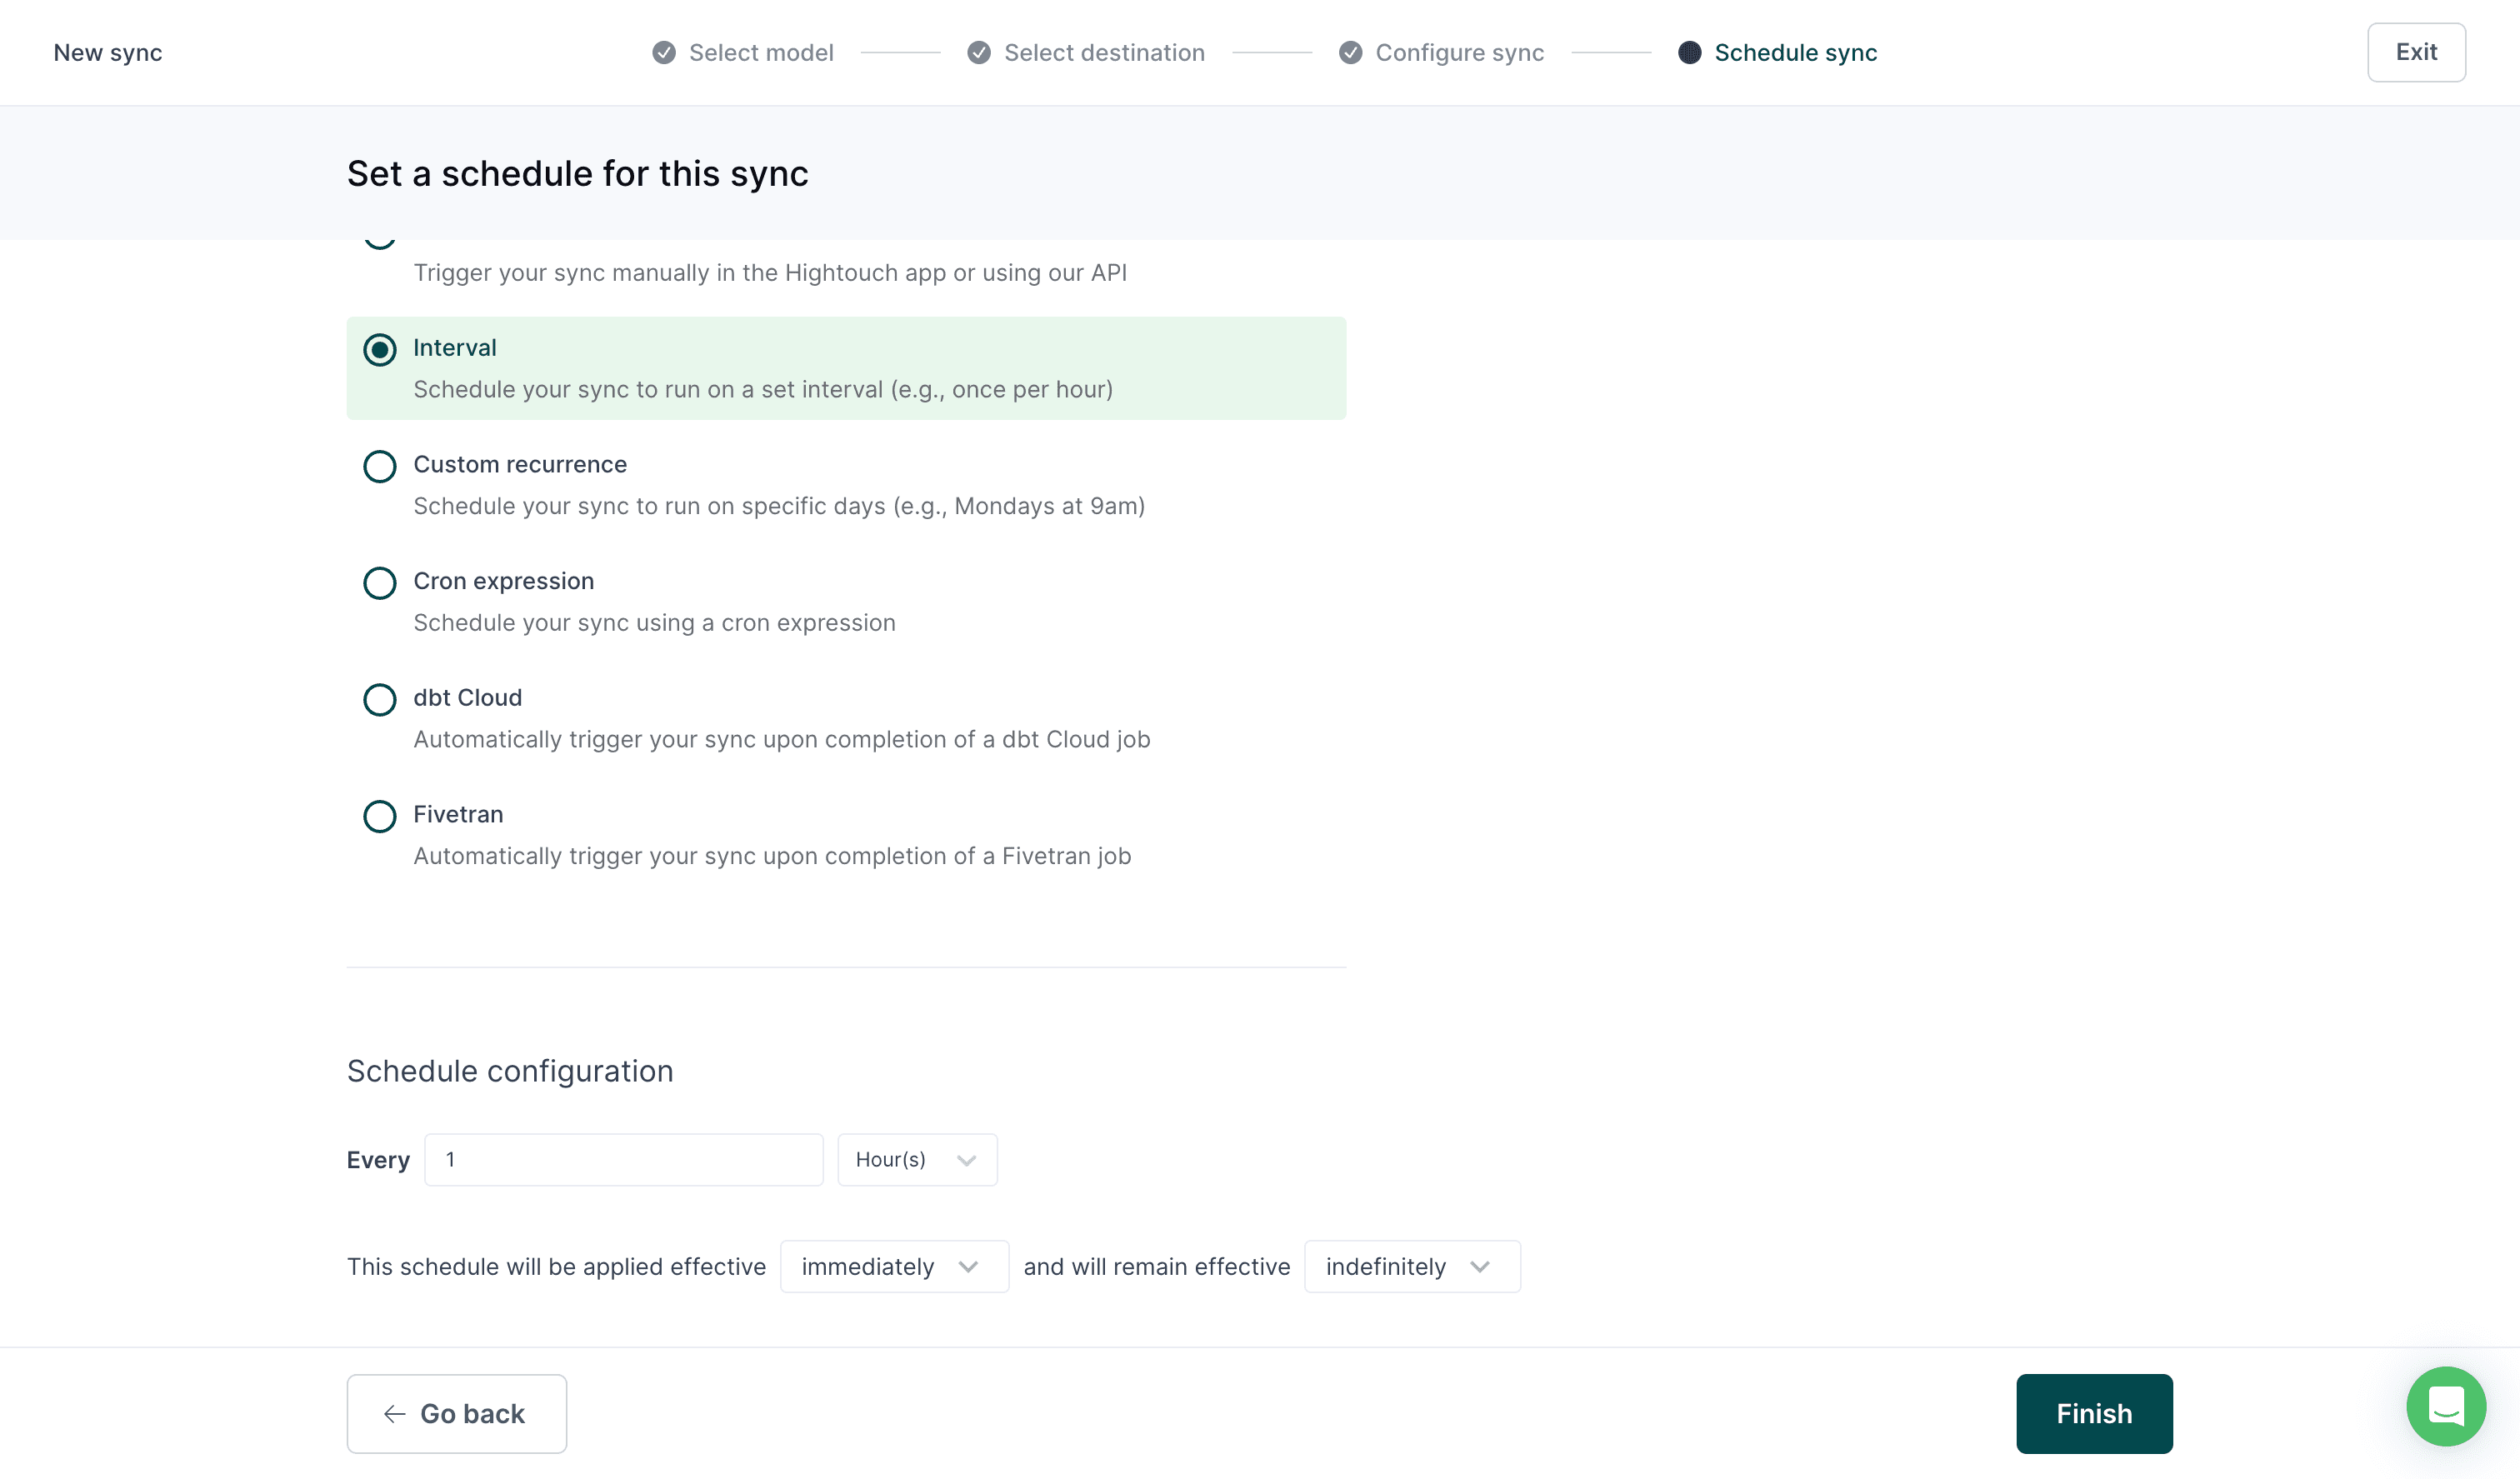
- Set a schedule for the sync. This depends on your event volume, but Facebook recommends sending events within an hour of occuring. Therefore, set a schedule that occurs at least hourly.

- Click Finish.
Once you've finished configuring a sync, you land on that sync's overview page. This page shows previous sync runs and lets you edit its Configuration, Schedule, and set up Alerts. It's also home to the Live Debugger, which helps understand previous runs down to the API request and response level.
To kick things off and load historical events in your warehouse, choose to run the sync manually.

Once you’ve done this, verify the events have been received in Meta’s Events Manager by following the documentation. In particular, check that the events contain all the data you mapped in your sync configuration.
Note that Facebook warns that it may take 20 minutes or more for the events to appear after the sync is complete.
If you want to automate the upload of complete conversions from your warehouse to Facebook CAPI, you can get started with a free Hightouch account. You can also learn more about the integration by visiting our documentation or requesting a demo.